ASUS VA24DQFS (90LM0540-B01370)
ASUS Business VA24DQFS Monitor User Manual
Model: VA24DQFS (90LM0540-B01370)
브랜드 : ASUS
1. 서론
This manual provides detailed instructions for the setup, operation, and maintenance of your ASUS Business VA24DQFS Full HD Monitor. Please read this manual thoroughly before using the monitor to ensure proper and safe operation.

이미지: 앞면 view of the ASUS Business VA24DQFS Monitor, showcasing its frameless design and the ASUS Business Monitor logo.
2. 안전 정보
Always observe the following safety precautions to prevent damage to the monitor and ensure your personal safety:
- 모니터를 비나 습기에 노출시키지 마세요.
- 모니터를 열지 마세요asing. 내부에는 사용자가 수리할 수 있는 부품이 없습니다.
- 모니터가 떨어지지 않도록 안정적이고 평평한 표면에 놓으세요.
- 모니터 주변의 통풍이 잘 되도록 하십시오. 통풍구를 막지 마십시오.
- 모니터와 함께 제공된 전원 어댑터만 사용하세요.
- 청소하기 전에 모니터를 전원 콘센트에서 분리하십시오.
3. 패키지 내용
패키지에 모든 구성품이 들어 있는지 확인하십시오. 구성품이 누락되었거나 손상된 경우 판매점에 문의하십시오.
- ASUS Business VA24DQFS Monitor
- 모니터 스탠드(베이스 및 넥)
- 전원 코드
- HDMI 케이블 (선택 사항, 지역에 따라 다를 수 있음)
- DisplayPort Cable (optional, may vary by region)
- VGA Cable (optional, may vary by region)
- USB Cable (optional, may vary by region)
- Audio Cable (optional, may vary by region)
- L자형 드라이버(선택사항)
- Rubber Sticker (optional)
- 보증 카드
- 빠른 시작 가이드
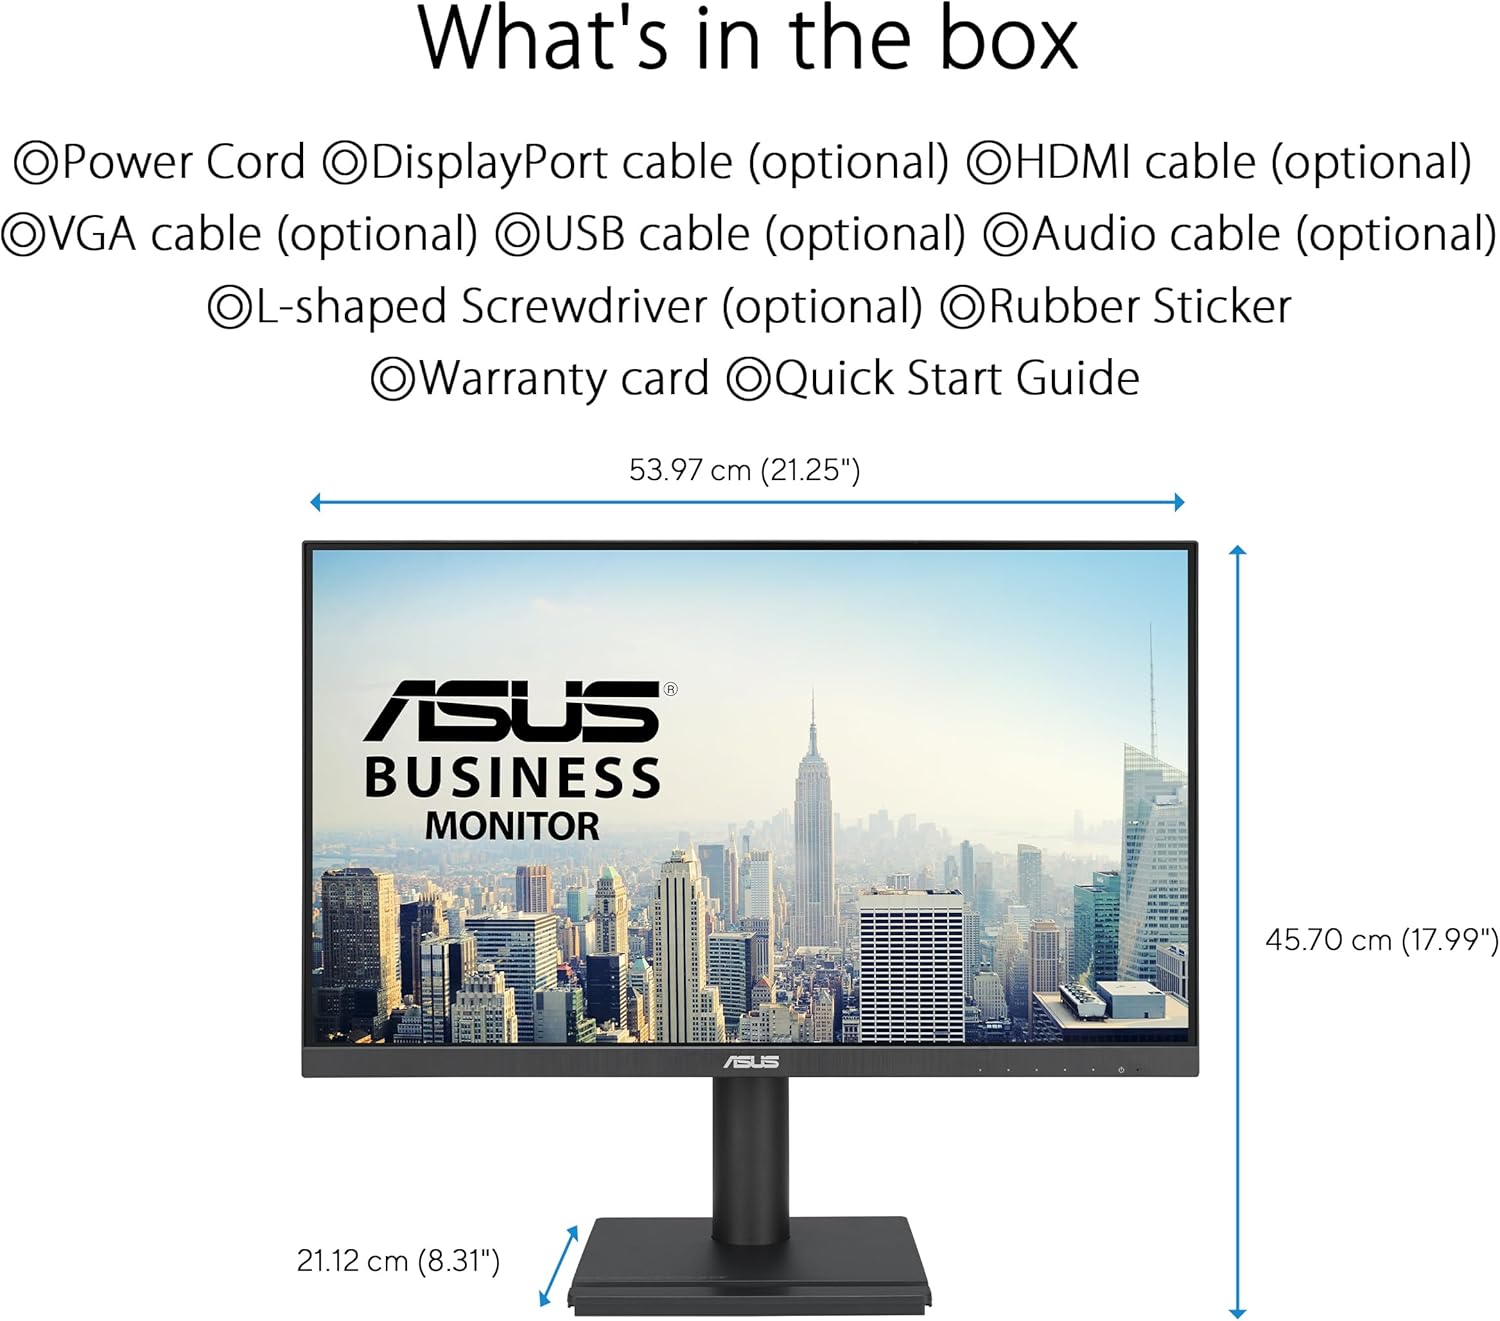
Image: Diagram illustrating the monitor's dimensions and a list of typical package contents, including various cables and accessories.
4. 설정
4.1 모니터 스탠드 조립
- 긁힘을 방지하려면 부드럽고 깨끗한 천 위에 모니터를 뒤집어서 놓으세요.
- Attach the stand neck to the monitor's rear.
- 스탠드 받침대를 스탠드 목에 고정합니다.
- Tighten any screws as necessary.
4.2 연결 케이블
필요한 케이블을 모니터와 컴퓨터의 해당 포트에 연결하십시오.
- 전원 케이블 : 전원 코드를 모니터의 전원 입력 단자에 연결한 다음 전원 콘센트에 꽂으십시오.
- 비디오 입력 : Connect one of the following video cables from your computer to the monitor:
- HDMI : 고화질 디지털 비디오 및 오디오용.
- 디스플레이포트: 고화질 디지털 비디오 및 오디오용.
- VGA(D-서브): For analog video.
- USB 업스트림 케이블: If using the integrated USB hub, connect a USB upstream cable from your computer to the monitor's USB upstream port.
- 오디오 케이블: Connect audio input/output cables if using external speakers or headphones with the monitor's audio jacks.

이미지: 후면 view of the ASUS Business VA24DQFS Monitor, highlighting the various connectivity ports including HDMI, DisplayPort, VGA, USB Hub, Earphone out, and Audio in.
4.3 초기 전원 켜기
- 모든 케이블이 단단히 연결되어 있는지 확인하십시오.
- 모니터의 전원 버튼을 누릅니다.
- 컴퓨터를 켜세요. 모니터가 입력 신호를 자동으로 감지해야 합니다.
- If no signal is detected, use the monitor's On-Screen Display (OSD) menu to manually select the input source.
5. 모니터 작동하기
5.1 화면 디스플레이(OSD) 메뉴 탐색
The OSD menu allows you to adjust various monitor settings. Use the buttons located on the bottom right of the monitor to navigate.
- 전원 버튼: 모니터를 켜거나 끕니다.
- 메뉴 버튼: OSD 메뉴를 엽니다.
- 탐색 버튼: Used to move through menu options and adjust values.
- 선택 버튼: 선택을 확인합니다.
5.2 디스플레이 설정
Adjust image quality and display characteristics through the OSD menu.
- 밝기/대비: 전반적인 밝기와 밝은 부분과 어두운 부분의 차이를 조정합니다.
- 색온도: Select predefined color modes (e.g., Warm, Cool, User Mode).
- 입력 선택: HDMI, DisplayPort, VGA 입력을 수동으로 전환합니다.
- 종횡비: Choose between Full, 4:3, or other aspect ratio modes.
- 새로 고침 빈도: The monitor supports up to 100Hz refresh rate. Ensure your graphics card is configured to output at this rate for the smoothest experience.

Image: The ASUS monitor showcasing its 178° wide viewing angles, demonstrating minimal color shift when view다양한 관점에서 편집했습니다.
5.3 특수 기능
- 적응 동기화: This technology synchronizes the monitor's refresh rate with your graphics card's frame rate to eliminate screen tearing and stuttering, providing a smoother visual experience. Activate this feature through the OSD menu.
- 로우 블루라이트 필터: Reduces harmful blue light emissions to protect your eyes during prolonged use. Multiple levels of filtering are available in the OSD.
- 플리커 프리 기술: Eliminates screen flickering, reducing eye strain and fatigue.
- USB 허브: The integrated USB hub allows you to connect USB devices directly to the monitor, providing convenient access to peripherals.
- Hands-free Convenience: The monitor base is designed to hold small items like phones or business cards, helping to keep your workspace tidy.

Image: A visual comparison demonstrating the effect of Ultra-low Blue Light Filter and Flicker-free Technology on the ASUS monitor versus a conventional monitor.

Image: The ASUS monitor on a desk, illustrating how its base can be used for hands-free convenience to hold small items like a phone or business cards, contributing to a tidier workspace.
5.4 인체공학적 조정
The VA24DQFS monitor offers versatile ergonomic adjustments for a comfortable view경험:
- 경사: 화면 각도를 +35°에서 -5°까지 조절하세요.
- 받침: Rotate the monitor horizontally up to ±180°.
- 피벗: Rotate the screen vertically (portrait mode) up to ±90°.
- 높이 조정: Adjust the screen height up to 130 mm.

Image: Diagrams illustrating the ergonomic adjustments available on the ASUS monitor stand, including swivel, tilt, pivot, and height adjustment capabilities.
6. 유지관리
적절한 관리는 모니터의 수명을 연장시켜 줍니다.
- 화면 청소: 부드럽고 보풀이 없는 천으로 화면을 부드럽게 닦으세요. 잘 지워지지 않는 얼룩의 경우,amp소량의 무암모니아, 무알코올 유리 세정제를 천에 묻혀 사용하십시오. 세정제를 화면에 직접 분사하지 마십시오.
- C 청소asing: 부드럽고 마른 천을 사용하여 모니터를 닦으세요.asing. 연마성 세척제는 피하세요.
- 통풍: 과열을 방지하기 위해 환기구에 먼지와 이물질이 쌓이지 않도록 하십시오.
- 전원 끄기 : 장기간 사용하지 않을 때는 모니터를 꺼 두십시오.
7. 문제 해결
모니터에 문제가 발생하면 다음의 일반적인 문제와 해결 방법을 참조하세요.
| 문제 | 가능한 해결책 |
|---|---|
| 화면에 이미지가 없습니다. |
|
| 이미지가 흐릿하거나 왜곡됩니다. |
|
| 스피커/헤드폰에서 소리가 나지 않습니다 |
|
| USB 포트가 작동하지 않음 |
|
8. 사양
| 특징 | 세부 사항 |
|---|---|
| 모델명 | VA24DQFS |
| 패널 크기 | 23.8인치(세워 놓았을 때 화면 크기 24인치) |
| 패널 유형 | IPS |
| 해결 | 1920 x 1080(풀 HD 1080p) |
| 종횡비 | 16시 9분 |
| 새로 고침 빈도 | 100Hz |
| 응답 시간 | 1ms MPRT |
| View잉 각도 | 178°(수평)/178°(수직) |
| 명도 | Not specified (typical) |
| 대비율 | Not specified (typical) |
| 패널 타입 | 매트 |
| 연결성 | 1x HDMI, 1x DisplayPort, 1x D-Sub (VGA), 2x USB (Total USB Ports), Earphone out, Audio in |
| 스피커 | Integrated (details not specified) |
| 인간 공학 | Tilt (+35° ~ -5°), Swivel (±180°), Pivot (±90°), Height Adjustment (0 ~ 130 mm) |
| VESA 벽걸이 | 100 x 100mm |
| 특별 기능 | Adaptive Sync, Low Blue Light, Flicker-Free, EPEAT Gold certified |
| 제품 치수(WxHxD) | 21.25 x 17.99 x 8.31인치(스탠드 포함) |
| 품목 무게 | 11.22파운드 |
| 전력 소비 | 12 kWh/1000h (Energy Class C) |

Image: EU Energy Label for the ASUS VA24DQFS monitor, indicating its energy efficiency class C and consumption of 12 kWh/1000h.
For detailed EPREL information, visit: https://eprel.ec.europa.eu/qr/2009230
9. 보증 및 지원
ASUS provides a limited warranty for this product. Please refer to the warranty card included in your package for specific terms and conditions.
- 보증 기간: As per the included warranty card and local regulations.
- 기술 지원: For technical assistance, troubleshooting beyond this manual, or warranty claims, please contact ASUS customer support.
- ASUS 지원 Web대지: https://www.asus.com/support/
- ASUS 공식 Web대지: https://www.asus.com/
Ask a question about this manual
Ask about setup, troubleshooting, compatibility, parts, safety, or missing instructions. Manuals+ will review the question and use this page’s manual context to help answer it.