
NVX xloc44x
NVX XLOC44X 4채널 라인 출력 컨버터 사용 설명서
Model: XLOC44X | Brand: NVX
1. 서론
This manual provides detailed instructions for the installation, operation, and maintenance of your NVX XLOC44X 4-Channel High Voltage Active Line Output Converter. The XLOC44X is designed to integrate aftermarket amplifiers with factory audio systems that lack RCA outputs, converting high-level speaker signals into low-level RCA signals. It features impedance matching, auto turn-on capabilities, and remote level control for enhanced audio system flexibility.
2. 안전 정보
- 설치를 시작하기 전에 항상 차량 배터리의 음극 단자를 분리하세요.
- Ensure all wiring is properly routed and secured to prevent damage or interference.
- Do not mount the unit in locations exposed to excessive heat, moisture, or direct sunlight.
- 과열을 방지하기 위해 전원 및 접지 연결에는 적절한 굵기의 전선을 사용하십시오.
- 설치 과정의 어떤 부분이든 확실하지 않은 경우 전문 설치자에게 문의하세요.
- 이 제품에는 캘리포니아주에서 암과 선천적 결함 또는 기타 생식적 피해를 일으키는 것으로 알려진 화학 물질이 포함되어 있습니다.
3. 제품 오버view
3.1 주요 특징
- 4-Channel Speaker Level Inputs | 4-Channel RCA Outputs
- Handles up to 40V (400 watts RMS) input
- Provides up to 9.5 Volts of output
- Auto turn-on via DC offset or Audio detection
- Load selection switch (20, 60, or 20K ohms) to prevent factory stereo shut-down
- Built-in Low Pass Filter (LPF)
- Adjustable Bass Boost (0dB to 12dB)
- Ground Isolation switch (GND, ISO, 200Ω)
- Remote Level Control included
3.2 구성 요소 및 제어
The NVX XLOC44X unit and its included accessories are designed for seamless integration into your vehicle's audio system.

그림 3.2.1: The NVX XLOC44X Line Output Converter shown with its included remote bass level control. The main unit features various input/output terminals and control switches on its top panel.
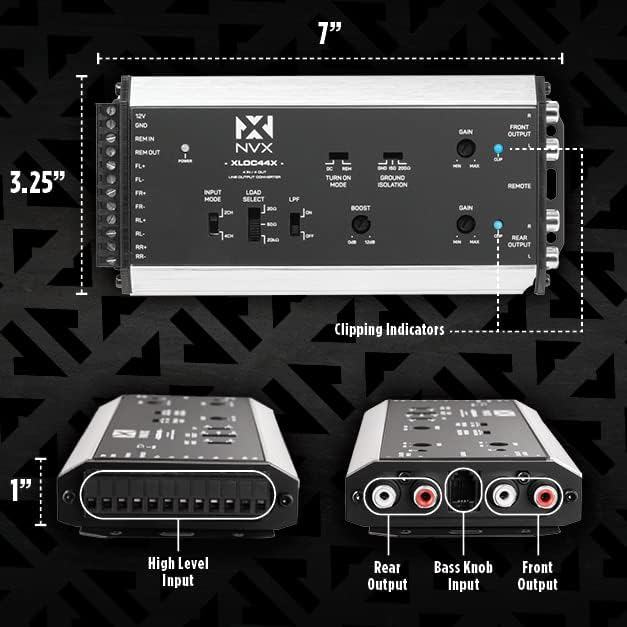
그림 3.2.2: 상세한 view of the NVX XLOC44X showing its dimensions (7 inches long, 3.25 inches wide, 1 inch high) and key labeled components. These include High Level Input terminals, Rear Output RCA jacks, Bass Knob Input, Front Output RCA jacks, and Clipping Indicators.

그림 3.2.3: The included remote level control knob and its connecting cable. This allows for convenient adjustment of the output level from the driver's seat.

그림 3.2.4: Mounting screws and a small screwdriver are provided for installation of the XLOC44X unit and the remote level control.
제어판 레이아웃:
- 12V/GND/REM IN/REM OUT: Power and remote turn-on connections.
- FL+/FL-/FR+/FR-/RL+/RL-/RR+/RR-: High-level speaker inputs.
- 입력 모드: Switch for 2CH or 4CH input configuration.
- LOAD SELECT: Switch for 20Ω, 60Ω, or 20KΩ impedance matching.
- LPF: Low Pass Filter switch (ON/OFF).
- 후원: Bass Boost adjustment knob (0dB to 12dB).
- TURN ON MODE: Switch for DC offset or REM (remote) turn-on.
- 접지 격리: Switch for GND, ISO, or 200Ω ground isolation.
- GAIN (FRONT/REAR): Output level adjustment knobs.
- CLIP (FRONT/REAR): Clipping indicator LEDs.
- FRONT OUTPUT/REAR OUTPUT: RCA low-level outputs.
- 먼: Port for the remote level control.
4. 설치
최적의 성능과 안전을 위해서는 올바른 설치가 매우 중요합니다. 다음 단계를 주의 깊게 따르세요.
4.1 Mounting the XLOC44X
- Choose a dry, secure location for the XLOC44X unit, away from direct heat sources or moving parts. Ensure adequate ventilation.
- Use the provided mounting screws to secure the unit to a flat surface.
- Mount the remote level control in an easily accessible location for the driver, using the provided bracket and screws.
4.2 배선 연결
All wiring should be done with the vehicle's battery disconnected.
- 전원(12V): Connect the 12V terminal of the XLOC44X to a constant +12V power source from the vehicle's battery. Use an appropriate fuse (not included) as close to the battery as possible.
- 접지(GND): Connect the GND terminal to a solid chassis ground point in the vehicle. Ensure a clean, paint-free metal-to-metal connection.
- 원격 입력(REM IN): If using the remote turn-on feature from your head unit, connect the REM IN terminal to the head unit's remote output wire. If using DC offset or audio detection, this connection may not be necessary.
- 원격 출력(REM OUT): Connect the REM OUT terminal to the remote turn-on input of your aftermarket amplifier(s). This provides a turn-on signal to the amplifier when the XLOC44X powers on.
- High-Level Speaker Inputs (FL+/FL-, FR+/FR-, RL+/RL-, RR+/RR-): Connect the vehicle's factory speaker wires to the corresponding high-level input terminals on the XLOC44X. Ensure correct polarity.
- RCA Outputs (FRONT OUTPUT, REAR OUTPUT): Connect RCA cables from the XLOC44X's FRONT OUTPUT and REAR OUTPUT jacks to the corresponding RCA inputs on your aftermarket amp작성자(들).
- 원격 레벨 제어: Connect the remote level control cable to the "REMOTE" port on the XLOC44X.
After all connections are made, reconnect the vehicle's battery and proceed to initial setup.
5. Operation and Initial Setup
Once installed, configure the XLOC44X settings for optimal audio performance.
5.1 Turn-On Mode Selection

그림 5.1.1: The "TURN ON MODE" switch allows selection between DC offset detection (DC) or remote wire input (REM) for automatic power-on.
- 직류: Select this mode if your factory head unit provides a DC offset on the speaker outputs when turned on. The XLOC44X will detect this voltage and turn on automatically.
- 렘 : Select this mode if you have connected a dedicated remote turn-on wire from your head unit to the REM IN terminal.
- 오디오 감지: The XLOC44X can also turn on by detecting an audio signal on the high-level inputs. This is often used when neither DC offset nor a remote wire is available.
5.2 Input Mode and Load Select
- 입력 모드 (2채널/4채널): Set this switch based on the number of high-level input channels you are using. If connecting only front speaker signals to drive all four outputs, select 2CH. If connecting both front and rear speaker signals, select 4CH.
- LOAD SELECT (20Ω, 60Ω, 20KΩ): This switch adjusts the impedance presented to the factory head unit. Experiment with these settings if your factory stereo shuts down or exhibits unusual behavior. Start with 20KΩ, then try 60Ω, and finally 20Ω if necessary. This helps prevent the factory system from detecting an incorrect load and shutting off.
5.3 Ground Isolation
- GROUND ISOLATION (GND, ISO, 200Ω): This switch helps eliminate ground loop noise.
- GND : 직접 접지 연결.
- ISO: 고립된 땅.
- 200Ω: Ground through a 200-ohm resistor.
5.4 게인 조정
- GAIN (FRONT/REAR): These knobs adjust the output level of the RCA signals. Set them to match the input sensitivity of your aftermarket amplifier(s). Start with the gain at minimum, then slowly increase it until the amplifier's input is properly driven without clipping. The CLIP indicators on the XLOC44X will illuminate if the signal is clipping, indicating that the gain is set too high.
5.5 Low Pass Filter (LPF) and Bass Boost

그림 5.5.1: The LPF switch and BOOST knob. The LPF can be turned ON or OFF, and the Bass Boost can be adjusted from 0dB to 12dB.
- LPF(켜짐/꺼짐): If you are sending the output to a subwoofer amplifier, you may want to engage the Low Pass Filter to only pass low frequencies. For full-range speakers, turn the LPF OFF.
- BOOST (0dB-12dB): This knob adjusts the amount of bass boost applied to the signal. Use sparingly and adjust to taste, ensuring the signal does not clip.
5.6 원격 레벨 제어

그림 5.6.1: The RCA output jacks and the dedicated port for the remote bass level control. The remote control allows for convenient adjustment of the output level.
The included remote level control allows you to adjust the output level of the XLOC44X from your listening position. This is particularly useful for controlling subwoofer levels independently.
6. 유지관리
The NVX XLOC44X requires minimal maintenance. Keep the unit clean and free from dust and debris. Periodically check all wiring connections to ensure they are secure. Do not use harsh chemicals or abrasive cleaners on the unit.
7. 문제 해결
| 문제 | 가능한 원인 | 해결책 |
|---|---|---|
| No power to XLOC44X or amp리퍼. | Blown fuse, loose power/ground connection, incorrect turn-on mode. | Check fuse on 12V line. Verify 12V and GND connections are secure. Ensure TURN ON MODE switch is set correctly (DC/REM) or that audio detection is working. |
| 오디오 출력이 없습니다. | Incorrect input/output connections, amplifier gain too low, XLOC44X gain too low, LPF engaged incorrectly. | Verify all high-level and RCA connections. Adjust XLOC44X and amplifier gain settings. Ensure LPF is OFF for full-range signals. |
| Engine whine or other noise. | 접지 루프 문제. | Adjust the GROUND ISOLATION switch (GND, ISO, 200Ω) to find the setting that eliminates the noise. Ensure a good chassis ground connection. |
| Factory stereo shuts down or distorts. | Incorrect load presented to factory head unit. | Adjust the LOAD SELECT switch (20Ω, 60Ω, 20KΩ) to a setting that is compatible with your factory system. |
| Audio sounds distorted or clips. | Gain set too high, excessive bass boost. | Reduce the GAIN settings on the XLOC44X and/or the amplifier. Reduce the BOOST level. Observe the CLIP indicators on the XLOC44X. |
8. 사양
| 특징 | 사양 |
|---|---|
| 입력 채널 | 4 (High-Level Speaker Inputs) |
| 출력 채널 | 4 (RCA Low-Level Outputs) |
| 최대 입력 볼륨tage | 40 Volts (equivalent to 400 watts RMS) |
| 최대 출력 볼륨tage | 9.5 볼트 |
| 켜짐 모드 | DC Offset, Audio Detection, Remote (REM) |
| Load Select Impedance | 20Ω, 60Ω, 20KΩ |
| 베이스 부스트 | 0dB ~ 12dB |
| 저역 통과 필터 (LPF) | 켜기/끄기 전환 가능 |
| 접지 절연 | GND, ISO, 200Ω |
| 치수(길이 x 너비 x 높이) | 7 x 3.25 x 1 인치(대략) |
| 품목 무게 | 1.08파운드 |
| 제조업체 | 엔비엑스 |
| 모델 번호 | xloc44x |
9. 보증 및 지원
For specific warranty information, please refer to the warranty card included with your product or visit the official NVX website. For technical support or further assistance, please contact NVX customer service or visit the 아마존에서 NVX 스토어를 만나보세요.
Ask a question about this manual
Ask about setup, troubleshooting, compatibility, parts, safety, or missing instructions. Manuals+ will review the question and use this page’s manual context to help answer it.