1. 서론
Thank you for choosing the CREWORKS 8-in-1 Heat Press. This versatile machine is designed for transferring designs onto various items such as T-shirts, bags, hats, mugs, and plates using heat transfer or sublimation paper and vinyl. Its 30x38cm heating platen provides ample space for creative projects, offering professional results for both personal and commercial use.
Key features of your heat press include:
- Powerful Functionality: Equipped with a 30x38cm Teflon-coated heating panel for efficient and safe operation.
- 듀얼 디지털 디스플레이: Features a digital timer and dual temperature control display for precise and intuitive operation.
- 편리한 디자인: Rack-type control box for easy connection and immediate use.
- 간편한 조작: Drawer-type work platform allows for simple replacement of accessories. Aluminum grill lid base and baking sheets ensure mechanical strength and reduced weight.
- 다재: The 8-in-1 design accommodates a wide range of items including T-shirts, mouse pads, backpacks, pillowcases, mugs, and hats.
2. 안전 지침
Please read all safety instructions carefully before operating the heat press to prevent injury or damage to the machine. Keep this manual for future reference.
- Always connect the machine to a grounded power outlet with the correct voltage (220V / 50Hz).
- Do not touch the heating platen or other hot surfaces during operation or immediately after use. Use heat-resistant gloves if necessary.
- 작동 중에는 어린이와 애완동물을 기계 가까이에 두지 마십시오.
- 이송 자재에서 발생하는 열과 연기를 배출하기 위해 작업 공간에 적절한 환기 시설을 확보하십시오.
- Never leave the machine unattended while it is powered on or operating.
- 젖은 손이나 d로 기계를 작동하지 마십시오.amp 정황.
- 사용하지 않을 때나 청소 및 유지 보수를 하기 전에는 기기의 전원 플러그를 콘센트에서 뽑으십시오.
- 전원 코드가 손상된 경우 위험을 방지하기 위해 제조업체, 서비스 대리점 또는 이와 유사한 자격을 갖춘 사람이 교체해야 합니다.
- The machine is designed with a heat-resistant casing, capable of withstanding temperatures up to 250°C (480°F). However, direct contact with hot surfaces should still be avoided.

Figure 2.1: The heat press features a heat-resistant casing and insulation layers, designed to protect users from direct heat and capable of withstanding temperatures up to 250°C (480°F).
3. 제품 구성품
Familiarize yourself with the main parts of your CREWORKS 8-in-1 Heat Press:
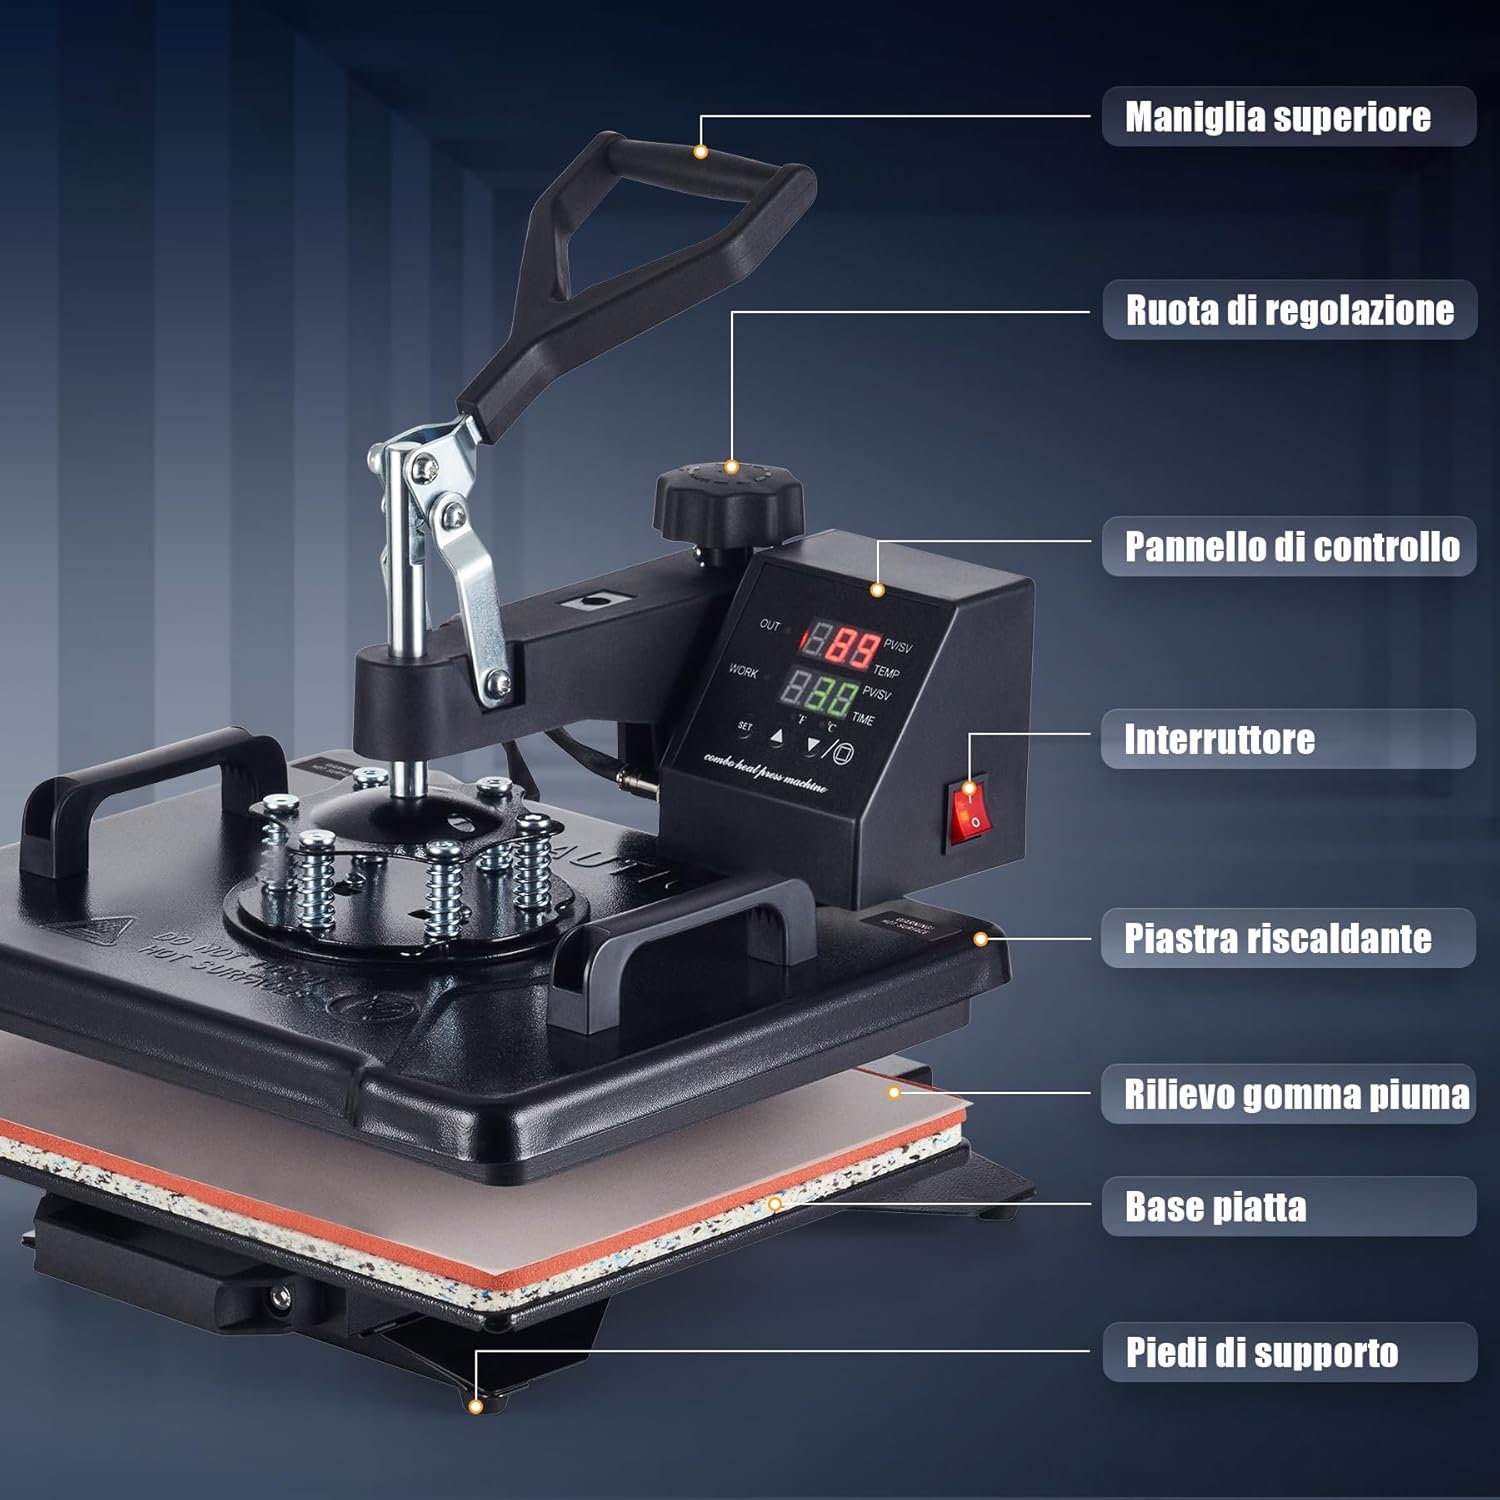
Figure 3.1: This diagram identifies the key parts of your heat press machine, including the top handle, adjustment wheel, control panel, power switch, heating platen, foam rubber pad, flat base, and support feet.
- 상단 핸들: Used to lift and lower the heating platen.
- 조정 휠: Controls the pressure applied by the heating platen.
- 제어판: Digital display for setting temperature and time.
- 전원 스위치: 기계를 켜거나 끕니다.
- Heating Platen: The upper heated surface that applies heat and pressure.
- Foam Rubber Pad: Provides a soft, heat-resistant surface for items.
- 플랫 베이스: The lower platform where items are placed.
- 지지 발: Stabilize the machine during operation.
4. 패키지 내용
포장을 풀 때 다음 품목이 모두 포함되어 있는지 확인하세요.
- 1 x Heat Press Main Unit
- 1 x 9 oz Cup Press Attachment
- 1 x 11 oz Cup Press Attachment
- 1 x 12 oz Cup Press Attachment
- 1 x 17 oz Cup Press Attachment
- 1 x 5" Plate Press Attachment
- 1 x 6" Plate Press Attachment
- 1 x 캡 프레스 부착물
- 1 x Instruction Manual (English or German)
5. 사양
| 특징 | 사양 |
|---|---|
| 상표 | 크레웍스 |
| 모델 | 30x38cm 8 in 1 |
| 힘 | 1150와트 |
| 권tage | 220V / 50Hz |
| 최대 온도 | 250°C(480°F) |
| 타이머 제어 | 0~999초 |
| 전체 치수 | 30 X 38 X 49.5 cm (12 X 15 X 19.5에서) |
| 높이 범위 | 34-43cm(13.25-17인치) |
| 플래튼 영역 | 30 x 38cm(12 x 15인치) |
| 케이블 길이 | 137cm(4.5피트) |
| 품목 무게 | 11.5 킬로그램 |
| 재료 | Ceramic, Silicone, Vinyl (for accessories) |
| 추천 용도 | Bag, Bottle, Cap, Handbag, Hat, Mouse Pad, Mug, Pillow, Plate, Socks, T-Shirt |
6. 설정
Follow these steps for initial setup of your heat press:
- 풀다: 모든 구성품을 포장에서 조심스럽게 꺼내세요. 나중에 보관하거나 운반할 수 있도록 포장을 보관하세요.
- 놓기: Place the main heat press unit on a stable, heat-resistant surface in a well-ventilated area. Ensure there is enough space around the machine for safe operation and rotation.
- Control Box Connection: The control box is designed for rack-type installation. Simply connect the control box to the main unit. Ensure all connections are secure.
- 전원 연결: 전원 코드를 접지된 220V/50Hz 콘센트에 꽂으십시오.
- 초기 확인: Before first use, turn on the power switch and allow the machine to heat up to a low temperature (e.g., 100°C) to ensure all functions are working correctly. Observe for any unusual smells or sounds.
7. 사용 설명서
This section outlines the general operation of your heat press. Specific settings (temperature, time, pressure) will vary depending on the material and transfer type.

Figure 7.1: Operating the heat press is simplified into three main steps: 1. Lift and rotate the heating platen away from the base. 2. Position your item and design on the silicone pad. 3. Lower the heating platen and apply pressure to begin the transfer.
7.1. 기본 작업 단계
- 전원 켜기: Turn on the main power switch located on the control panel.
- 온도 및 시간 설정: Use the digital control panel to set the desired temperature and time according to your transfer material's specifications. Refer to Section 7.2 for details.
- 예열 : Allow the machine to reach the set temperature. The display will indicate when the target temperature is achieved.
- 항목 준비: Lift the top handle and rotate the heating platen 360 degrees to the side, away from the base. This provides a clear workspace.
- 위치 항목: Place your item (e.g., T-shirt, mug) onto the appropriate pad or attachment. Lay your transfer design onto the item.
- 압력을 가하세요: Rotate the heating platen back over the item. Lower the top handle firmly to engage the heating platen with the item. The timer will start automatically.
- 이체 완료: Once the timer alarms, lift the top handle and rotate the heating platen away from the item. Carefully remove the transferred item.
- 전원 끄기 : When finished, turn off the power switch and unplug the machine.
7.2. 제어판 설정
The intuitive LED control panel allows precise adjustment of temperature and time.

Figure 7.2: The intuitive LED control panel displays the maximum temperature (250°C / 480°F) and timer interval (0-999 seconds). It also provides recommended temperature settings for common materials like chemical fibers (160°C), cotton apparel (170°C), and ceramic mugs (200°C).
- 온도 설정: Press the 'SET' button, then use the up/down arrows to adjust the target temperature. Press 'SET' again to confirm. The maximum temperature is 250°C (480°F).
- 시간 설정: Press the 'SET' button twice, then use the up/down arrows to adjust the transfer time in seconds. Press 'SET' again to confirm. The timer range is 0-999 seconds.
- 온도 단위 : The display can switch between Celsius and Fahrenheit. Consult the manual for specific instructions on changing units if needed.
권장 온도 지침:
- Chemical Fibers: Approximately 160°C
- Cotton Apparel: Approximately 170°C
- Ceramic Mugs: Approximately 200°C
Note: These are general guidelines. Always refer to the specific instructions provided with your transfer material and item.
7.3. 압력 조정
The pressure adjustment wheel allows you to fine-tune the downward force of the heating platen. Proper pressure is crucial for a successful transfer.

Figure 7.3: The machine features a 360-degree swivel design for safe and easy placement of items, along with a pressure adjustment knob to apply the correct force for various materials.
- To Increase Pressure: Turn the adjustment wheel clockwise.
- To Decrease Pressure: Turn the adjustment wheel counter-clockwise.
- Testing Pressure: Before heating, close the platen onto your item. You should feel a firm resistance when closing the handle. Adjust until the desired pressure is achieved.
7.4. 다양한 첨부 파일 사용
The 8-in-1 heat press includes various attachments for different items. The drawer-type work platform makes changing accessories straightforward.
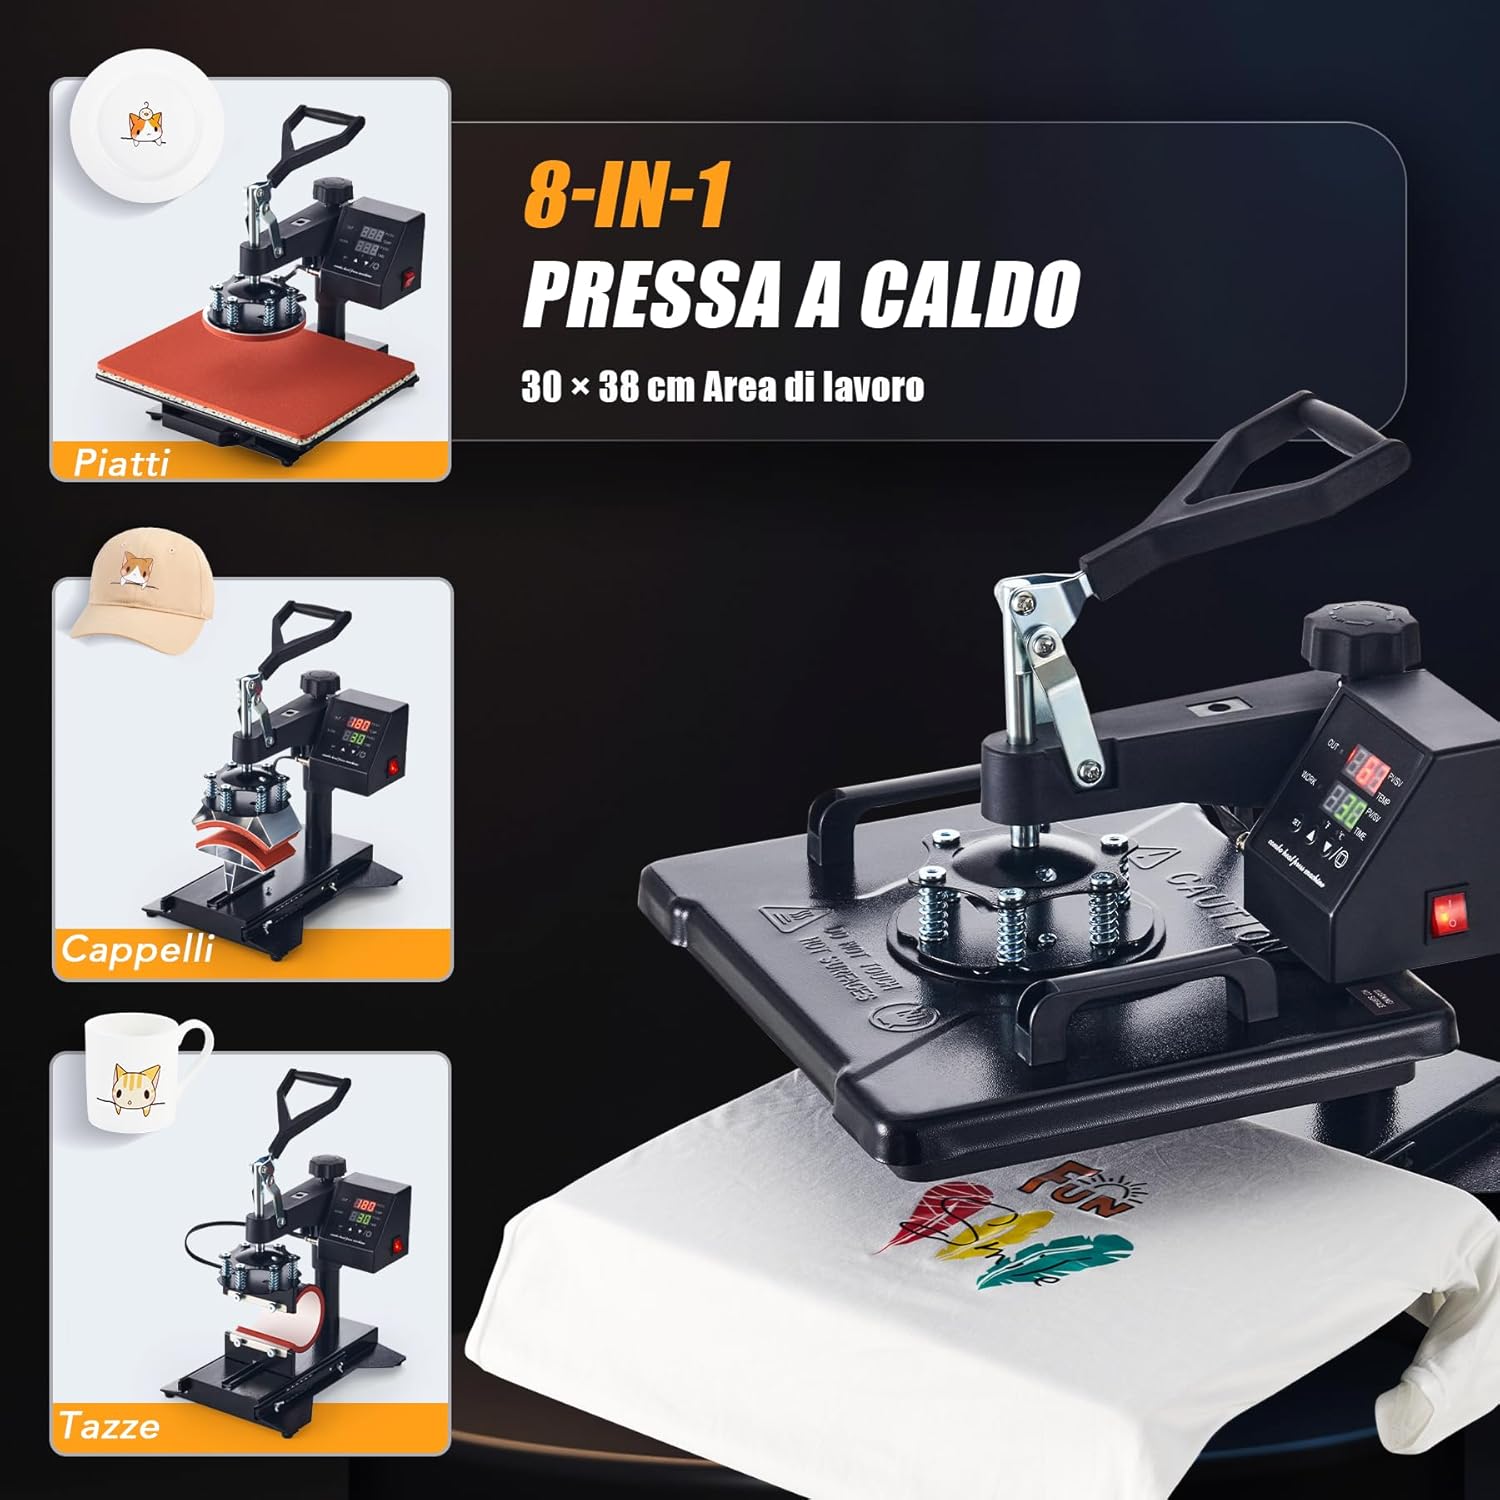
Figure 7.4: The CREWORKS 8-in-1 Heat Press comes with various attachments, allowing you to transfer designs onto different items such as plates, caps, and mugs, in addition to flat items like T-shirts.
- 첨부 파일 변경: Ensure the machine is unplugged and cool. Loosen any securing screws or clips holding the current attachment. Carefully remove it and install the desired attachment (e.g., mug press, plate press, cap press). Secure it firmly.
- 머그 프레스: Use the appropriate mug attachment for your mug size (9oz, 11oz, 12oz, 17oz). Adjust the pressure knob on the mug attachment to ensure a snug fit around the mug.
- 플레이트 프레스: Use the 5" or 6" plate attachment. Ensure the plate is centered and stable.
- 캡 프레스: Use the cap attachment. Position the cap securely on the curved surface.
7.5. Uniform Heat Transfer
The CREWORKS heat press is designed with a dual-tube heating element to ensure consistent results.
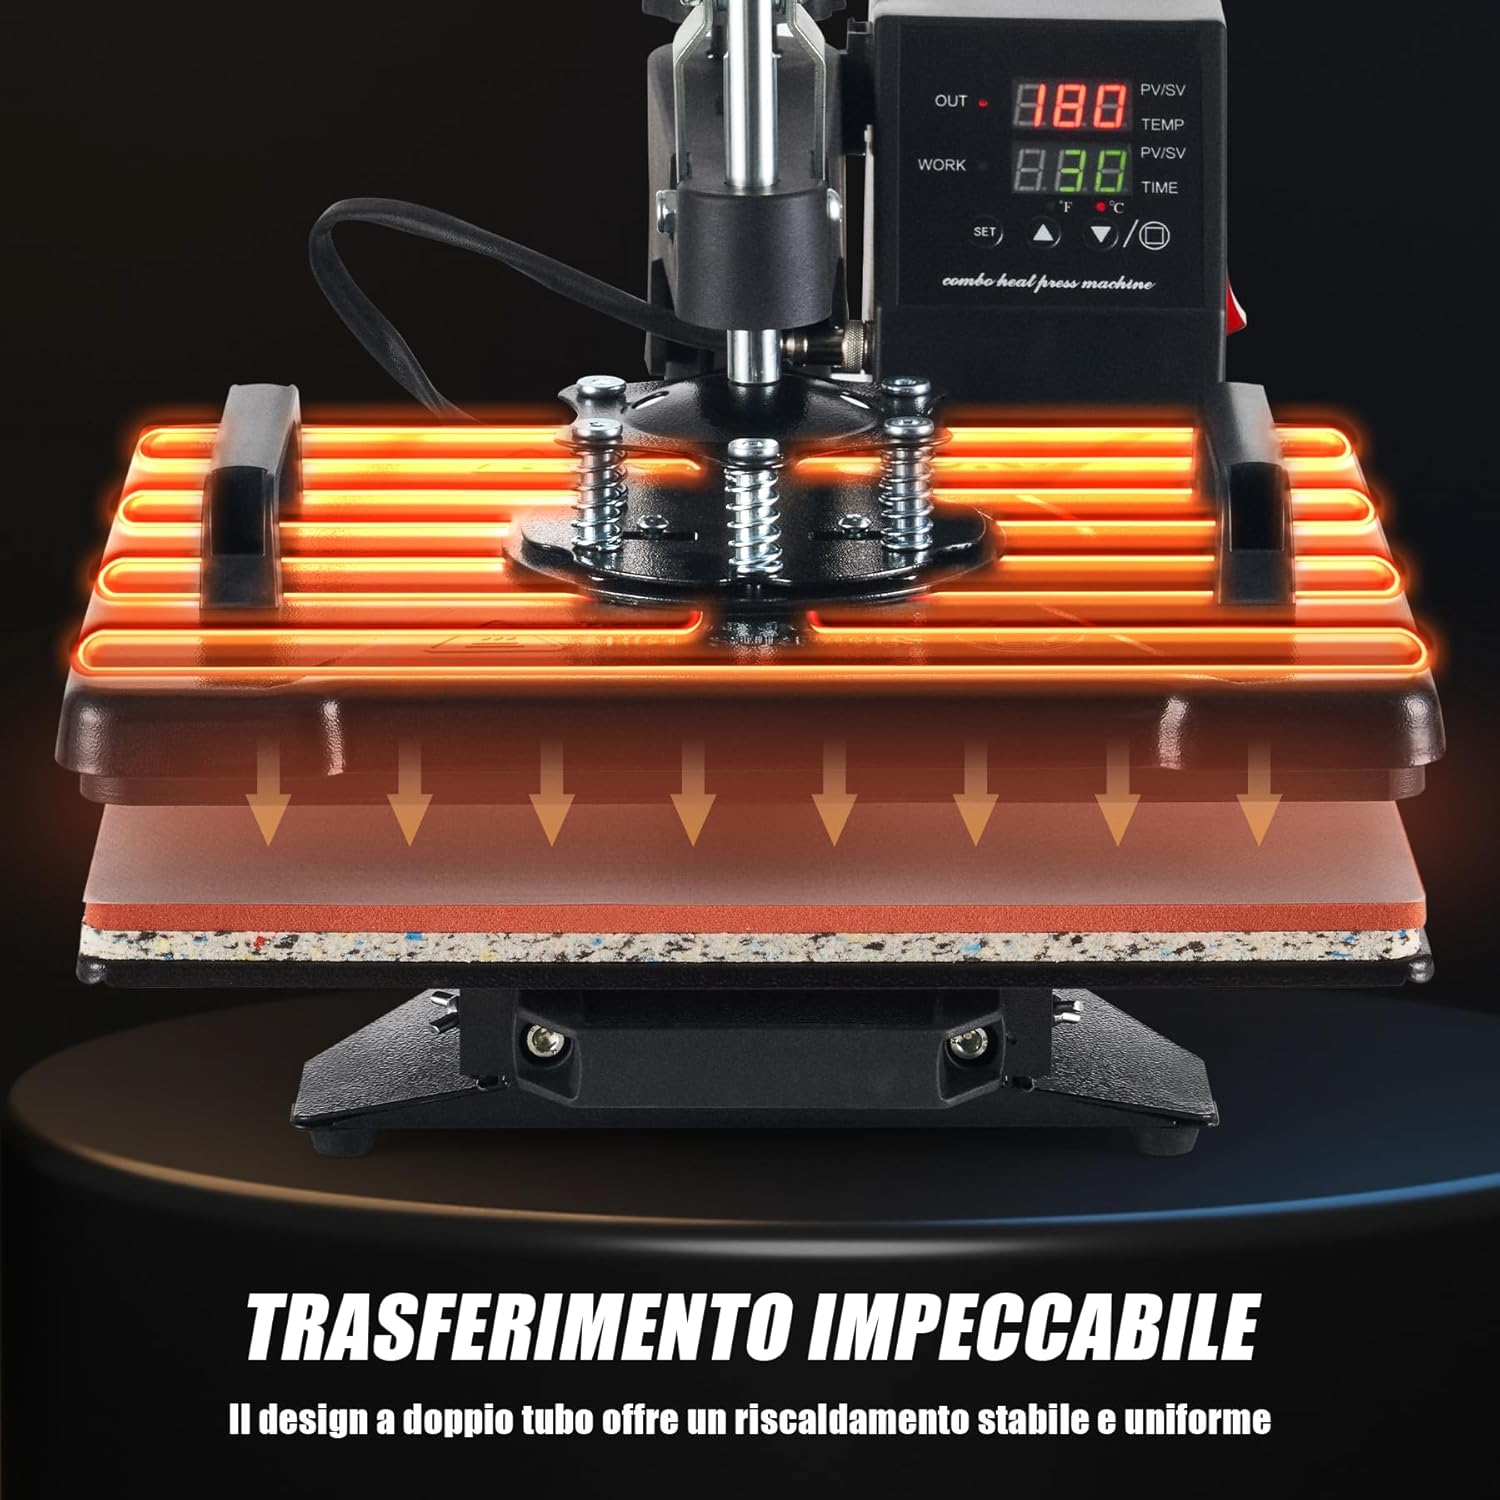
Figure 7.5: The dual-tube heating design ensures stable and uniform heat distribution across the entire platen, guaranteeing consistent and high-quality transfers.
The dual-tube heating design provides stable and uniform heat distribution across the entire platen surface. This minimizes cold spots and ensures that your designs are transferred evenly and consistently, resulting in professional-quality finished products.
8. 유지관리
정기적인 유지관리를 통해 열 프레스의 수명과 최적의 성능을 보장할 수 있습니다.
- 플래튼 청소: Ensure the machine is cool and unplugged. Use a soft, damp cloth to wipe down the Teflon-coated heating platen. For stubborn residue, use a specialized platen cleaner. Avoid abrasive cleaners or tools that could scratch the surface.
- 실리콘 패드 청소: The silicone pad can be wiped with a damp cloth. If it becomes heavily soiled or damaged, it may need replacement to ensure even pressure.
- 일반 청소: 마른 천이나 약간 젖은 천으로 기기 외부를 닦아주세요.amp 먼지와 이물질을 제거하는 천.
- 저장: Store the heat press in a clean, dry environment when not in use.
- 점검: Periodically check all cables and connections for signs of wear or damage. Do not operate the machine if any part is damaged.
9. 문제 해결
If you encounter issues with your heat press, refer to the table below for common problems and solutions.
| 문제 | 가능한 원인 | 해결책 |
|---|---|---|
| 기계가 켜지지 않습니다 | Power cord not plugged in; Power outlet fault; Main switch off | 전원 코드 연결 상태를 확인하십시오. 다른 기기를 사용하여 콘센트를 테스트하십시오. 메인 스위치가 켜져 있는지 확인하십시오. |
| Heating platen not heating up | Temperature not set; Heating element fault | Verify temperature setting on control panel; Contact customer support if issue persists. |
| Uneven transfer results | Uneven pressure; Incorrect temperature/time; Damaged silicone pad | Adjust pressure knob; Verify temperature and time settings; Inspect and replace silicone pad if damaged. |
| 전송이 준수되지 않음 | Insufficient temperature; Insufficient time; Insufficient pressure; Incorrect transfer material | Increase temperature or time; Increase pressure; Ensure correct transfer material for item; Consult transfer material instructions. |
| Design peeling or cracking | Over-pressing; Too high temperature; Incorrect peeling method (hot/cold peel) | Reduce pressure or time; Lower temperature; Follow transfer material's specific peeling instructions. |
If you encounter a problem not listed here or if the suggested solutions do not resolve the issue, please contact CREWORKS customer support.
10. 보증 및 지원
CREWORKS products are manufactured to high-quality standards. For information regarding warranty coverage, please refer to the warranty card included with your product or visit the official CREWORKS web대지.
For technical assistance, troubleshooting, or spare parts, please contact CREWORKS customer support through the retailer where you purchased the product or via the contact information provided on the official CREWORKS web대지.