1. 서론
Thank you for choosing the FEELWORLD T7PLUS 7-inch On-Camera Field Monitor. This manual provides detailed instructions for the proper setup, operation, and maintenance of your device. Please read this manual thoroughly before using the monitor to ensure optimal performance and to prevent damage.
The FEELWORLD T7PLUS is an advanced 7-inch field monitor designed for professional videographers and photographers. It features a 1920x1200 resolution IPS display, 4K HDMI input/output, and a robust metal casing. Key functionalities include custom 3D LUT support, waveform, vector scope, and various professional video assist features to enhance your shooting workflow.

Image: The FEELWORLD T7PLUS monitor displaying a high-resolution image, highlighting its compact design and clear display.
2. 주요 특징
- 7인치 풀 HD IPS 디스플레이: Features a 1920x1200 resolution, 450 cd/m² brightness, and 1200:1 contrast ratio for clear and accurate image monitoring.
- Professional Video Assist Functions: Includes 3D LUT, Waveform, Vector Scope, Histogram, Peaking Focus Assist, False Color, Zebra Exposure, Nine Grid, Zoom-in, Embedded Audio, Anamorphic Mode, Image Flip, and Check Field.
- 사용자 정의 3D LUT 지원: Allows users to load up to 32 custom 3D LUTs via USB for real-time color calibration and workflow optimization.
- 4K HDMI Input and Output: Supports 4K@30Hz HDMI signals, enabling synchronous monitoring and output to other devices.
- 내구성 있는 금속 Casing: Ultra-thin 18mm design with a robust metal shell for enhanced protection and portability (320g weight).
- 유연한 전력 시스템: Compatible with F970 battery plates (standard) and optional D28S/D54, LP-E6, U60 battery plates. Can also be powered by an optional DC 12V adapter.
- 사용자 정의 가능한 바로가기 버튼: Four user-definable F1-F4 shortcut buttons for quick access to frequently used functions.
- 다국어 지원: The T7PLUS supports 11 languages, including English, French, German, Spanish, Japanese, Chinese, Traditional Chinese, Portuguese, Korean, Russian, and Dutch.
3. 패키지 내용
모든 품목이 들어 있는지 확인하기 위해 상자를 푼 후 패키지 내용물을 확인하세요.
- 1 × FEELWORLD T7PLUS Monitor
- 미니 HDMI 케이블 1개
- 1 × 선쉐이드
- 핫슈 마운트 1개
- 1 × F970 Battery Plate (pre-installed)
- 1 × 사용자 설명서
- 1 × USB Adapter Cable (for LUT loading)
- 1 × Storage Bag (optional, not always included)

Image: An illustration of the FEELWORLD T7PLUS package contents, including the monitor, mini HDMI cable, sunshade, hot shoe mount, F970 battery plate, and user manual.
4. 설정
4.1 모니터 장착
- Attach the hot shoe mount to the bottom of the monitor using the screw thread.
- 핫슈 마운트를 카메라의 핫슈 또는 호환되는 리그에 고정하십시오.
- 모니터 각도를 최적의 상태로 조정하세요. viewing. The hot shoe mount typically allows for 360-degree rotation and 180-degree tilt.

Image: The FEELWORLD T7PLUS monitor mounted on a camera, illustrating its use in a typical shooting setup.
4.2 모니터 전원 켜기
The T7PLUS offers flexible power options:
- NP-F 배터리: The monitor comes with a standard F970 battery plate. Insert a compatible NP-F series battery (F970, F960, F950, F930, F770, F750, F730, F570, F550, F530 series) into the battery slot. Ensure the battery is fully charged.
- DC 12V 어댑터: Connect an optional DC 12V/1.5A power adapter to the DC IN port on the side of the monitor.
메모: Batteries and DC power adapters are typically sold separately and are not included in the standard package.

Image: A diagram illustrating the flexible power options for the FEELWORLD T7PLUS, including the NP-F battery plate and the DC 12V input port.
4.3 Connecting to a Camera (HDMI)
The T7PLUS supports 4K HDMI input and output.
- Connect one end of the provided Mini HDMI cable to the HDMI OUT port of your camera.
- Connect the other end of the Mini HDMI cable to the HDMI IN port on the side of the T7PLUS monitor.
- If you need to output the signal to another monitor, connect an HDMI cable from the HDMI OUT port of the T7PLUS to the input of the secondary monitor.
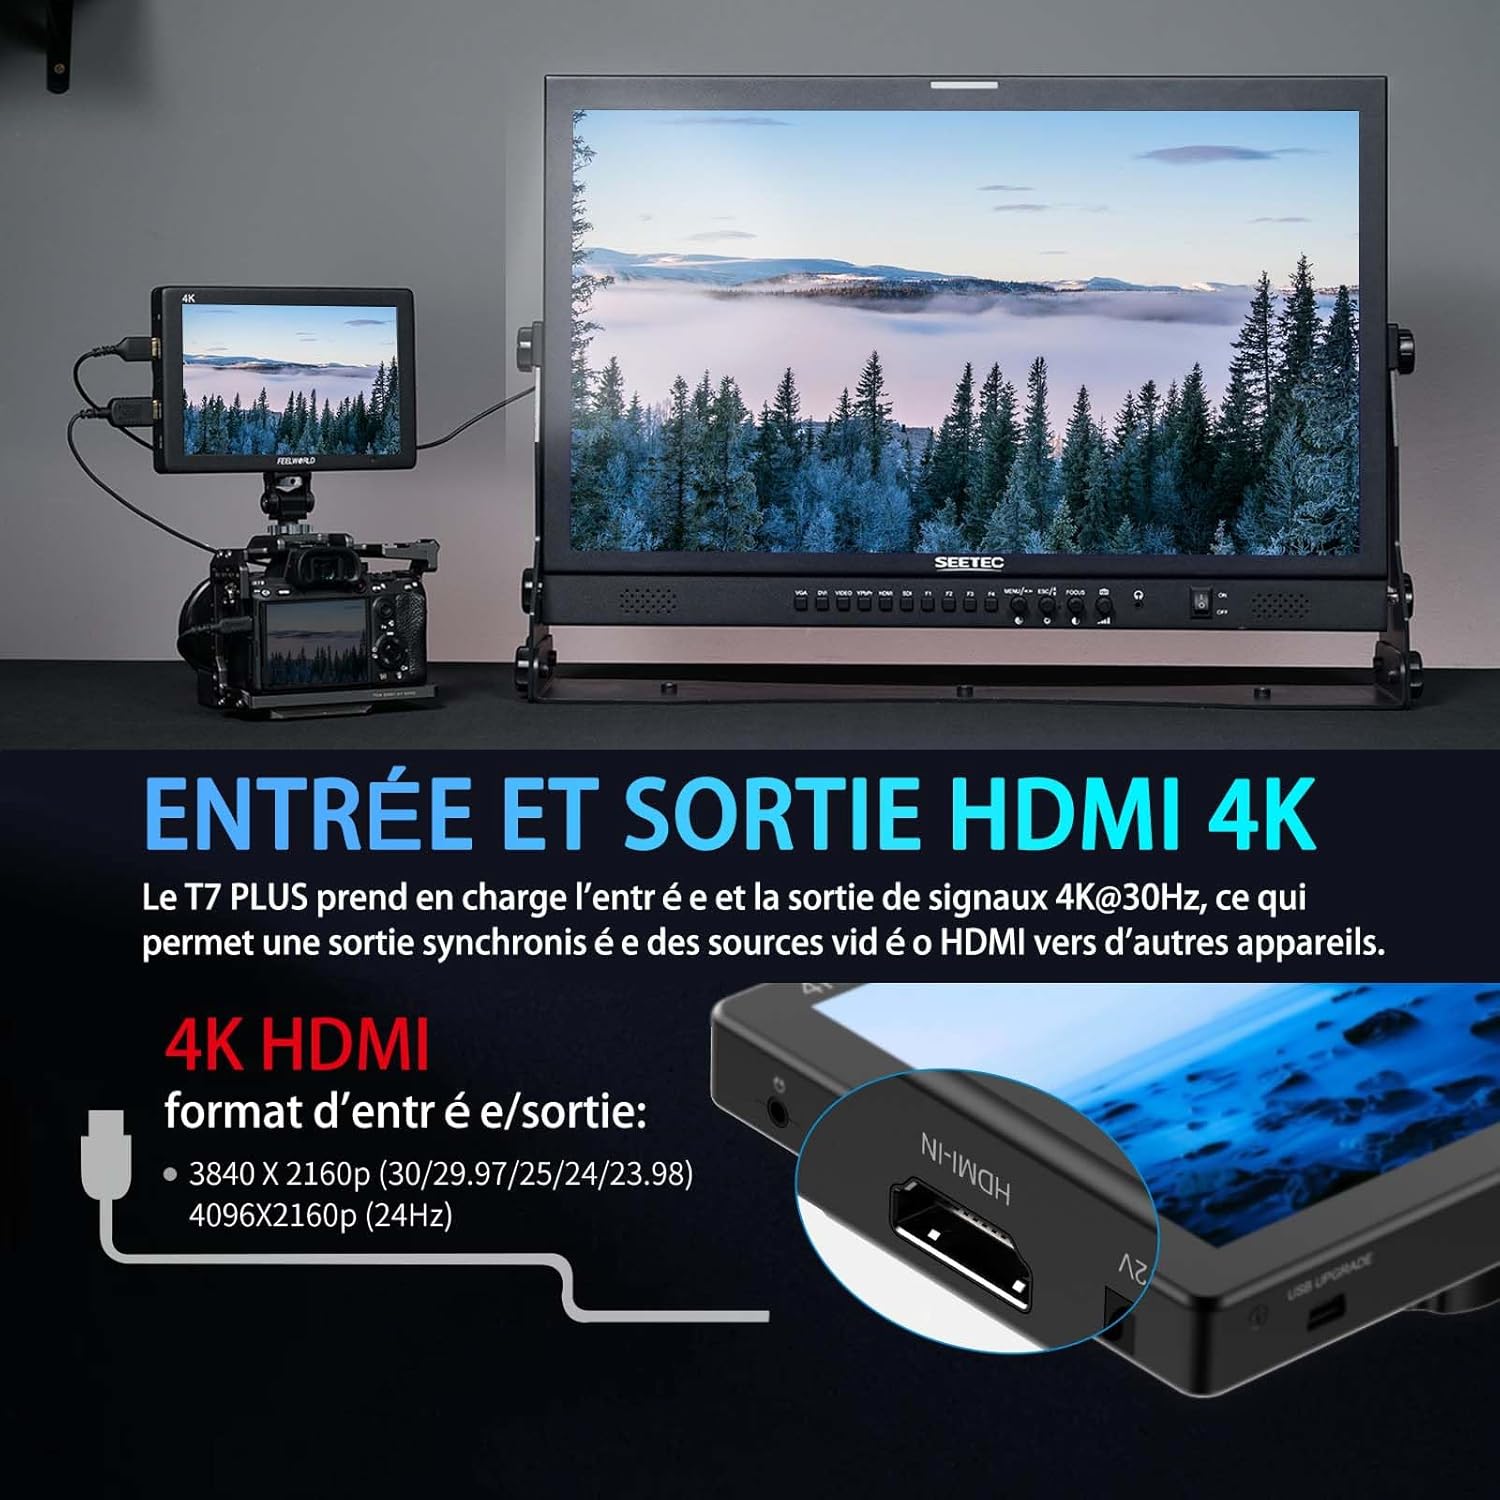
Image: A visual representation of the 4K HDMI input and output ports on the FEELWORLD T7PLUS, demonstrating connectivity to a camera and a larger display.
5. 모니터 작동하기
5.1 전원 켜기/끄기
Press and hold the power button located on the top or side of the monitor to turn it on or off.
5.2 Menu Navigation and Shortcut Buttons
The T7PLUS features an intuitive menu system accessible via buttons on the top of the monitor. It also includes four customizable shortcut buttons (F1-F4) for quick access to frequently used functions.
- Use the menu buttons to navigate through settings such as image adjustments, assist functions, and system settings.
- To customize F1-F4 buttons: Enter the main menu, navigate to "User Option" or "Function Settings," and assign desired functions (e.g., Peaking, False Color, LUTs) to each button.

Image: The user interface menu of the FEELWORLD T7PLUS, demonstrating the navigation options and the location of the F1-F4 shortcut buttons.
5.3 Using Professional Video Assist Functions
The T7PLUS integrates a suite of tools to aid in precise exposure, focus, and color management. These can be accessed via the main menu or assigned to shortcut buttons.
- 3D LUT: Load custom LUTs to preview 당신의 푸tage with desired color grades. Connect a USB drive with .cube LUT files to the monitor's USB port, then navigate to the LUT menu to import and apply them. Up to 32 user LUTs can be stored.
- 파형 : Monitor luminance and chrominance levels across the image. This helps in achieving correct exposure and color balance.
- 벡터 범위: Analyze the color saturation and hue of your video signal.
- 피킹 포커스 어시스트: Highlights sharp edges in red, green, or blue to help achieve precise focus.
- 거짓 색상 : Displays different exposure levels as distinct color overlays, assisting in setting optimal exposure.
- 얼룩말 노출: 과도하게 노출된 영역을 얼룩말 줄무늬로 나타냅니다.
- 히스토그램 : Provides a graphical representation of the tonal distribution of your image.
- 나인 그리드: 구도 설정을 돕기 위해 3x3 격자를 겹쳐 표시합니다.
- 확대: Magnifies a portion of the image for critical focus checking.
- 아나모픽 모드: 아나모픽 푸를 압축 해제합니다tage 적절한 view주고받음.
- 이미지 뒤집기 : Flips the image horizontally or vertically, useful for various mounting configurations.
- 체크 필드 : Displays only red, green, blue, or mono channels for color calibration.
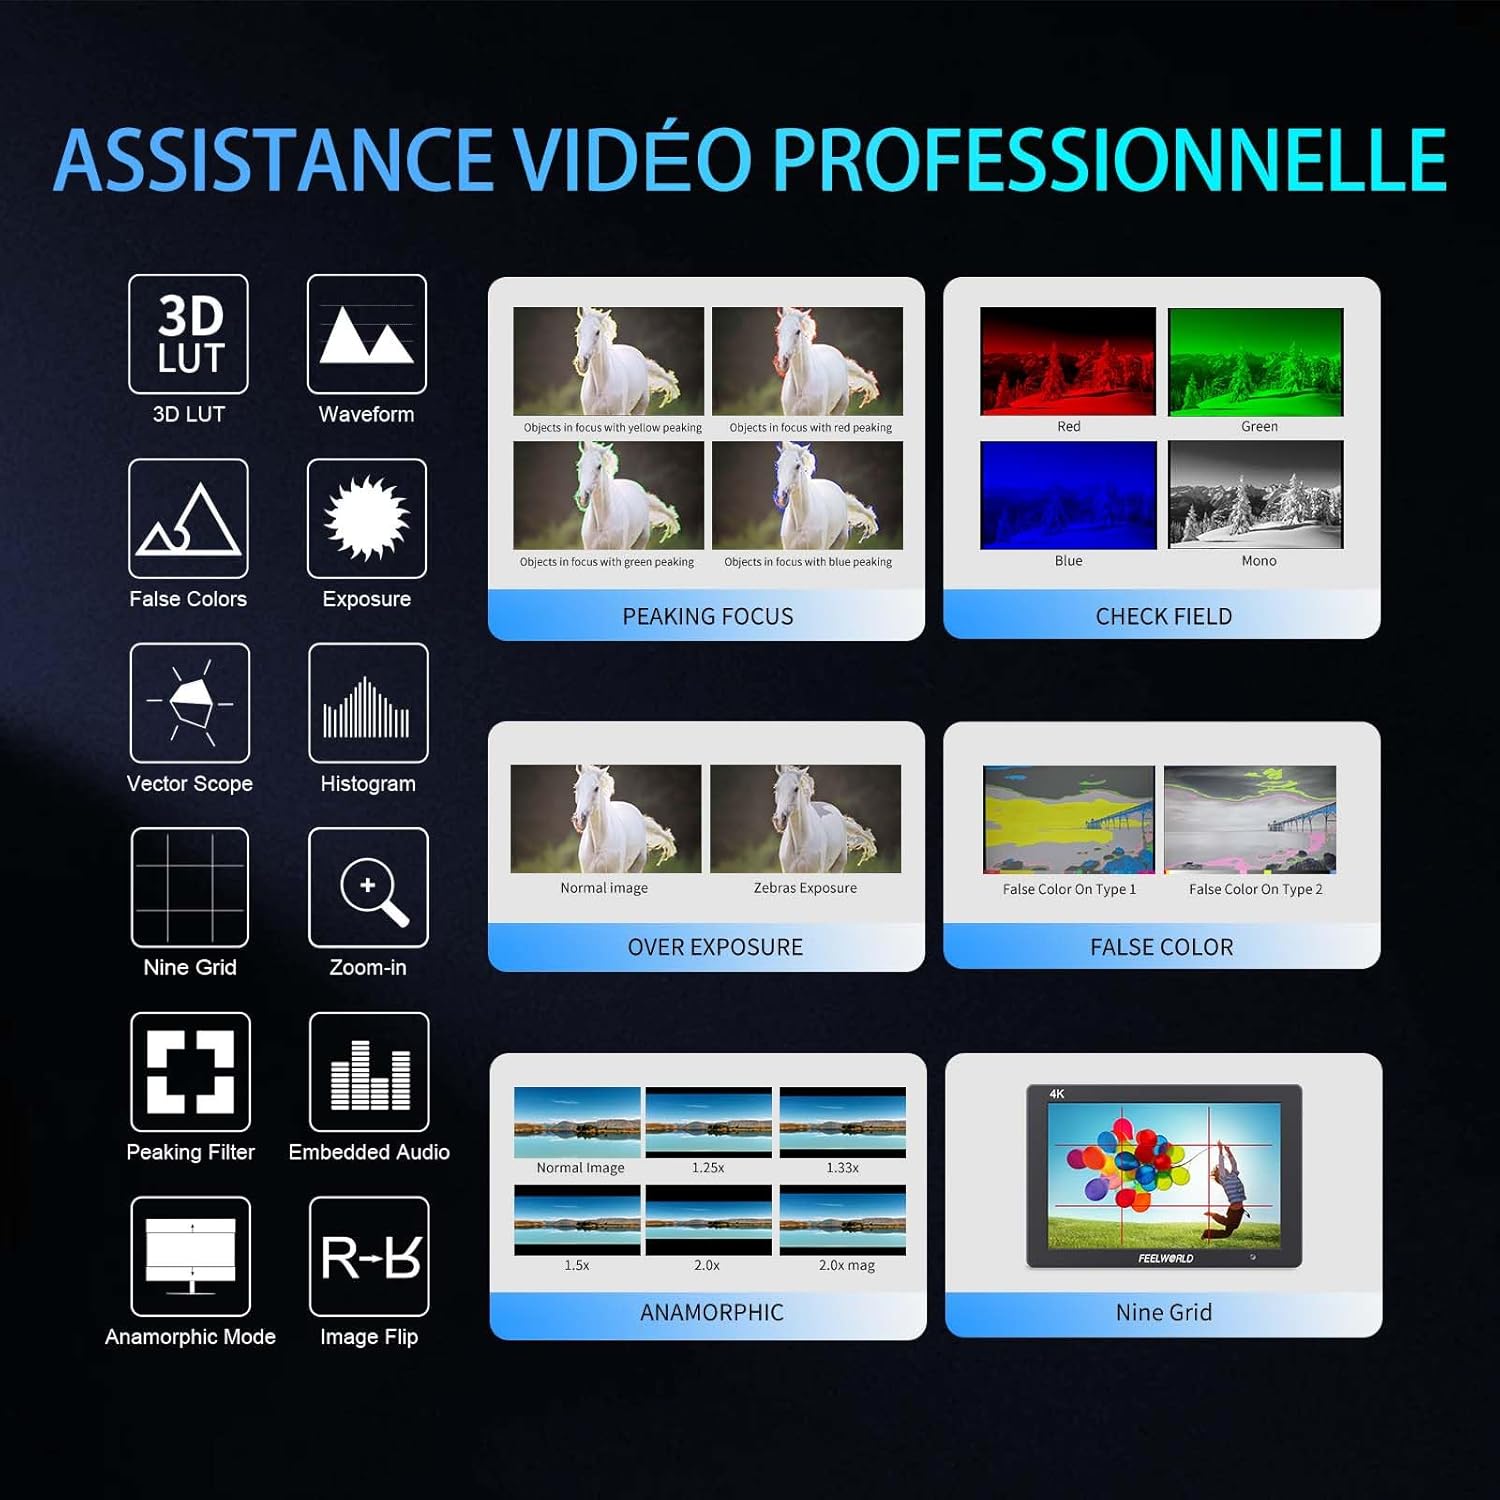
이미지: 시각적 오버view of the professional video assistance features available on the FEELWORLD T7PLUS monitor, including 3D LUT, Waveform, Peaking Focus, and False Color.
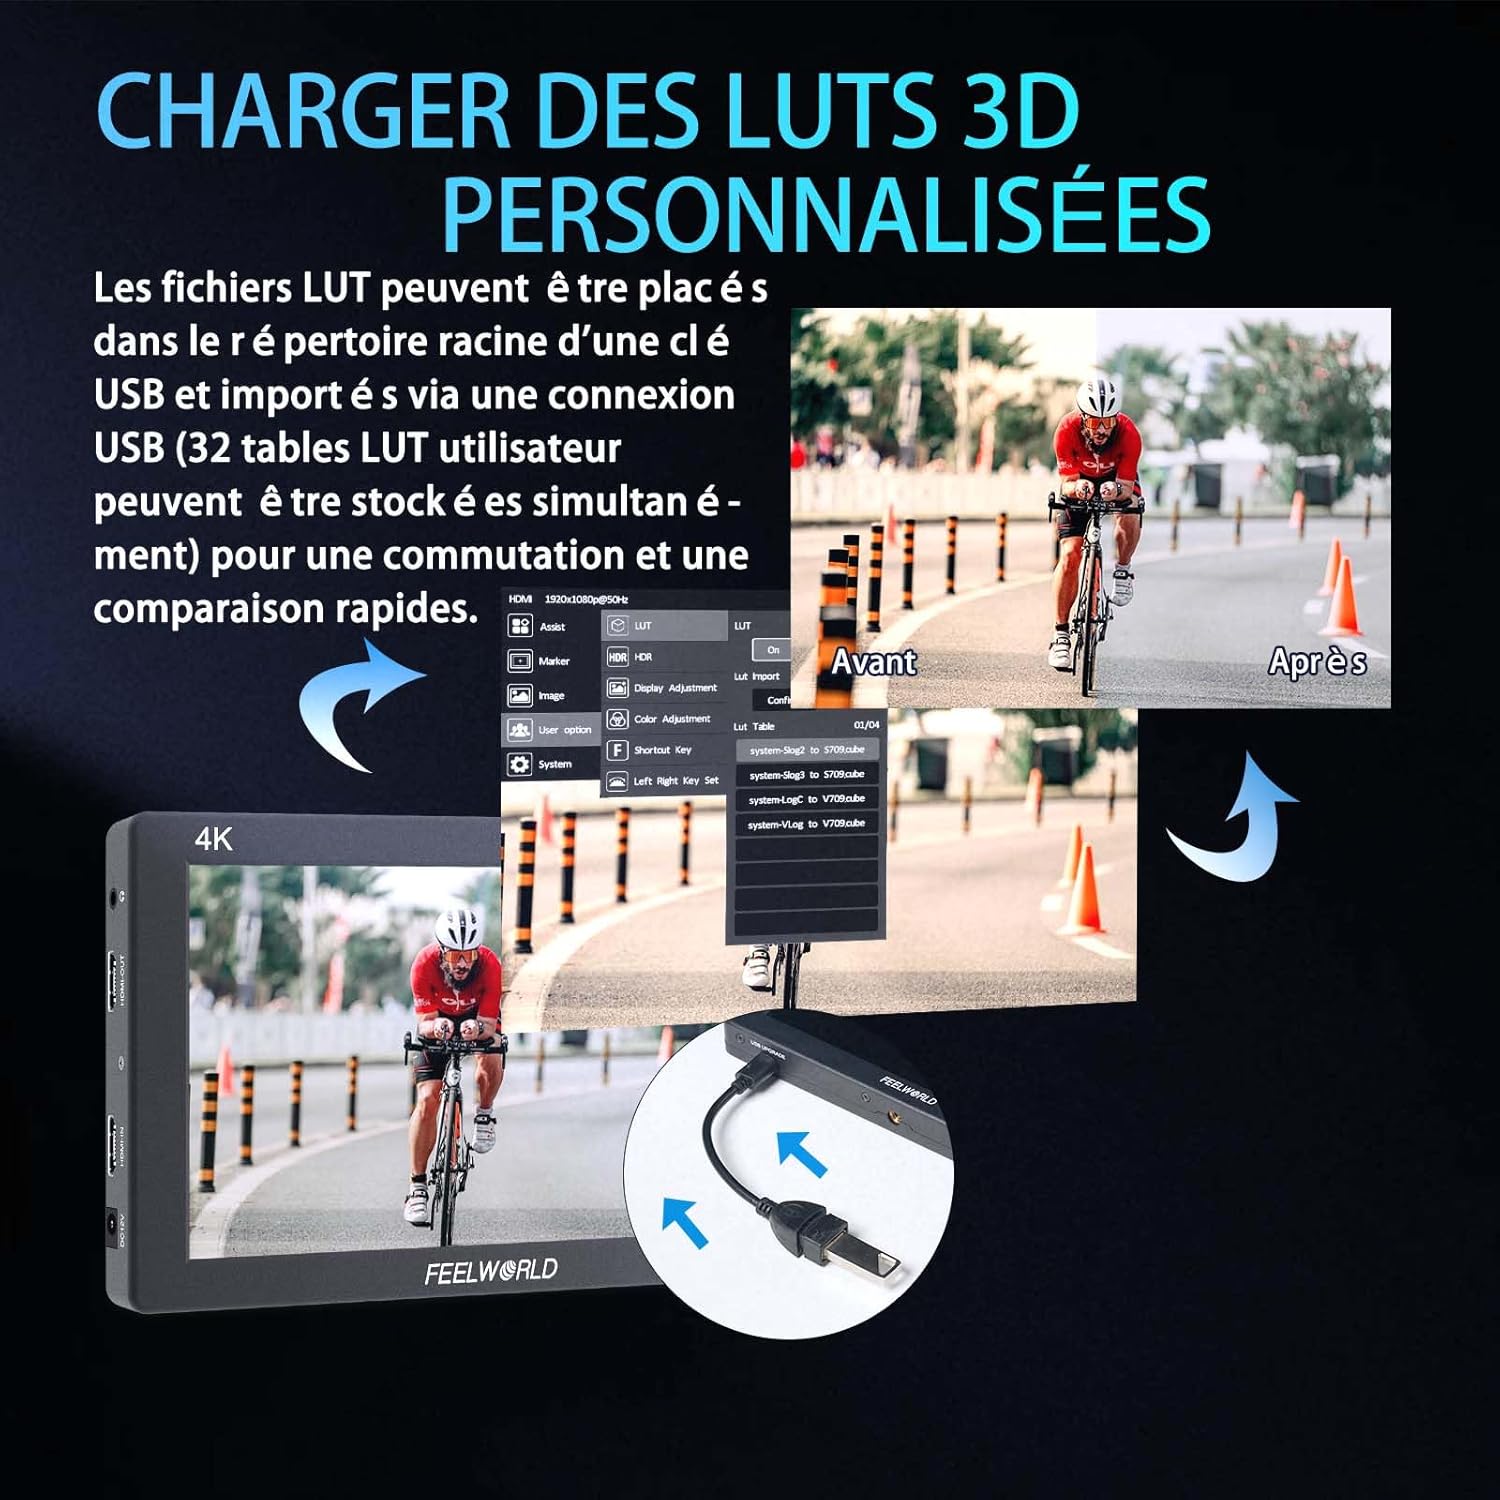
Image: The FEELWORLD T7PLUS demonstrating the process of loading custom 3D LUTs via USB, with a split screen showing the "Before" and "After" application of a LUT.

Image: The FEELWORLD T7PLUS displaying broadcast-level waveform monitoring functions, including Vectorscope, Brightness Histogram, YUV Parade, and Y Parade.
5.4 언어 설정
To change the display language, navigate to the "System" menu and select "Language." Choose your preferred language from the available options.
6. 유지관리
- 청소: 부드럽고 마른 천으로 모니터 화면과 본체를 닦으세요. 잘 지워지지 않는 얼룩은 약간 거친 천으로 닦아내세요.amp cloth with a mild cleaning solution designed for electronics can be used, but avoid direct spraying.
- 저장: When not in use, store the monitor in a cool, dry place, away from direct sunlight and extreme temperatures. Use the provided storage bag for protection.
- 배터리 관리 : If using batteries, ensure they are charged regularly and stored properly. Remove batteries if the monitor will not be used for an extended period.
- 펌웨어 업데이트: Check the FEELWORLD official website periodically for any available firmware updates to ensure your monitor has the latest features and bug fixes.
7. 문제 해결
| 문제 | 가능한 원인 | 해결책 |
|---|---|---|
| 모니터 전원이 켜지지 않습니다. | Low or dead battery; power adapter not connected or faulty. | Ensure battery is charged or replace it. Check power adapter connection and functionality. |
| No signal on screen. | HDMI cable loose or faulty; incorrect input selected; camera not outputting signal. | Check HDMI cable connections. Ensure the correct input source is selected on the monitor. Verify camera's HDMI output settings. |
| Image is distorted or colors are off. | Incorrect color settings; faulty HDMI cable; monitor settings misconfigured. | Reset monitor to factory settings. Check HDMI cable. Adjust color settings in the menu. |
| 버튼이 반응하지 않습니다. | 일시적인 소프트웨어 오류, 물리적 손상. | Power cycle the monitor. If the problem persists, contact customer support. |
8. 사양
| 특징 | 세부 사항 |
|---|---|
| 상표 | 느낌 |
| 모델 | T7PLUS-OF-EU |
| 화면 크기 | 7인치 |
| 해결 | 1920x1200 |
| 명도 | 450칸델라/제곱미터 |
| 대비율 | 1200시 1분 |
| 픽셀 밀도 | 323PPI |
| View잉 각도 | 160° (IPS) |
| HDMI 입력/출력 | 4K@30Hz (3840x2160p, 4096x2160p) |
| 전원 입력 | DC 12V/1.5A or NP-F Battery Plate |
| 치수(길이 x 너비 x 높이) | 22.5 x 16.2 x 8.1cm (약 8.86 x 6.38 x 3.19인치) |
| 무게 | 930그램(약 2.05파운드) |
| Casing 재료 | 금속 |
9. 보증 및 지원
The FEELWORLD T7PLUS monitor comes with a 1년 제조사 보증. 본 보증은 정상적인 사용 환경에서 발생하는 재료 및 제조상의 결함에 적용됩니다. 보증 청구를 위해 구매 증빙 서류를 보관해 주십시오.
For technical support, troubleshooting assistance, or warranty service, please contact FEELWORLD customer support through their official web제품을 구매한 사이트 또는 소매업체.
메모: Availability of spare parts and software updates may vary. Please refer to the manufacturer's official channels for the most current information.