
plustek 8200i SE
플러스텍 옵틱필름 8200i SE 필름/슬라이드 스캐너 사용 설명서
Model: 8200i SE | Brand: Plustek
소개
This manual provides comprehensive instructions for the setup, operation, and maintenance of your Plustek OpticFilm 8200i SE Film & Slide Scanner. The OpticFilm 8200i SE is designed for high-resolution scanning of 35mm negative film and mounted slides, featuring a built-in infrared channel for dust and scratch detection and removal.

Image: The Plustek OpticFilm 8200i SE scanner shown with included 35mm negative film stripe holders and a mounted slide holder.
패키지 내용
아래 나열된 모든 품목이 패키지에 포함되어 있는지 확인하세요.
- Plustek OpticFilm 8200i SE Scanner
- 전원 어댑터
- USB 케이블
- 35mm Negative Film Stripe Holder (x2 kits, total 4 holders)
- Mounted Slide Holder
- 빠른 설명
- Software DVD (SilverFast SE Plus 8)
- 운반 가방
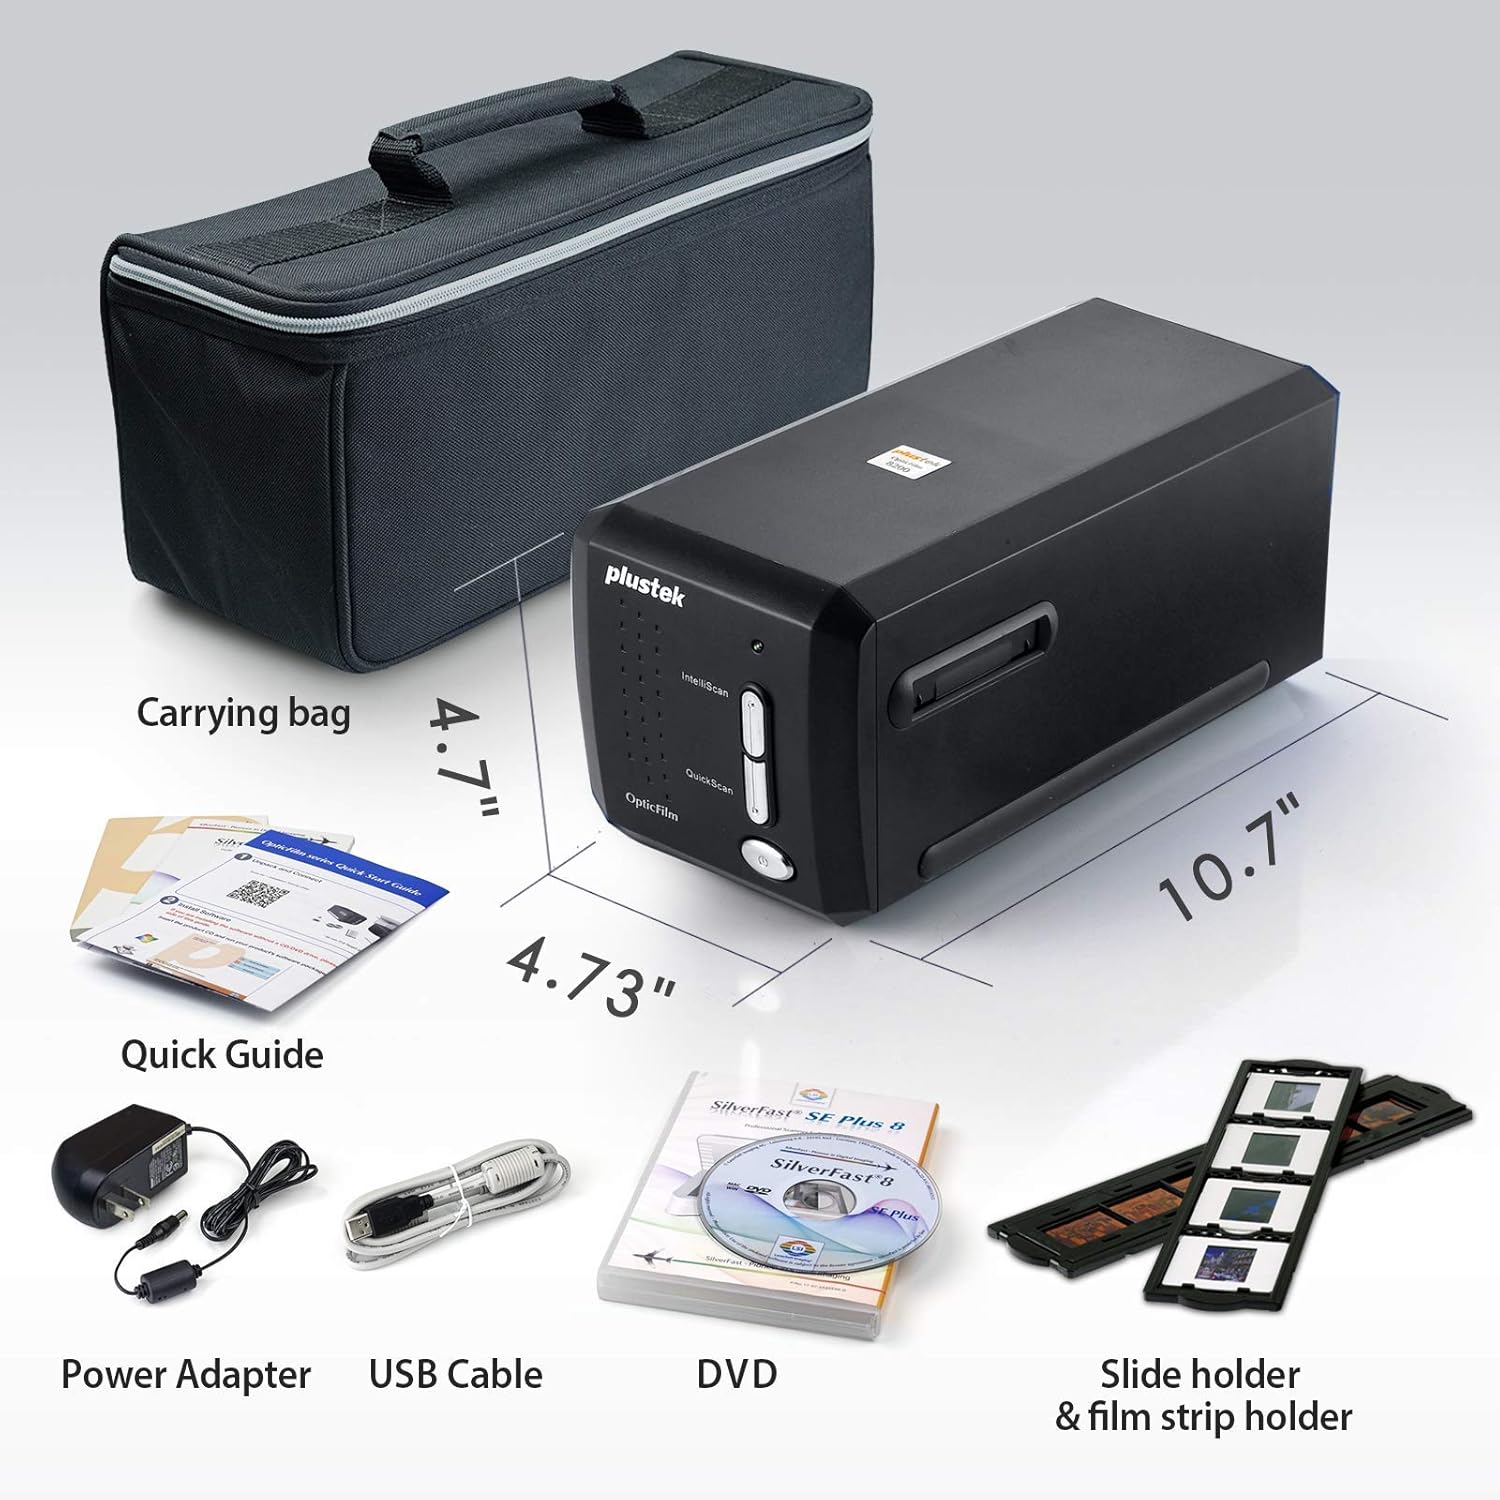
Image: All components included in the Plustek OpticFilm 8200i SE package, including the scanner, power adapter, USB cable, software DVD, quick guide, carrying bag, and film/slide holders.
설정
- 하드웨어 연결:
- 전원 어댑터를 스캐너에 연결한 다음 전원 콘센트에 연결하십시오.
- 스캐너의 USB 케이블을 컴퓨터의 사용 가능한 USB 포트에 연결하십시오.
- 소프트웨어 설치:
- Insert the provided SilverFast SE Plus 8 software DVD into your computer's optical drive.
- Follow the on-screen instructions to install the software and necessary drivers.
- If your computer does not have an optical drive, or for the latest drivers, download them from the official Plustek website. The scanner supports Windows 7/8/10/11 and Mac OS 10.12 ~ 11.x.
- SilverFast License Registration:
- After installation, launch the SilverFast software.
- You will be prompted to register your free SilverFast license. Follow the steps provided, which typically involve entering your scanner's hardware serial number.

Image: A visual guide demonstrating the steps for registering the SilverFast software license, including locating the serial number and inputting registration details.
작동 지침
Loading Film/Slides:
- For 35mm negative film strips, carefully insert the film into the 35mm Negative Film Stripe Holder. Ensure the film is flat and correctly aligned.
- For mounted slides, place the slide into the Mounted Slide Holder.
- Insert the loaded holder into the scanner's film slot.

Image: Two 35mm negative film holders, designed to securely hold film strips for scanning with the OpticFilm 8200i SE.
Scanning Process with SilverFast:
- Launch the SilverFast SE Plus 8 software.
- Select the appropriate film type (negative or slide) and film profile 소프트웨어 내에서.
- 사전을 활용하라view function to adjust scanning area and settings.
- iSRD (Infrared Smart Removal of Defects): The scanner features a built-in infrared channel to detect and remove dust and scratches. Enable this function in the SilverFast software for optimal results.
- Multi-Exposure Function: For improved image quality and dynamic range, enable the Multi-Exposure feature in the software. This captures multiple exposures to enhance detail in highlights and shadows.
- Adjust other settings such as resolution (up to 7200 dpi), color depth (48-bit input), and image enhancements as needed.
- 스캔을 시작하세요. 스캔된 이미지가 소프트웨어 인터페이스에 나타납니다.
- Save your scanned image in your desired format (e.g., TIFF, JPEG).

Image: A diagram illustrating how the infrared channel detects dust and scratches on film, showing the original source image, infrared scan, marker for defects, and the final corrected result.

Image: Screenshot of the SilverFast SE Plus 8 software interface, highlighting the iSRD (Infrared Dust and Scratch Removal) feature and its controls.

이미지: 전amples demonstrating the effects of SilverFast NegaFix for film profiles, iSRD for defect removal, and Multi-Exposure for increased dynamic range, showing before and after comparisons.
유지
- 스캐너 청소: Use a soft, lint-free cloth to gently wipe the exterior of the scanner. Do not use liquid cleaners or abrasive materials.
- Cleaning Film/Slides: Before scanning, ensure your film and slides are free of dust and fingerprints. Use a soft brush or compressed air designed for photographic materials. Avoid touching the film surface directly.
- 저장: When not in use, store the scanner in a clean, dry, and dust-free environment, preferably in its original packaging or the provided carrying bag.
문제 해결
일반적인 문제 및 해결책:
- 스캐너가 감지되지 않음:
- USB 케이블이 스캐너와 컴퓨터에 단단히 연결되어 있는지 확인하세요.
- 전원 어댑터가 연결되어 있고 스캐너 전원이 켜져 있는지 확인하십시오.
- Reinstall the scanner drivers from the Plustek web대지.
- 컴퓨터의 다른 USB 포트를 사용해 보십시오.
- Dust/Scratches on Scans:
- Ensure the film/slides are clean before scanning.
- Activate and properly configure the iSRD (Infrared Smart Removal of Defects) function in the SilverFast software. This feature is specifically designed to address dust and scratches.
- Poor Image Quality (Low Dynamic Range, Lack of Detail):
- Ensure the film/slide is correctly loaded and flat in the holder.
- Utilize the Multi-Exposure function in SilverFast to capture more detail in highlights and shadows.
- Check and adjust exposure, contrast, and color settings in the SilverFast software.
- Ensure you are scanning at an appropriate resolution for your needs (e.g., 7200 dpi for maximum detail).
- 소프트웨어 충돌 또는 정지:
- Ensure your operating system meets the minimum system requirements (Windows 7 or later, Mac OS 10.12 or later).
- Update your SilverFast software and scanner drivers to the latest versions from the Plustek web대지.
- Close other demanding applications while scanning.
명세서
| 특징 | 설명 |
|---|---|
| 모델명 | OpticFilm 8200i SE |
| 스캐너 유형 | Film (35mm Negative & Mounted Slides) |
| 광학 해상도 | 7200dpi |
| 다이나믹 레인지 | Up to 3.6 Dmax |
| 색상 깊이 | 48비트 입력, 24/48비트 출력 |
| 광원 | 주도의 |
| 센서 유형 | 영상 |
| 연결성 | USB |
| Infrared Channel | Yes (for dust and scratch removal) |
| 지원되는 OS | Windows 7/8/10/11, Mac OS 10.12 ~ 11.x |
보증 및 지원
For detailed warranty information, please refer to the warranty card included with your product or visit the official Plustek website. Plustek provides technical support and driver updates through their web대지.
Official Plustek Web대지: www.plustek.com
It is recommended to regularly check the Plustek website for the latest software updates and support resources to ensure optimal performance of your scanner.
Ask a question about this manual
Ask about setup, troubleshooting, compatibility, parts, safety, or missing instructions. Manuals+ will review the question and use this page’s manual context to help answer it.