
PowMr ML2440
PowMr 40A MPPT 태양광 충전 컨트롤러 사용 설명서
모델: ML2440
1. 서론
This manual provides essential information for the safe and efficient operation of your PowMr 40A MPPT Solar Charge Controller, model ML2440. Please read this manual thoroughly before installation and use to ensure optimal performance and longevity of the product.
2. 안전 지침
- 단락이나 손상을 방지하기 위해 모든 배선이 올바르게 연결되고 고정되었는지 확인하십시오.
- Always connect the battery to the charge controller first, then the solar panels, and finally the load. Disconnect in the reverse order.
- 컨트롤러를 직접 수리하거나 개조하지 마십시오. 자격을 갖춘 전문가에게 서비스를 의뢰하십시오.
- 컨트롤러는 통풍이 잘 되는 곳에 설치하고, 가연성 물질과 직사광선을 피하세요.
- 전기 시스템을 다룰 때는 적절한 개인 보호 장비(PPE)를 착용하세요.
- 시스템 볼륨을 확인하세요tage matches the controller's specifications (12V/24V auto-detection).
3. 제품 오버view
The PowMr 40A MPPT Solar Charge Controller is designed to efficiently manage power from your solar panels to charge various battery types, including Lithium, Sealed, Gel, and Flooded batteries. It features Maximum Power Point Tracking (MPPT) technology for optimized solar energy harvesting, automatic 12V/24V system voltage detection, and a clear LCD display for monitoring system status.
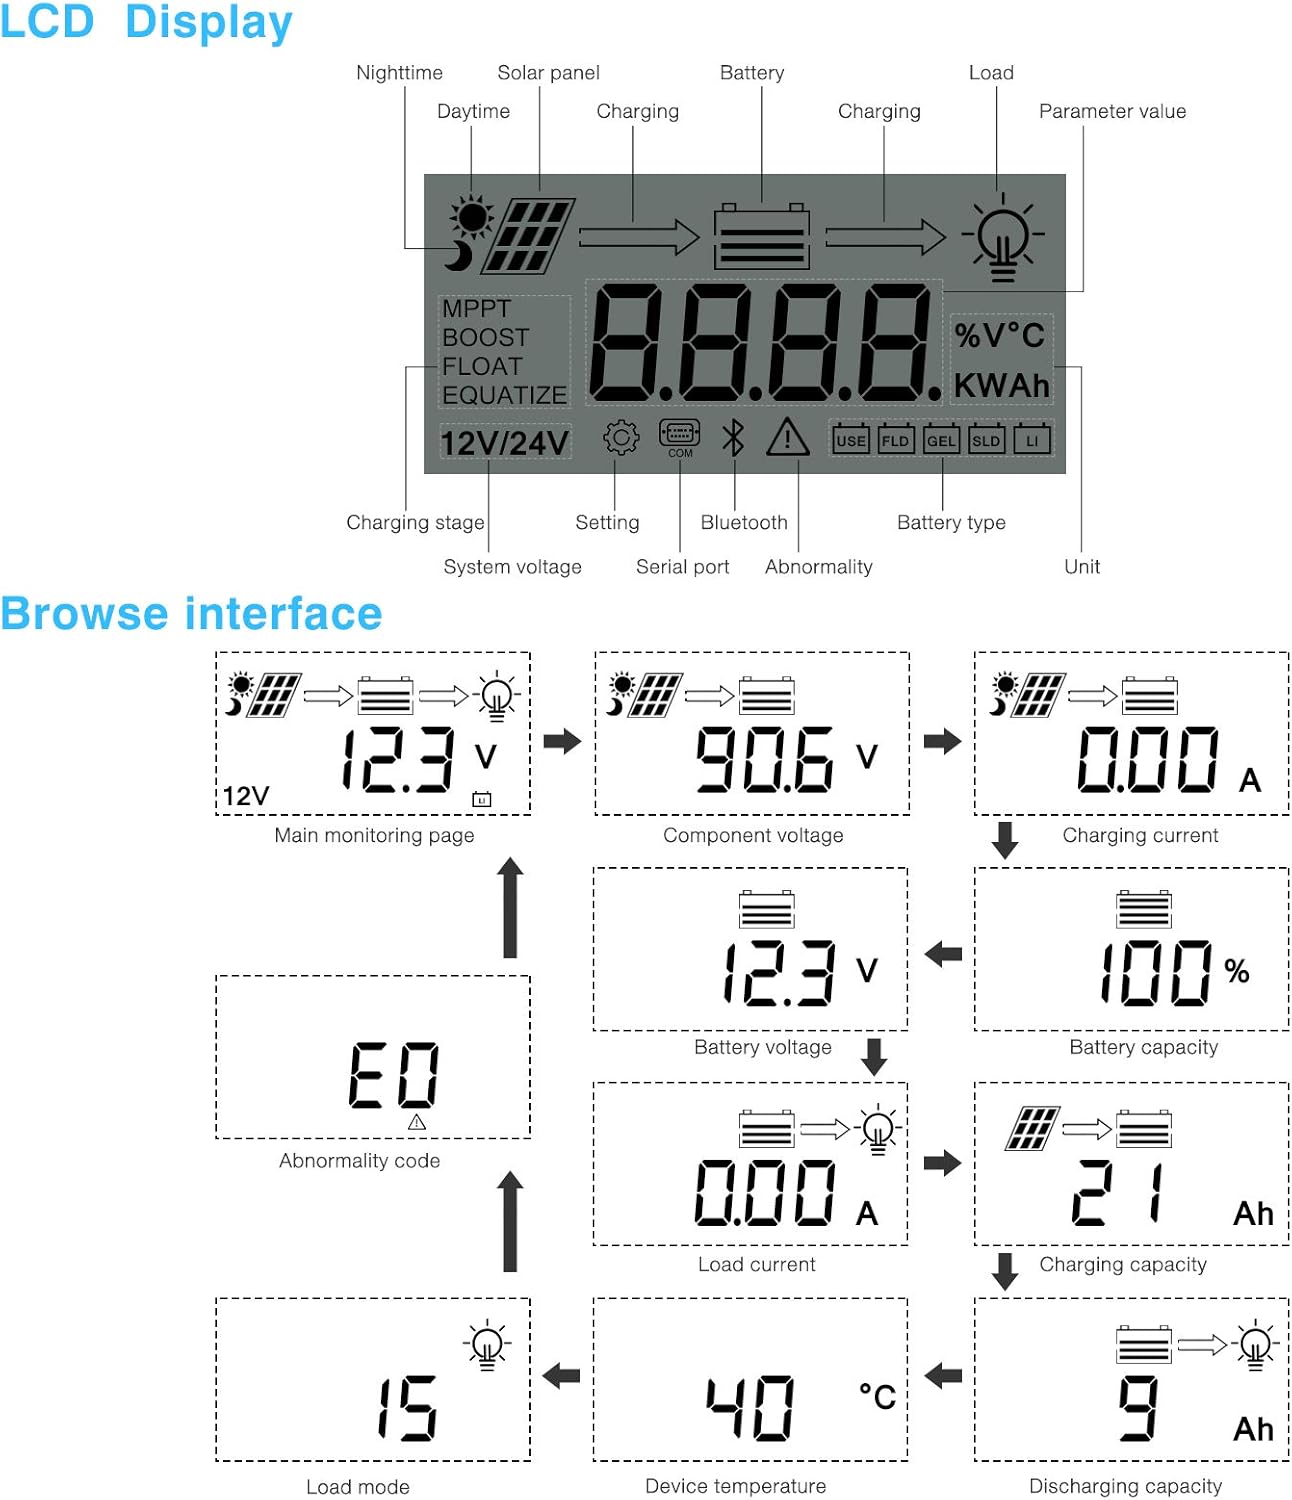
그림 3.1: 앞쪽 view of the PowMr 40A MPPT Solar Charge Controller.
This image shows the main unit of the PowMr 40A MPPT Solar Charge Controller, highlighting its compact design and integrated LCD screen.
The controller supports a maximum solar input voltage of 100V and a maximum input power of 1100W for a 24V system (550W for 12V). It also includes temperature compensation for accurate charging across varying environmental conditions.

그림 3.2: Temperature compensation feature.
This image illustrates the temperature compensation capability of the controller, ensuring optimal battery charging performance in both hot and cold environments.
4. 설치 및 배선
태양광 충전 컨트롤러의 안전하고 효율적인 작동을 위해서는 올바른 설치가 매우 중요합니다. 다음 단계를 주의 깊게 따르십시오.
4.1 배선도

그림 4.1: Wiring diagram for the PowMr MPPT Solar Charge Controller.
This diagram illustrates the correct connection order for the battery, solar panels, DC load, and optional inverter. A temperature sensor is also shown.
4.2 연결 단계
- 먼저 배터리를 연결하세요: Connect the battery to the charge controller's battery terminals. Ensure correct polarity. The controller will auto-detect 12V or 24V system voltage.
- 태양광 패널 연결: Connect the solar panels to the PV input terminals. Ensure correct polarity. The controller will begin charging if sufficient sunlight is available.
- DC 부하 연결 (선택 사항): If using a DC load directly from the controller, connect it to the load terminals.
- 인버터 연결 (선택 사항): If using an inverter, connect it to the battery terminals (not directly to the load terminals of the controller).
- 온도 센서 연결: For accurate temperature compensation, connect the provided temperature sensor to the designated port on the controller and place the sensor near the battery.
연결 해제 순서: To disconnect the system, always follow the reverse order: Disconnect load, then solar panels, then battery.
5. 사용 설명서
This section details how to monitor and configure your charge controller using its integrated LCD display and the optional Bluetooth mobile application.
5.1 LCD 디스플레이 오버view

그림 5.1: LCD Display and Browse Interface.
This image shows the various icons and parameters displayed on the LCD screen, along with the navigation flow through different monitoring pages.
The LCD provides real-time information about your solar system. Key indicators include:
- 충전 중 Stage: MPPT, Boost, Float, Equalize.
- 시스템 볼륨tage: 12V/24V auto-detected.
- 배터리 유형: Icons for Lithium (Li), Sealed (SLD), Gel (GEL), Flooded (FLD).
- 상태 표시기 : Solar panel activity, battery charging, load status, abnormality.
- 매개변수 값: 표시량tage, current, capacity, temperature, etc.
Use the buttons below the LCD to navigate through different screens to view parameters such as main monitoring page, component voltage, 충전 전류, 배터리 용량tage, battery capacity, load current, charging capacity, device temperature, discharging capacity, abnormality codes, and load mode.
5.2 Bluetooth Mobile Application
The controller supports an optional Bluetooth module (BT-1) for remote monitoring and parameter adjustment via a mobile application (available for Apple iOS and Android devices). The Bluetooth module connects to the RS232 port on the controller.

그림 5.2: Controller with optional Bluetooth module.
This image displays the PowMr MPPT Solar Charge Controller alongside its optional BT-1 Bluetooth communication module and connecting cable.

그림 5.3: BT-1 Bluetooth module.
자세한 view of the BT-1 Bluetooth module, which enables wireless communication with the solar charge controller for remote monitoring and settings adjustments.

그림 5.4: Bluetooth Mobile Interface Display.
This image shows various screens from the mobile application, including real-time monitoring, data records, energy records, and parameter settings.
모바일 애플리케이션을 통해 다음 기능을 사용할 수 있습니다.
- Monitor real-time system data (voltage, current, power, temperature).
- View historical data and energy records.
- Adjust various charging parameters and battery settings.
- 공장 기본 설정을 복원합니다.
6. 유지관리
정기적인 유지보수는 충전 컨트롤러의 수명 연장과 최적의 성능을 보장합니다.
- 청소: 컨트롤러 외부를 주기적으로 마른 천으로 닦아 먼지와 이물질을 제거하십시오. 통풍구가 막히지 않도록 하십시오.
- 사이: Annually check all wiring connections for tightness and corrosion. Loose connections can cause overheating and poor performance.
- 환경: Ensure the installation environment remains within the specified operating temperature range and is free from excessive moisture or dust.
7. 문제 해결
This section provides guidance for common issues. Refer to the LCD display for abnormality codes.
- 디스플레이 없음/전원 없음:
- 배터리 연결 상태를 확인하고 배터리 용량이 충분한지 확인하십시오.tage는 작동 범위 내에 있습니다.
- Verify that the battery fuse (if installed) is intact.
- 충전 안함:
- 태양광 패널이 올바르게 연결되어 있고 충분한 햇빛을 받고 있는지 확인하십시오.
- 태양 전지판 vol 확인tage와 현재.
- Verify that the battery is not fully charged or in a protection state.
- 로드가 작동하지 않음:
- Check load connections and ensure the load current does not exceed the controller's rating.
- 배터리 용량 확인tage는 저볼륨 위에 있습니다tage 연결 해제(LVD) 설정.
- Check for any abnormality codes on the LCD related to load output.
- Abnormality Codes (e.g., "E0"):
- Refer to the specific abnormality code displayed on the LCD. Consult the full product manual or manufacturer's support for detailed explanations and solutions for each code.
8. 사양
Technical specifications for the PowMr 40A MPPT Solar Charge Controller (Model ML2440).

그림 8.1: Product Specifications Table.
This table provides detailed technical parameters for the ML2420, ML2430, and ML2440 models. The ML2440 column is relevant for this 40A controller.
| 매개변수 | Value (ML2440) |
|---|---|
| 모델 | ML2440 |
| 시스템 볼륨tage | 12V / 24V 자동 |
| 무부하 손실 | 0.7W ~ 1.2W |
| 배터리 용량tage | 9~35V |
| 최대 태양열 입력 voltage | 100V(25°C), 90V(-25°C) |
| 최대 파워 포인트 권tage 범위 | 배터리 용량tage +2V ~ 75V |
| 정격 충전 전류 | 40A |
| 정격 부하 전류 | 20A |
| 최대 용량성 부하 용량 | 10000uF |
| 최대 태양광 시스템 입력 전원 | 550W/ 12V, 1100W/ 24V |
| 변환 효율 | ≤ 98% |
| MPPT 추적 효율성 | > 99% |
| 온도 보상 계수 | -3.0mv/ °C/ 2V (default) |
| 작동 온도 | -35°C ~ +45°C |
| 보호 정도 | IP32 |
| 무게 | 2kg |
| 통신방법 | RS232 |
| 고도 | ≤ 3000m |
| 제품 치수 | 238*173*72.5mm |
9. 보증 및 지원
For warranty information, please refer to the documentation included with your product packaging or visit the official PowMr website. If you encounter any issues not covered in this manual or require further assistance, please contact PowMr customer support.
PowMr Official Web대지: Visit the PowMr Store on Amazon
Ask a question about this manual
Ask about setup, troubleshooting, compatibility, parts, safety, or missing instructions. Manuals+ will review the question and use this page’s manual context to help answer it.