
1. 서론
This manual provides detailed instructions for the setup, operation, and maintenance of your WISE TIGER LED Digital Alarm Clock (Model CK-LED1302). Please read this manual thoroughly before use to ensure proper functionality and to maximize your product experience.

Image 1.1: WISE TIGER LED Digital Alarm Clock and its remote control.
2. 패키지 내용
패키지에 모든 품목이 들어 있는지 확인하세요.
- WISE TIGER LED Digital Alarm Clock (Model CK-LED1302)
- 원격 제어
- USB 전원 케이블
- 사용 설명서 (본 문서)
- Fixed Bracket (for desk placement)
3. 제품 오버view
The WISE TIGER LED Digital Alarm Clock features a modern 3D design, offering clear time display and multiple functions for various environments.
3.1 주요 특징
- 시간 표시: 12-hour or 24-hour format.
- 달력 표시: Shows date.
- 알람 시계: With snooze function.
- 온도 표시 : 주변 온도를 표시합니다.
- 조정 가능한 밝기: Automatic brightness sensor and manual adjustment via remote control.
- 야간 조명 기능: 은은한 조명을 제공합니다.
- 메모리 기능: Built-in battery retains time settings for 4-8 hours during power disconnection.
- 다양한 배치: Suitable for desk or wall mounting.

Image 3.1: Visual representation of the clock's main functions.
3.2개의 구성요소
자세한 내용은 아래 다이어그램을 참조하세요.view of the clock's components and connection points.
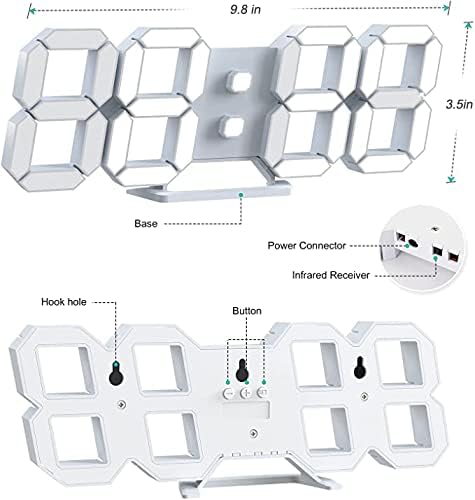
이미지 3.2: 뒤 view and dimensions of the clock, highlighting the power connector, infrared receiver, and mounting options.
- 표시하다: Large 3D LED digits for time, date, and temperature.
- 베이스: Removable stand for desk placement.
- 전원 커넥터 : USB port for power input.
- 적외선 수신기: 원격 제어 신호용입니다.
- Hook Holes: 벽걸이용.
- 제어 버튼: Located on the back for basic settings (Power, Up, Down, Set).
4. 설정
4.1 전원 연결
- Connect the provided USB power cable to the power connector on the back of the clock.
- USB 케이블의 다른 쪽 끝을 표준 USB 전원 어댑터(별도 구매) 또는 컴퓨터 USB 포트에 연결하십시오.
- The clock will power on and display the time.
The clock is powered by the USB cable only. A built-in battery serves to record time settings when power is disconnected, ensuring settings are retained for 4-8 hours.

Image 4.1: Explanation of the clock's power and memory function.
4.2 배치 옵션
The clock can be used as a desk clock or a wall clock.
- 책상 배치: Attach the fixed bracket to the bottom of the clock. The angle of the bracket can be adjusted for optimal view주고받음.
- 벽면 장착: Remove the fixed bracket if attached. Use the installation slots (hook holes) on the back of the clock to hang it securely on a wall using appropriate fasteners (not included).

Image 4.2: The clock configured for wall mounting and desk placement.
5. 사용 설명서
The clock's functions are primarily controlled using the included remote control. Basic settings can also be adjusted via the buttons on the back of the clock.
5.1 시간 및 날짜 설정
- 를 누르세요 시간 리모컨의 버튼을 눌러 시간 설정 모드로 들어갑니다.
- 사용하세요 UP 그리고 아래에 시간을 조정하는 화살표.
- 누르다 시간 again to move to minute setting, then use UP 그리고 아래에 조정하다.
- 계속 누르기 시간 연도, 월, 일 설정을 순환하며 각각을 조정합니다. UP 그리고 아래에.
- 누르다 시간 마지막으로 한 번 더 시도하거나, 설정이 자동으로 저장될 때까지 몇 초간 기다리세요.
5.2 12/24시간 형식
12시간제와 24시간제 시간 형식을 전환하려면 버튼을 누르세요. 12/24시간 리모컨의 버튼을 누르세요.

이미지 5.1: Example of 12-hour and 24-hour time display.
5.3 알람 설정
- 를 누르세요 경보 button on the remote control to enter alarm setting mode.
- 사용하세요 UP 그리고 아래에 화살표를 사용하여 원하는 알람 시간을 설정하세요.
- 누르다 경보 again to move to minute setting, then use UP 그리고 아래에 조정하다.
- 누르다 경보 one last time or wait for the settings to save.
- 알람을 활성화/비활성화하려면 다음을 누르세요. 경보 설정 모드 외부에서 버튼을 잠시 떼십시오. 디스플레이에 알람 아이콘이 나타났다가 사라집니다.
5.4 스누즈 기능
알람이 울리면 버튼을 누르세요. 선잠 button on the remote control to temporarily silence the alarm. The alarm will sound again after a set interval (typically 5-10 minutes).

Image 5.2: The snooze alarm function in use.
5.5 밝기 조정
The clock features both automatic and manual brightness control.
- 자동 밝기: 내장 센서가 주변 조명 조건에 따라 디스플레이 밝기를 자동으로 조절합니다.
- 수동 밝기: 를 누르세요 밝은 button on the remote control to cycle through different brightness levels (e.g., high, medium, low).

Image 5.3: Automatic brightness adjustment based on ambient light.

Image 5.4: Manual adjustment through three brightness levels.
5.6 온도 디스플레이
The clock automatically displays the ambient temperature. No manual adjustment is typically required for this function.
6. 유지관리
To ensure the longevity and optimal performance of your WISE TIGER LED Digital Alarm Clock, follow these maintenance guidelines:
- 청소: 부드럽고 마른 천으로 디스플레이를 닦으십시오.asing. Avoid abrasive cleaners, solvents, or spray cleaners directly on the clock.
- 힘: Always use the provided USB cable for power. Ensure the power source is stable.
- 환경: 시계를 극한 온도, 직사광선 및 높은 습도로부터 멀리 두십시오.
- 원격 제어: Store the remote control in a safe place to prevent loss or damage. Ensure batteries are replaced when needed (typically 2 Lithium Ion batteries, included).
7. 문제 해결
시계 사용에 문제가 발생하면 다음의 일반적인 문제 및 해결 방법을 참조하십시오.
| 문제 | 가능한 원인 | 해결책 |
|---|---|---|
| 시계가 켜지지 않음 | 전원이 없거나 연결이 느슨함 | USB 케이블이 제대로 연결되어 있고 전원이 켜져 있는지 확인하십시오. 다른 USB 포트나 어댑터를 사용해 보십시오. |
| 리모컨이 작동하지 않습니다 | Remote batteries are dead or remote is out of range/blocked | Replace remote control batteries. Ensure remote is pointed at the clock's infrared receiver (refer to Image 3.2) and within 8 meters. Remove any obstructions. |
| 시간이 정확하지 않습니다 | Time was not set precisely | Reset the time carefully, ensuring you set it at the exact second of the desired time. |
| 화면이 너무 어둡거나 너무 밝습니다. | 밝기 설정을 조정해야 합니다. | 를 누르세요 밝은 button on the remote to cycle through manual brightness levels. Check if automatic brightness is functioning correctly in different light conditions. |
| 알람이 울리지 않습니다 | 알람이 활성화되지 않았거나 잘못 설정되었습니다. | Ensure the alarm is set and activated (alarm icon visible). Verify the alarm time is correct. |
8. 사양
| 특징 | 세부 사항 |
|---|---|
| 상표 | 현명한 호랑이 |
| 모델 번호 | CK-LED1302 |
| 디스플레이 유형 | 디지털 |
| 색상 | 하얀색 |
| 제품 치수 | 폭 9.7인치 x 높이 3.5인치 |
| 전원 | 유선 전기(USB) |
| 메모리 배터리 | 2 Lithium Ion batteries (included), retains settings for 4-8 hours |
| 장착 유형 | Wall Mount, Desk Mount |
| 특별 기능 | Adjustable Brightness, Alarm Clock, Temperature Display, Date Display, 12/24 Hour Format |
| 재료 | 아크릴로 니트릴 부타디엔 스티렌 |
| 품목 무게 | 0.317 온스(약 9그램) |
| 한국어: | 728990655931 |
9. 보증 및 지원
For warranty information or technical support, please refer to the product packaging or contact the retailer where the product was purchased. Keep your purchase receipt as proof of purchase.