
상고마 P315
상고마 P315 IP 전화 사용 설명서
Model: P315 | Part Number: 1TELP315LF
1. 서론
This user manual provides comprehensive instructions for the setup, operation, and maintenance of your Sangoma P315 IP Phone. Please read this manual thoroughly to ensure proper use and to maximize the features of your device. For additional support, refer to the official Sangoma documentation and support resources.
2. 제품 오버view
The Sangoma P315 is a 2-line SIP IP Phone designed for clear communication with HD Voice quality. It features a 2.4-inch color display and supports Gigabit Ethernet connectivity. This phone is compatible with Sangoma's UC offerings, including Switchvox, PBXact, FreePBX, and Asterisk, offering seamless auto-provisioning.
2.1 주요 특징
- 2-line appearance keys for managing multiple calls.
- 2.4-inch (320 x 240 pixel) backlit color LCD display for clear visibility.
- High-definition call quality for superior audio.
- Power over Ethernet (PoE) support with 2 switched 10/100/1000 Mbps Gigabit Ethernet ports.
- Built-in EHS support for Sangoma H10 and H20 wireless headsets.
- Secure deployments with SRTP/TLS and VLAN support.
- Compatibility with Switchvox 7.7, FreePBX v14, PBXact v14, Asterisk v16, Endpoint Manager v14/v15, DPMA 3.6.x.
2.2 휴대폰 구성 요소
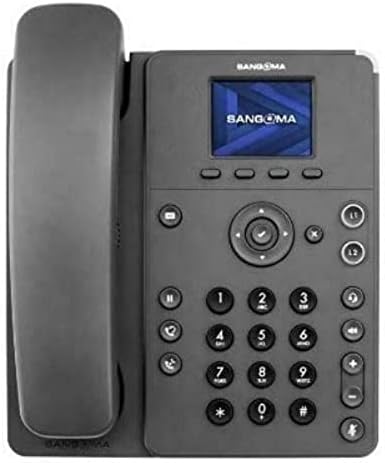
Figure 1: Sangoma P315 IP Phone Front View
The Sangoma P315 IP Phone features a standard telephone handset on the left, connected to the main unit. The main unit includes a 2.4-inch color display at the top, below which are four context-sensitive soft keys. A navigation cluster with a central 'OK' button is located below the soft keys. To the left of the navigation cluster are dedicated buttons for message, headset, and speakerphone. To the right are line keys (L1, L2) and call management buttons (hold, transfer, conference, mute, volume up/down). A standard numeric keypad (0-9, *, #) is positioned centrally on the lower part of the unit.
3. 설정
3.1 패키지 내용
계속하기 전에 모든 구성 요소가 있는지 확인하세요.
- Sangoma P315 IP Phone unit
- 핸드셋 및 핸드셋 코드
- 이더넷 케이블
- 폰 스탠드
- Note: A 12V Power Adapter (1TELP001LF) is not included and may be required if PoE is not available.
3.2 물리적 연결
- 휴대폰 스탠드 부착: 스탠드를 전화기 뒷면의 홈에 맞춰 끼우고 제자리에 고정하세요.
- 핸드셋 연결: 코일형 수화기 코드의 한쪽 끝을 수화기에 꽂고 다른 쪽 끝을 전화기 본체의 수화기 포트(일반적으로 수화기 아이콘으로 표시됨)에 꽂으십시오.
- 네트워크에 연결:
- 사용하는 경우 이더넷 전원 장치(PoE): Connect one end of the Ethernet cable to the LAN port on the phone and the other end to a PoE-enabled network switch or router.
- 사용하는 경우 AC 어댑터 (sold separately): Connect the AC adapter to the power port on the phone, then connect one end of the Ethernet cable to the LAN port on the phone and the other end to a standard network switch or router.
- PC에 연결(선택 사항): 전화기를 통해 컴퓨터를 연결하려면 PC와 전화기의 PC 포트에 이더넷 케이블을 연결하십시오.
3.3 Initial Boot-up and Provisioning
Once connected to the network and powered on, the phone will begin its boot-up sequence. The Sangoma P315 supports auto-provisioning with Sangoma's UC platforms. The phone will attempt to obtain network settings and configuration from your PBX system automatically. This process may take a few minutes. Once complete, the display will show your line status and be ready for use.
4. 사용 설명서
4.1 기본 호출 함수
- 전화 걸기:
- Pick up the handset, press the speakerphone button, or press an available line key.
- 숫자 키패드를 사용하여 원하는 번호를 누르세요.
- 를 누르세요 다이얼 소프트 키를 누르거나 통화가 자동으로 연결될 때까지 기다리세요.
- 전화 받기 : 전화가 울리면 수화기를 들고 스피커폰 버튼을 누르거나 깜빡이는 회선 키를 누르세요.
- 통화 종료: 수화기를 내려놓고 스피커폰 버튼을 다시 누르거나, 통화 종료 소프트 키.
4.2 고급 통화 기능
- 잡고 있다: 통화 중 통화 중 잡고 있다 버튼을 누릅니다. 다시 누르면 통화가 재개됩니다.
- 이전: 통화 중 통화 중 옮기다 버튼을 누릅니다. 전송할 번호를 다이얼한 다음 옮기다 soft key again (blind transfer) or wait for the party to answer and then press 옮기다 (이전에 참석).
- 회의: 통화 중 통화 중 회의 button. Dial the number of the third party, and once connected, press the 회의 모든 파티를 참여시키려면 소프트 키를 다시 누르십시오.
- 무음: 를 누르세요 무음 통화 중 마이크를 음소거하려면 이 버튼을 누르세요. 다시 누르면 음소거가 해제됩니다.
- 음성사서함: 를 누르세요 메시지 button to access your voicemail. Follow the voice prompts.
- 볼륨 조절: 사용하세요 볼륨 높이기/낮추기 통화 중에는 수화기, 헤드셋 또는 스피커폰의 볼륨을 조절하거나, 통화 중이 아닐 때는 벨소리 볼륨을 조절할 수 있는 버튼이 있습니다.
4.3 디스플레이 탐색
The 2.4-inch color display provides access to various phone features and settings. Use the navigation cluster (up, down, left, right arrows, and central OK button) to scroll through menus and select options. The soft keys below the display change their function based on the current screen or call status.
5. 유지관리
5.1 휴대폰 청소
휴대전화의 외관과 기능을 유지하려면 다음 사항을 준수하십시오.
- 부드럽고 약간 d를 사용하세요amp, lint-free cloth to wipe the phone's surface.
- 독한 화학 약품, 연마성 세척제 또는 에어로졸 스프레이는 휴대전화의 마감재와 내부 부품을 손상시킬 수 있으므로 사용을 피하십시오.
- 세척제를 휴대전화에 직접 뿌리지 마십시오.
5.2 소프트웨어 업데이트
Your Sangoma P315 IP Phone may receive software updates to improve performance, add features, or address security vulnerabilities. These updates are typically managed by your system administrator through the PBX. Do not attempt to manually update firmware unless instructed by your administrator or Sangoma support.
6. 문제 해결
상고마 P315 IP 전화기 사용 중 문제가 발생하면 다음 일반적인 문제 및 해결 방법을 참조하십시오.
| 문제 | 가능한 원인 | 해결책 |
|---|---|---|
| 통화 연결이 되지 않음 / 전화를 걸거나 받을 수 없음 | Network cable disconnected, no power, incorrect network configuration, PBX issue. |
|
| 디스플레이가 비어 있거나 멈췄습니다. | 전원 문제, 소프트웨어 오류. |
|
| 음질이 좋지 않음 (에코, 잡음) | Network congestion, faulty cable, environmental interference. |
|
For issues not covered here, please contact your IT department or Sangoma technical support.
7. 사양
| 특징 | 세부 사항 |
|---|---|
| 모델 | 피315 |
| 부품 번호 | 1TELP315LF |
| 표시하다 | 2.4-inch (320 x 240 pixel) backlit color LCD |
| 라인 키 | 2 |
| 이더넷 포트 | 2 x 10/100/1000 Mbps Gigabit Ethernet (switched) |
| 전원 | PoE (Power over Ethernet) and AC Adapter (12V, not included) |
| 헤드셋 지원 | EHS support for Sangoma H10 and H20 wireless headsets |
| 보안 | SRTP/TLS, VLAN support |
| 크기(대략) | 27.9 x 21.3 x 8.9cm(10.98 x 8.39 x 3.5인치) |
| 무게(대략) | 1.08kg(2.38파운드) |
| 한국어: | 797734603330 |
8. 보증 및 지원
8.1 제품 보증
The Sangoma P315 IP Phone comes with a standard manufacturer's warranty. For detailed information regarding warranty terms, duration, and coverage, please refer to the warranty card included with your product or visit the official Sangoma web사이트. 보증 청구를 위해 구매 증빙 자료를 보관하세요.
8.2 기술 지원
For technical assistance, troubleshooting beyond this manual, or advanced configuration, please contact your system administrator or Sangoma technical support. You can find contact information and additional resources on the official Sangoma support portal.
온라인 리소스: www.sangoma.com/support
Ask a question about this manual
Ask about setup, troubleshooting, compatibility, parts, safety, or missing instructions. Manuals+ will review the question and use this page’s manual context to help answer it.