
1. 서론
구매해주셔서 감사합니다asing the Soundsation MIOMIX 404FXM 6-Channel Mixer. This versatile mixer is designed for a wide range of audio applications, including home recording, live performances, and podcasting. It combines professional audio quality with portability, featuring low-noise preamplifiers, digital effects, a USB media player/recorder, and Bluetooth connectivity. This manual provides essential information for safe operation, setup, and optimal use of your MIOMIX 404FXM mixer.
2. 안전 지침
경고: 화재나 감전의 위험을 줄이려면 이 장비를 비나 습기에 노출시키지 마십시오.
- 장치를 작동하기 전에 이 지침을 주의 깊게 읽으세요.
- 이 설명서를 향후 참고용으로 보관하세요.
- 모든 경고를 주의 깊게 읽고 모든 지침을 따르세요.
- 이 기기를 물 근처에서 사용하지 마십시오.
- 마른 천으로만 닦으십시오.
- 환기구를 막지 마십시오. 제조업체의 지침에 따라 설치하십시오.
- 라디에이터, 난방 조절기, 스토브 또는 기타 장치(다음을 포함)와 같은 열원 근처에 설치하지 마십시오. amp열을 생성하는 발전기.
- 극성 또는 접지형 플러그의 안전 목적을 저버리지 마십시오. 극성 플러그에는 두 개의 날이 있으며, 하나는 다른 하나보다 넓습니다. 접지형 플러그에는 두 개의 날과 세 번째 접지 갈래가 있습니다. 넓은 날 또는 세 번째 갈래는 안전을 위해 제공됩니다. 제공된 플러그가 콘센트에 맞지 않으면 전기 기술자에게 문의하여 오래된 콘센트를 교체하십시오.
- 전원 코드가 밟히거나 끼지 않도록 보호하세요. 특히 플러그, 편의용 콘센트 및 기기에서 나오는 부분은 보호하세요.
- 제조사가 지정한 부속품/액세서리만 사용하세요.
- 번개 폭풍 시 또는 장기간 사용하지 않을 때는 기기의 플러그를 뽑아두세요.
- 모든 서비스는 자격을 갖춘 서비스 담당자에게 의뢰하십시오. 전원 코드나 플러그가 손상되었거나, 액체가 쏟아졌거나, 물체가 기기에 떨어졌거나, 기기가 비나 습기에 노출되었거나, 정상적으로 작동하지 않거나, 떨어졌을 때와 같이 기기가 어떤 식으로든 손상된 경우 서비스가 필요합니다.
3. 패키지 내용
아래 나열된 모든 품목이 패키지에 포함되어 있는지 확인해 주십시오.
- Soundsation MIOMIX 404FXM Mixer
- 전원 어댑터
- 사용자 설명서
4. 제품 특징
- 6-channel mixer with digital multi-effect processor.
- Integrated USB player/recorder supporting WAV, MP3, WMA, and FLAC formats.
- Wireless Bluetooth audio streaming.
- 4 Mic/Line channels with low-noise preamps and Combo connectors.
- Selectable Hi-Z inputs for guitars and other high-impedance instruments.
- +48V Phantom Power for condenser microphones.
- Peak indicators on input channels.
- 1 stereo line channel with 6.3mm jacks and +4/-10 dB pad adapter.
- 2-band EQ on channels 1-4.
- 24-bit/48 kHz digital effects processor with 16 presets (Reverb, Delay, Echo, Chorus, etc.) and TAP-Tempo function.
- USB player level control.
- 레벨 제어가 가능한 헤드폰 출력.
- XLR main outputs with volume control.
- Stereo VU Meter with 2 x 6 LED bars.
5. 컨트롤 및 기능
5.1 전면 패널 오버view

Image: Front panel of the Soundsation MIOMIX 404FXM mixer, showing all input channels, EQ controls, effect section, USB/Bluetooth media player, and main output controls.
Input Channels (MIC/INST 1-4)
- MIC/INST Input (Combo Jack): Connect XLR microphones or 1/4" instrument/line cables.
- +48V 팬텀 전원: Activates phantom power for condenser microphones. Use with caution.
- 하이 임피던스 스위치: Engages high impedance input for direct connection of guitars or basses.
- 게인 노브: 연결된 마이크 또는 악기의 입력 감도를 조절합니다.
- 하이 노브: Adjusts the high-frequency equalization (treble).
- 낮춤 조절 손잡이: Adjusts the low-frequency equalization (bass).
- FX 노브: Controls the amount of signal sent to the internal digital effects processor.
- 팬 손잡이: 채널의 스테레오 위치(좌/우)를 조정합니다.
- 볼륨 노브: Adjusts the output volume of the individual channel.
- PK (Peak) LED: 입력 신호가 너무 높을 때, 즉 클리핑이 발생할 가능성이 있을 때 점등됩니다.
Stereo Line Input (CH 5-6)
- L/Mono, R Inputs (1/4" Jacks): Connect stereo line-level devices (keyboards, CD players, DJ consoles, etc.). The L/Mono input can be used alone for a mono signal.
- +4/-10dB Switch: Adjusts input sensitivity for different line-level devices.
- 팬 손잡이: 채널의 스테레오 위치를 조정합니다.
- 볼륨 노브: Adjusts the output volume of the stereo channel.
- PK (Peak) LED: Illuminates when the input signal is too high.
USB & Bluetooth Media Player
- USB 포트: Connect a USB drive for playing audio files or recording.
- 디스플레이 화면: 현재 모드, 트랙 정보 및 설정을 표시합니다.
- Up/Rewind Button: Navigates up in menus or rewinds current track.
- Down/Forward Button: Navigates down in menus or fast-forwards current track.
- Play/Pause/Enter Button: Plays/pauses audio or confirms menu selections.
- 메뉴 버튼: Accesses media player menu options (BT streaming, music player, audio recorder, selection).
- MP3 PLAYER LVL Knob: Controls the output level of the USB/Bluetooth media player.
Digital Effects Processor (24-bit/48 kHz)
- 효과 표시: Shows the selected effect number and parameter values.
- 프로그램 노브: Rotates to select one of the 16 built-in digital effects. Press to confirm selection.
- 탭 템포 버튼: Tap multiple times to set the tempo for time-based effects (e.g., Delay).
- 레벨 노브: Adjusts the overall wet/dry mix of the effects.
Output & Monitoring Section
- PHONES Jack (1/4"): 모니터링을 위해 헤드폰을 연결하세요.
- PHONES LVL Knob: 헤드폰 출력 볼륨을 조절합니다.
- MAIN OUT L/R (XLR): Balanced XLR outputs for connecting to powered speakers, amplifier 또는 녹음 장치.
- MAIN OUT Knob: 메인 믹스의 전체 출력 볼륨을 조절합니다.
- VU 미터(LED): Displays the stereo output level of the main mix.
5.2 후면 패널 오버view
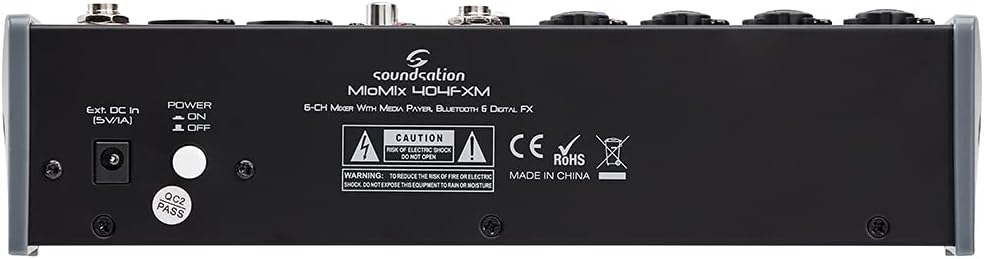
Image: Rear panel of the Soundsation MIOMIX 404FXM mixer, showing the power input, power switch, and main output connections.
- Ext. DC In (5V/1A): Power input for connecting the provided external power adapter.
- 전원 켜기/끄기 스위치: Turns the mixer's power on or off.
- REC OUT L/R (RCA): Unbalanced RCA outputs for connecting to recording devices.
6. 설정
- 믹서기 풀기: Carefully remove the MIOMIX 404FXM from its packaging.
- 놓기: 믹서를 안정적이고 평평한 표면에 놓고, 제품 주변에 충분한 환기가 이루어지도록 하십시오.
- 전원 연결: Ensure the mixer's POWER switch is in the OFF position. Connect the provided power adapter to the "Ext. DC In (5V/1A)" port on the rear panel, then plug the adapter into a suitable power outlet.
- 초기 전원 켜기: Flip the POWER switch to the ON position. The mixer's indicators should light up, and the display should activate.
- 출력 연결: Connect the MAIN OUT XLR outputs to your powered speakers, amplifier, or audio interface. Connect headphones to the PHONES jack for monitoring.
- 입력 단자 연결: Connect your microphones, instruments, and line-level devices to the appropriate input channels.
7. 사용 설명서
7.1 오디오 소스 연결
- 마이크: Connect dynamic microphones via XLR cables to the MIC/INST Combo jacks. For condenser microphones, connect via XLR and activate the +48V Phantom Power switch for the respective channel.
- Instruments (Guitars/Basses): Connect directly using a 1/4" TS cable to the MIC/INST Combo jack and engage the Hi-Z switch for that channel.
- Line-Level Devices (Keyboards, CD Players): Connect using 1/4" TS cables to the MIC/INST Combo jacks (for mono) or to the CH 5-6 L/Mono and R inputs (for stereo). Adjust the +4/-10dB switch on CH 5-6 as needed.
7.2 Adjusting Channel Levels and EQ
- Set all GAIN, VOL, and MAIN OUT knobs to their minimum positions before starting.
- Speak into the microphone or play your instrument. Slowly increase the GAIN knob for the respective channel until the PK LED flashes only occasionally during the loudest parts.
- Adjust the HIGH and LOW EQ knobs to shape the tone of your sound.
- Use the PAN knob to position the sound in the stereo field.
- Slowly increase the channel's VOL knob to blend it into the overall mix.
7.3 Using the USB Media Player/Recorder
- 재생: Insert a USB drive containing WAV, MP3, WMA, or FLAC files into the USB port. The display will show the file list. Use the Up/Down buttons to navigate and Play/Pause/Enter to select and play. Adjust the MP3 PLAYER LVL knob to control its volume in the mix.
- 녹음: In the media player menu (accessed via MENU button), select the 'Audio Recorder' function. Ensure your USB drive has enough free space. Press Play/Pause/Enter to start and stop recording. The mixer records the main stereo mix.
7.4 블루투스 연결
- Press the MENU button on the media player and select 'BT Streaming'. The display will show 'Bluetooth' and indicate it's searching.
- On your smartphone or Bluetooth device, search for available devices and select 'MIOMIX 404FXM'.
- Once paired, you can stream audio from your device to the mixer. Control the volume using your device and the MP3 PLAYER LVL knob on the mixer.
7.5 Applying Digital Effects
- Turn the FX knob on the desired input channel to send signal to the effects processor.
- Rotate the PROGRAM knob to browse through the 16 available effects. Press the PROGRAM knob to select an effect.
- Adjust the LEVEL knob in the FX section to control the overall amount of effect applied to the mix.
- For time-based effects, use the TAP TEMPO button to synchronize the effect to your music.
7.6 Monitoring and Main Output
- 헤드폰: Connect headphones to the PHONES jack and adjust the PHONES LVL knob for comfortable monitoring.
- 주요 출력 : Slowly increase the MAIN OUT knob to send the mixed audio to your connected speakers or amplifier. Monitor the VU Meter to ensure levels are not clipping (avoiding red LEDs).
8. 유지관리
- 청소: 믹서 표면을 닦을 때는 부드럽고 마른 천을 사용하십시오. 액체 세제나 용제를 사용하지 마십시오.
- 저장: 장기간 사용하지 않을 경우 믹서를 직사광선과 극한 온도 변화를 피해 서늘하고 건조한 곳에 보관하십시오.
- 통풍: 과열을 방지하려면 환기구가 막히지 않았는지 확인하세요.
9. 문제 해결
- 사운드 출력 없음:
- 모든 전원 연결을 확인하고 믹서가 켜져 있는지 확인하십시오.
- Verify that all channel VOL knobs, MAIN OUT knob, and PHONES LVL knob are turned up.
- Ensure your speakers/amp앰프의 전원이 켜져 있고 올바르게 연결되어 있습니다.
- Check input source connections and ensure GAIN knobs are set appropriately.
- 왜곡된 소리:
- Reduce the GAIN knob for the input channel.
- Check if the PK LED is constantly lit; if so, reduce the input level.
- Lower the MAIN OUT volume if the VU Meter is consistently in the red.
- 팬텀 전원이 작동하지 않음:
- Ensure the +48V switch is engaged for the specific channel.
- Verify that you are using an XLR cable, as phantom power is only supplied via XLR.
- 블루투스가 연결되지 않음:
- Ensure the mixer's media player is in 'BT Streaming' mode.
- Make sure your device's Bluetooth is enabled and it's searching for devices.
- 기기의 페어링을 해제한 후 다시 페어링해 보세요.
- USB Playback/Recording Issues:
- Ensure the USB drive is formatted correctly (FAT32 is generally recommended).
- 오디오를 확인하세요. files are in a supported format (WAV, MP3, WMA, FLAC).
- For recording, ensure the USB drive has sufficient free space.
10. 사양
| 특징 | 사양 |
|---|---|
| 제조업체 | 사운드세이션 |
| 모델 번호 | E923E |
| 채널 수 | 6 |
| 품목 무게 | 1900그램 |
| 연결 기술 | USB, 블루투스 |
| 전원 | 전기 케이블 |
| 출력 커넥터 유형 | XLR |
| 오디오 입력 | XLR, 1/4" 잭 |
| 권tage | 48볼트(팬텀 전원) |
| 디지털 효과 | 16 Presets, 24-bit/48 kHz |
| 지원되는 USB 오디오 형식 | WAV, MP3, WMA, FLAC |
11. 보증 및 지원
Soundsation products are designed and manufactured to the highest quality standards. For information regarding warranty coverage, service, or technical support, please refer to the warranty card included with your product or visit the official Soundsation web사이트. 보증 청구에 대비해 구매 증빙 자료로 구매 영수증을 보관하세요.

