
1. 서론
This manual provides detailed instructions for the setup, operation, and maintenance of your Waveshare 7.9-inch Capacitive Touch Screen LCD Monitor. This display features a 400x1280 hardware resolution, IPS panel, and capacitive touch control, making it suitable for various applications including Raspberry Pi, Jetson Nano, and PC systems.

이미지 1: 앞면 view of the Waveshare 7.9-inch Capacitive Touch Screen LCD Monitor.
2. 특징
- 7.9-inch IPS LCD screen with a hardware resolution of 400x1280 pixels.
- Capacitive touch control for intuitive interaction.
- Supports Raspbian, Ubuntu, Kali, and Retropie with Raspberry Pi (driver-free).
- Functions as a computer monitor with Windows 10/8.1/8/7, offering five-point touch (driver-free).
- Includes 3.5mm audio jack for HDMI audio output.
- Toughened glass cover for enhanced durability.
3. 패키지 내용
아래 나열된 모든 품목이 패키지에 포함되어 있는지 확인하세요.
- 7.9inch HDMI LCD x1
- HDMI 케이블 x1
- USB A to MicroB cable x1
- HDMI Adapter (B) x1
- USB Adapter (B) x1
- HDMI Adapter (C) x1
- USB Adapter (C) x1
- 나사 팩 x1
4. 사양
| 사양 | 값 |
|---|---|
| 상표 | 웨이브셰어 |
| 화면 크기 | 7.9 인치 |
| 화면 표면 설명 | 광택있는 |
| 특징 | 터치스크린 |
| 연결 기술 | HDMI, USB |
| Screen Finish | 광택있는 |
| 모델 번호 | 7.9inch HDMI LCD |
| 한국어: | 761722109180 |
| 제조업체 | 탑1 |
| HDMI 포트 총 개수 | 1 |
| 총 USB 포트 | 1 |
| 추가 기능 | 터치스크린 |
| 장착 유형 | 벽걸이형 |
| 품목 무게 | 0.38 킬로그램 |
| 네이티브 해상도 | 1280 x 800 pixels (Note: Default is 400x1280 portrait) |
| 하드웨어 연결 | HDMI, USB |
5. 시스템 호환성
The Waveshare 7.9-inch LCD monitor offers broad compatibility:
- 라즈베리 파이: Supports Raspbian (5-point touch, driver-free), Ubuntu/Kali/WIN10 IoT (single-point touch, driver-free), and Retropie (driver-free). Compatible with all versions of Raspberry Pi.
- 젯슨 나노: 우분투 운영체제를 지원합니다(싱글포인트 터치, 드라이버 설치 필요 없음).
- PC: Supports Windows 10/8.1/8/7 (5-point touch, driver-free).
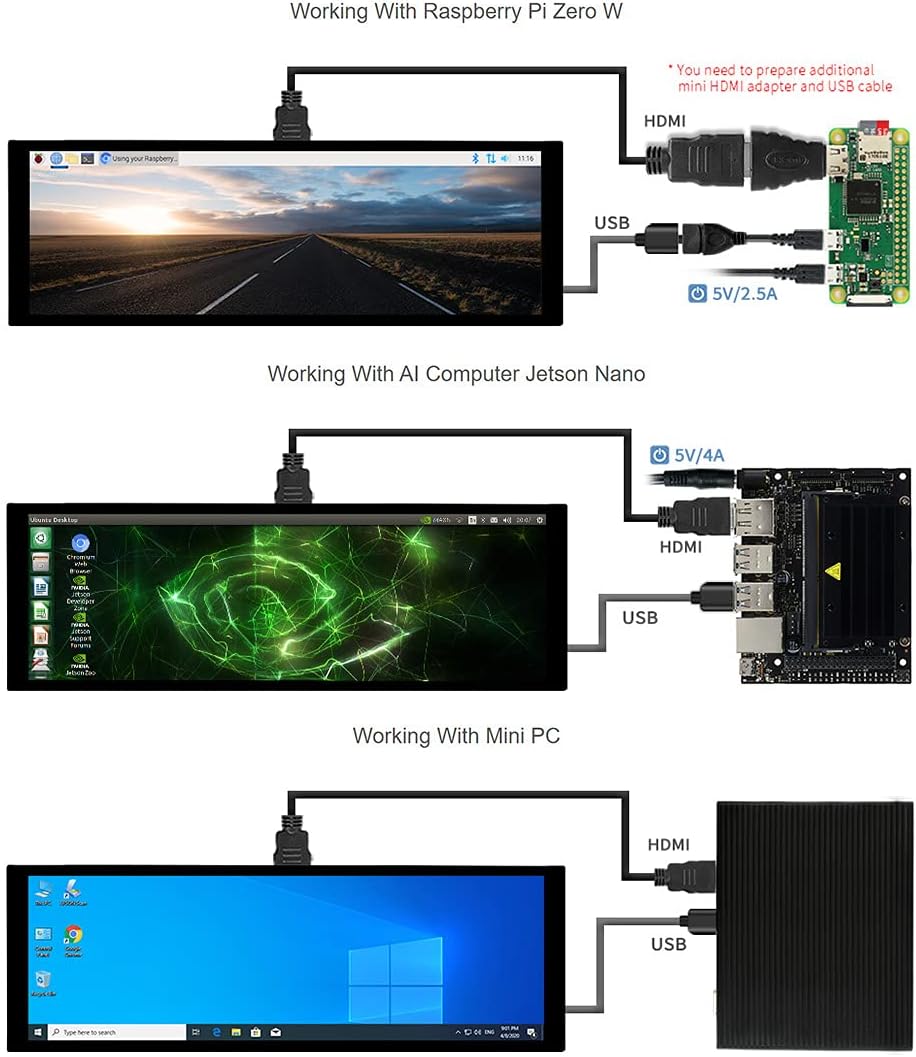
이미지 2: 연결 예amples for Raspberry Pi Zero W, Jetson Nano, and Mini PC.
6. 설정 지침
Follow these steps to set up your Waveshare 7.9-inch LCD monitor:
- 물리적 연결:
- Connect the display to your host device (Raspberry Pi, Jetson Nano, or PC) using the provided HDMI cable for video output.
- Connect the display to your host device using the provided USB A to MicroB cable for touch functionality and power. Ensure the USB connection provides sufficient power.
- For Raspberry Pi, use the appropriate HDMI and USB adapters (B or C) as needed for your specific Pi model.
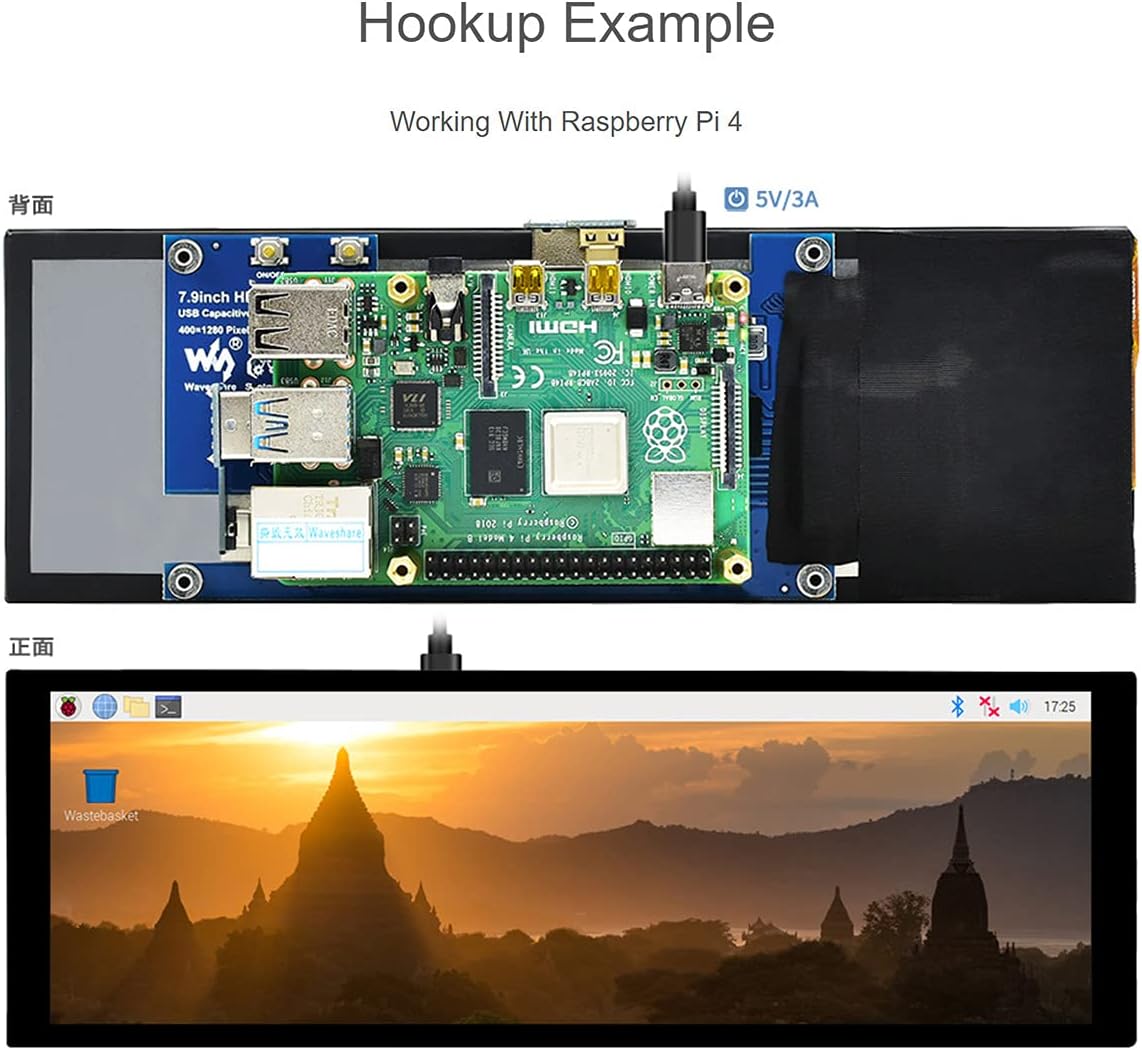
이미지 3: Example of connecting the display to a Raspberry Pi 4.
- 전원 켜기: Once connected, power on your host device. The display should automatically turn on and show the output.
- 드라이버 설치(필요한 경우): For most supported systems (Raspberry Pi, Jetson Nano, Windows), the display and touch functions are driver-free. If you encounter issues, refer to the Waveshare official documentation for specific driver or configuration details for your operating system.
The back of the display features various ports and controls:

이미지 4: 후면 view of the display highlighting the HDMI port, USB touch/power port, audio jack, and control buttons.

Image 5: Labeled diagram of the display's ports and buttons, including On/Off & Brightness Adjustment, Rotate Touch Orientation, Audio Jack, HDMI Port, Power Port, and Touch Port.
7. 운영
The display offers capacitive touch control and adjustable orientation.
- 터치 컨트롤: The display supports capacitive touch. For Windows, it supports five-point touch. For Raspberry Pi and Jetson Nano, it typically supports single-point touch, with Raspbian supporting five-point touch.
- 오디오 출력: The display supports HDMI audio output via its 3.5mm audio jack.

Image 6: Visual representation of the 170-degree IPS viewing angle and capacitive touch capabilities.
Video 1: Demonstration of the 7.9-inch Capacitive Touch Screen LCD in use with Raspberry Pi and Jetson Nano, showcasing touch functionality and display features.
8. Display Orientation Configuration
The display orientation is portrait by default (400x1280 HxV). To change to landscape mode, you will need to modify the software configuration on your host device. Refer to the operating system's documentation or Waveshare's official wiki for specific instructions on how to adjust display orientation for your system (e.g., editing config.txt for Raspberry Pi).
The touch orientation can be adjusted using a physical button on the display's control board, as indicated in Image 5.
9. 문제 해결
- 디스플레이 없음: Ensure both HDMI and USB cables are securely connected. Verify the host device is powered on and outputting video. Try a different HDMI port or cable if available.
- 터치 없이 작동하는 기능: Confirm the USB cable is connected to both the display and the host device. Ensure the host device's operating system supports touch input and that no conflicting drivers are installed.
- 화면 방향이 잘못되었습니다: Adjust the software configuration on your host device for display orientation. Use the physical button on the display to rotate touch orientation if needed.
- 화면 깜빡임: Check power supply to both the display and the host device. Ensure cables are not damaged.
10. 보증 및 지원
보증 정보, 기술 지원 또는 기타 문의 사항은 Waveshare 공식 웹사이트를 참조하십시오. web사이트를 방문하거나 고객 서비스에 직접 문의하세요. 보증 청구를 위해 구매 영수증을 보관하세요.