
마운트업 MU0034
MOUNTUP MU0034 싱글 모니터 데스크 마운트 사용 설명서
상표: MOUNTUP | 모델: 무크 녹스
1. 서론
This manual provides detailed instructions for the installation, operation, and maintenance of your MOUNTUP MU0034 Single Monitor Desk Mount. Please read this manual thoroughly before installation to ensure correct setup and safe operation. This monitor mount is designed to enhance your workspace ergonomics by providing adjustable positioning for a single monitor.
2. 안전 정보
- 설치하기 전에 모든 구성품이 있는지, 손상되지 않았는지 확인하십시오. 부품이 누락되었거나 결함이 있는 경우 사용하지 마십시오.
- This product is intended for monitors weighing up to 17.6 lbs (8 kg) and screen sizes from 17 to 32 inches. Do not exceed the maximum weight capacity.
- Compatible VESA patterns are 75x75mm and 100x100mm. Verify your monitor's VESA pattern before proceeding.
- Ensure the desk surface is stable and strong enough to support the combined weight of the mount and monitor.
- 모든 나사를 단단히 조이되, 나사산이 마모되거나 부품이 손상되지 않도록 너무 세게 조이지 마십시오.
- 설치하는 동안 어린이와 애완동물이 접근하지 못하도록 하세요.
- 설치 과정에 대해 궁금한 점이 있으면 자격을 갖춘 전문가에게 문의하십시오.
3. 패키지 내용
패키지에 모든 부품이 포함되어 있는지 확인해 주십시오.
- 모니터 암 어셈블리
- 데스크 Clamp 베이스
- 그로밋 베이스 구성 요소
- VESA 플레이트
- 하드웨어 키트(나사, 와셔, 육각 렌치)
- 사용 설명서
4. 사양
| 특징 | 사양 |
|---|---|
| 모델 번호 | 무크 녹스 |
| 재료 | 광택 알루미늄 |
| 화면 크기 호환성 | 17" to 32" (flat or curved) |
| 중량 용량 | 최대 17.6kg(8파운드) |
| VESA 호환성 | 75x75mm, 100x100mm |
| 높이 조정 | Up to 11" (16.3" total height adjustment range) |
| 기울기 범위 | +45° ~ -45° |
| 스위블 범위 | 360° (arm), 180° (monitor plate) |
| 회전 | 360° (가로에서 세로로) |
| Max Desk Thickness (C-clamp) | 3.35인치 |
| 그로밋 구멍 직경 | 0.39인치 - 3.1인치 |
5. 설정 및 설치
The MOUNTUP MU0034 offers two installation options: C-clamp mounting and Grommet mounting. Choose the method suitable for your desk.
5.1. C-Clamp 설치
This method is for desks without existing grommet holes, or if you prefer clamping to the edge of your desk. Ensure your desk thickness is no more than 3.35 inches.
- C-cl을 부착하세요amp: C-cl을 조립하세요amp components to the base of the monitor arm. Position the base on the edge of your desk and tighten the clamp screw until it is secure.
- 모니터에 VESA 플레이트 부착: Secure the VESA plate to the back of your monitor using the appropriate screws from the hardware kit. Ensure the screws are tightened securely.
- Slide Monitor onto Arm: Carefully slide the monitor (with the attached VESA plate) onto the monitor arm's VESA head. Ensure it clicks into place or is secured with the provided locking mechanism.
- 장력 조절: Refer to Section 6.1 for adjusting the gas spring tension to match your monitor's weight.

Figure 1: Illustration of C-clamp 및 그로밋 장착 옵션. C-clamp is shown securing the mount to the desk edge, while the grommet mount uses a desk hole.
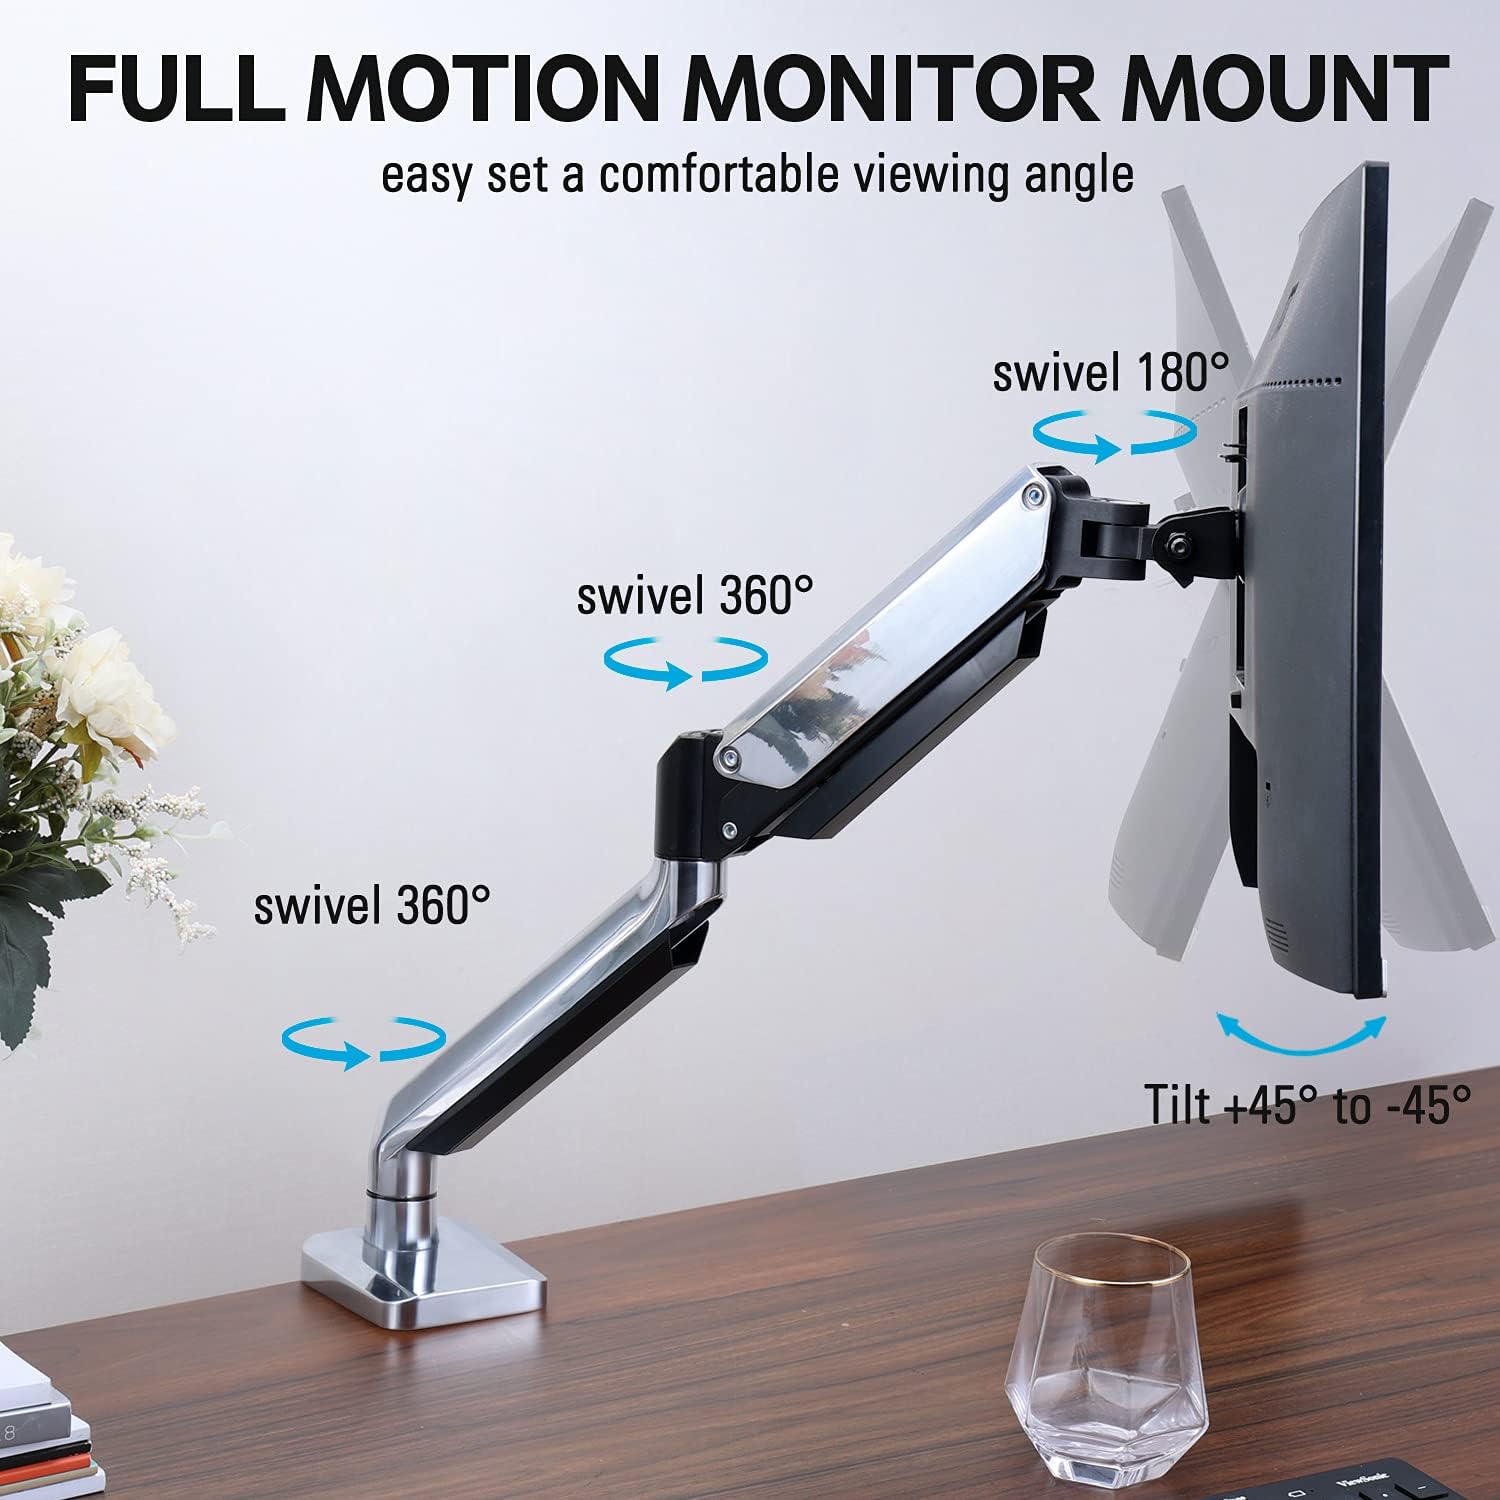
Figure 2: The removable VESA plate being attached to the back of a monitor, then sliding onto the monitor arm for easier installation.
5.2. 그로밋 장착
This method utilizes an existing hole in your desk. Ensure your desk thickness is no more than 3.35 inches and the grommet hole diameter is between 0.39 and 3.1 inches.
- 그로밋 베이스 조립: Insert the grommet base components through the desk hole and secure them from underneath the desk using the provided plate and nut.
- 모니터에 VESA 플레이트 부착: Secure the VESA plate to the back of your monitor using the appropriate screws from the hardware kit. Ensure the screws are tightened securely.
- Slide Monitor onto Arm: Carefully slide the monitor (with the attached VESA plate) onto the monitor arm's VESA head. Ensure it clicks into place or is secured with the provided locking mechanism.
- 장력 조절: Refer to Section 6.1 for adjusting the gas spring tension to match your monitor's weight.
6. 운영 및 조정
The MOUNTUP MU0034 monitor arm offers various adjustments for optimal view편안함을.
6.1. 가스 스프링 장력 조절
The gas spring tension needs to be adjusted to match the weight of your monitor. This ensures the monitor stays in position once adjusted.
- If the monitor drifts down, turn the adjustment screw (usually located on the arm joint) clockwise ("+") to increase tension.
- If the monitor floats up, turn the adjustment screw counter-clockwise ("-") to decrease tension.
- Adjust gradually until the monitor remains stable at any height.
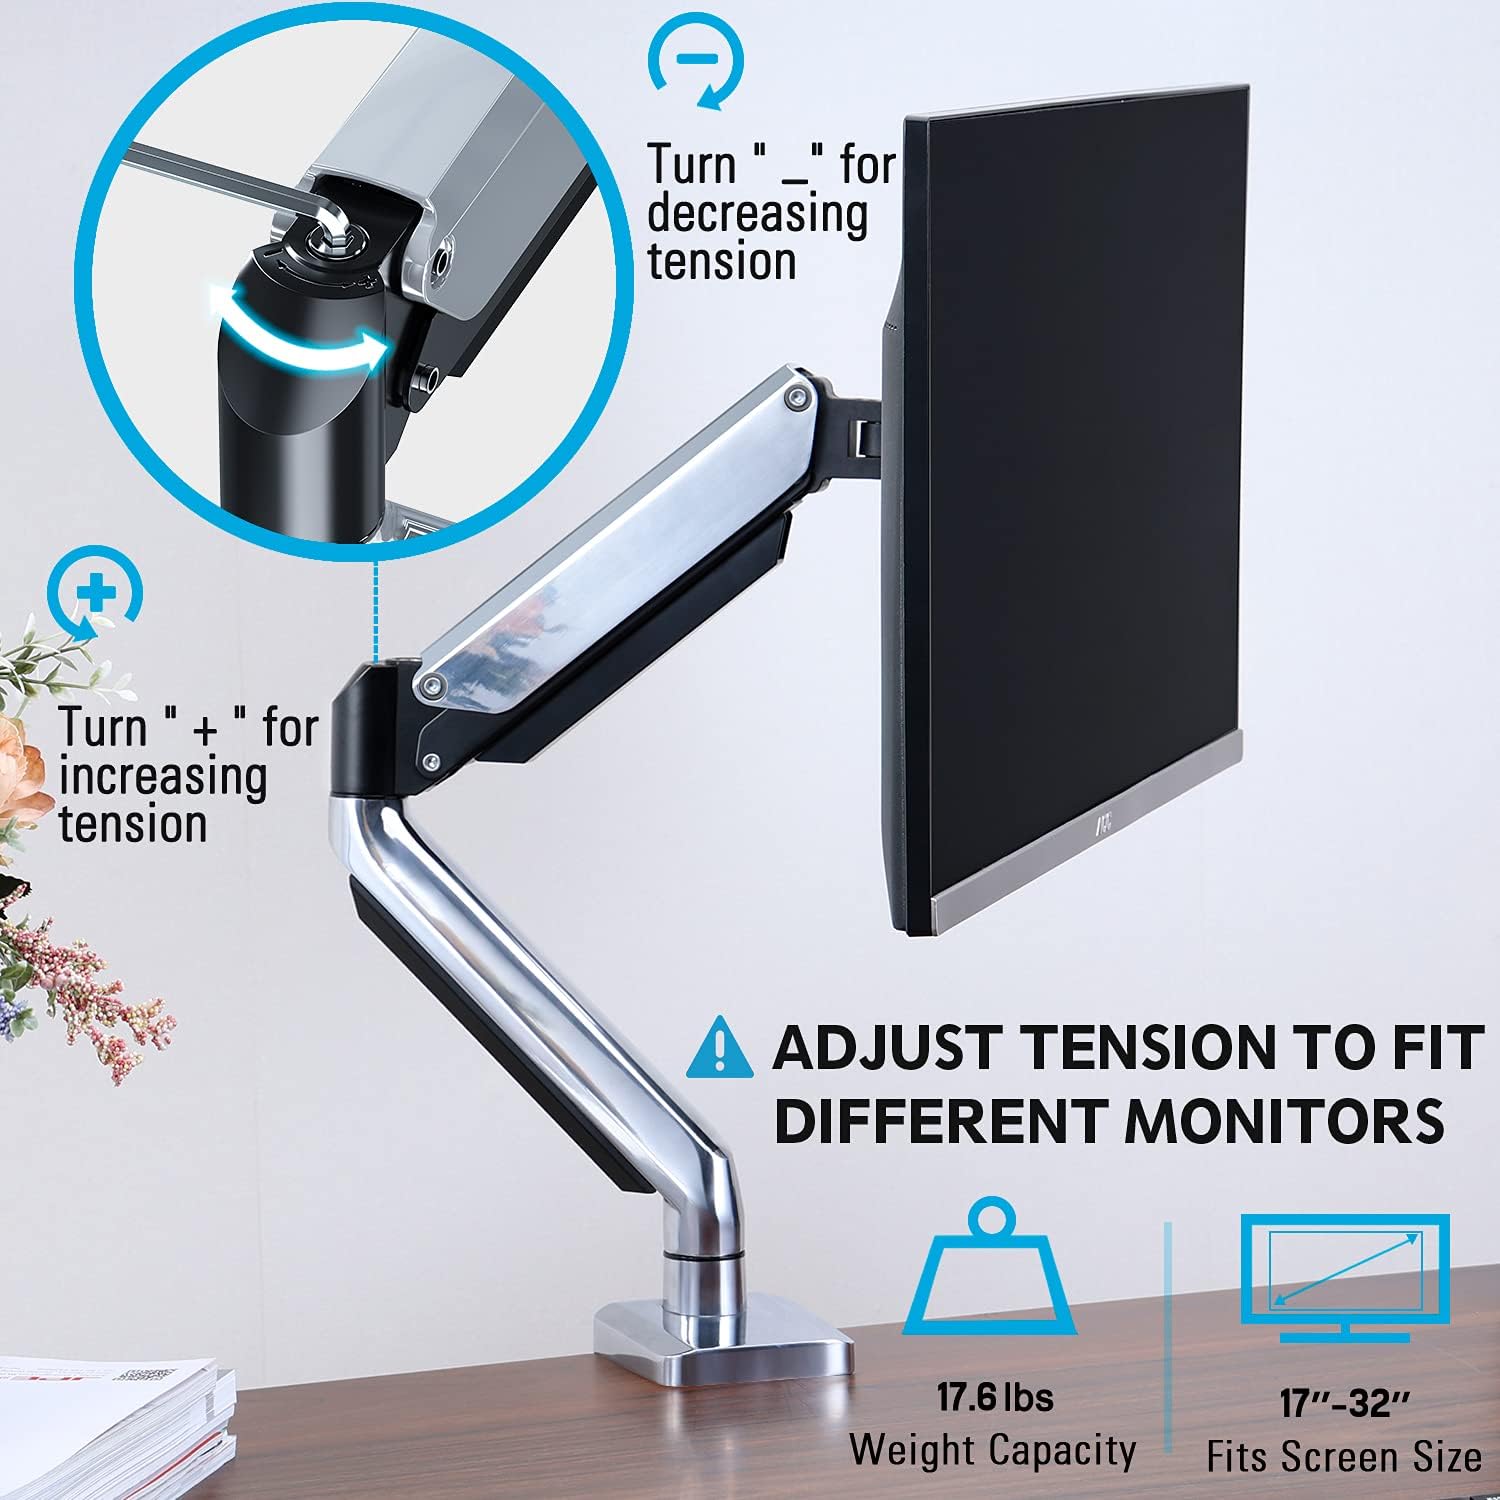
Figure 3: Instructions for adjusting the gas spring tension using an Allen key. Turning clockwise increases tension, counter-clockwise decreases it.
6.2. 높이 조절
Once the gas spring tension is correctly set, you can easily raise or lower your monitor to your desired ergonomic height. The arm allows for up to 11 inches of vertical adjustment.

Figure 4: Diagram illustrating the maximum height adjustment of 11 inches and maximum extension of 17.5 inches.
6.3. Tilt, Swivel, and Rotation
The monitor arm provides full motion capabilities:
- 경사: Adjust the monitor screen +45° to -45° to reduce glare or find a comfortable view잉 각도.
- 받침: The arm can swivel 360° at the base and 360° at the middle joint. The monitor plate itself can swivel 180°. This allows for easy screen sharing or repositioning.
- 회전: 모니터를 360° 회전하여 가로 모드와 세로 모드를 전환하세요.

Figure 5: Visual representation of the monitor arm's full motion capabilities, including 360° swivel, 180° swivel at the monitor plate, and +45° to -45° tilt.

Figure 6: An image demonstrating the monitor's ability to rotate 360 degrees, allowing for both landscape and portrait view잉 모드.
7. 케이블 관리
The MOUNTUP MU0034 features integrated cable management to keep your workspace tidy.
- 모니터 케이블(전원, 비디오 등)은 암의 아랫면을 따라 정리하십시오.
- Use the provided cable clips or covers to secure the cables within the arm channels.
- 케이블에 충분한 여유를 두어 장력 없이 완전한 동작 범위를 확보하십시오.

Figure 7: Illustration of how cables are routed and organized through the integrated channels on the monitor arm, keeping the desk clear.
8. 유지관리
- 모든 나사와 연결부를 정기적으로 점검하여 단단히 고정되어 있는지 확인하세요.
- 마운트를 부드러운 천으로 닦으십시오.amp 천으로 닦으세요. 연마성 세제나 용제는 사용하지 마세요.
- 가스 스프링 메커니즘에 윤활유를 바르지 마십시오.
9. 문제 해결
| 문제 | 가능한 원인 | 해결책 |
|---|---|---|
| Monitor sags or won't stay up | 가스 스프링 장력이 모니터 무게에 비해 너무 낮습니다. | Increase gas spring tension by turning the adjustment screw clockwise ("+"). |
| Monitor floats up or is hard to push down | 가스 스프링 장력이 모니터 무게에 비해 너무 높습니다. | Decrease gas spring tension by turning the adjustment screw counter-clockwise ("-"). |
| Monitor is wobbly | Mount not securely fastened to desk or VESA plate not tight. | 모든 클립을 확인하고 조여주세요.amp/grommet screws and VESA plate screws. |
| Difficulty rotating/tilting monitor | 관절이 너무 뻑뻑해요. | Loosen the corresponding joint screws slightly (do not remove). |
10. 보증 및 지원
The MOUNTUP MU0034 Single Monitor Desk Mount is backed by a 3-year support period. For technical assistance, missing parts, or warranty claims, please contact MOUNTUP customer support through their official channels or the retailer where the product was purchased.
보증을 위해 구매 증빙서류를 보관하세요.
관련 문서무크 녹스


Ask a question about this manual
Ask about setup, troubleshooting, compatibility, parts, safety, or missing instructions. Manuals+ will review the question and use this page’s manual context to help answer it.