ASUS TUF GAMING B560M-PLUS WIFI
ASUS TUF Gaming B560M-PLUS WiFi 메인보드 사용 설명서
Model: TUF GAMING B560M-PLUS WIFI | Brand: ASUS
1. 서론
This manual provides comprehensive instructions for the installation, operation, and maintenance of your ASUS TUF Gaming B560M-PLUS WiFi Motherboard. Please read this manual thoroughly before using the product to ensure proper setup and optimal performance. This motherboard is designed for 24/7 unparalleled performance with upgraded power delivery and comprehensive cooling options to fuel the latest Intel 11th gen CPUs. It also provides faster memory and storage.
2. 제품 오버view
The ASUS TUF Gaming B560M-PLUS WiFi is a Micro ATX gaming motherboard featuring the LGA1200 socket, supporting Intel 11th/10th Gen processors. It includes PCIe 4.0 support, dual M.2 slots, 8+1 power stages, 2.5Gb LAN, and WiFi 6 connectivity.

그림 2.1: 위에서 아래로 view of the ASUS TUF Gaming B560M-PLUS WiFi Motherboard, showcasing the CPU socket, RAM slots, PCIe slots, and various headers.
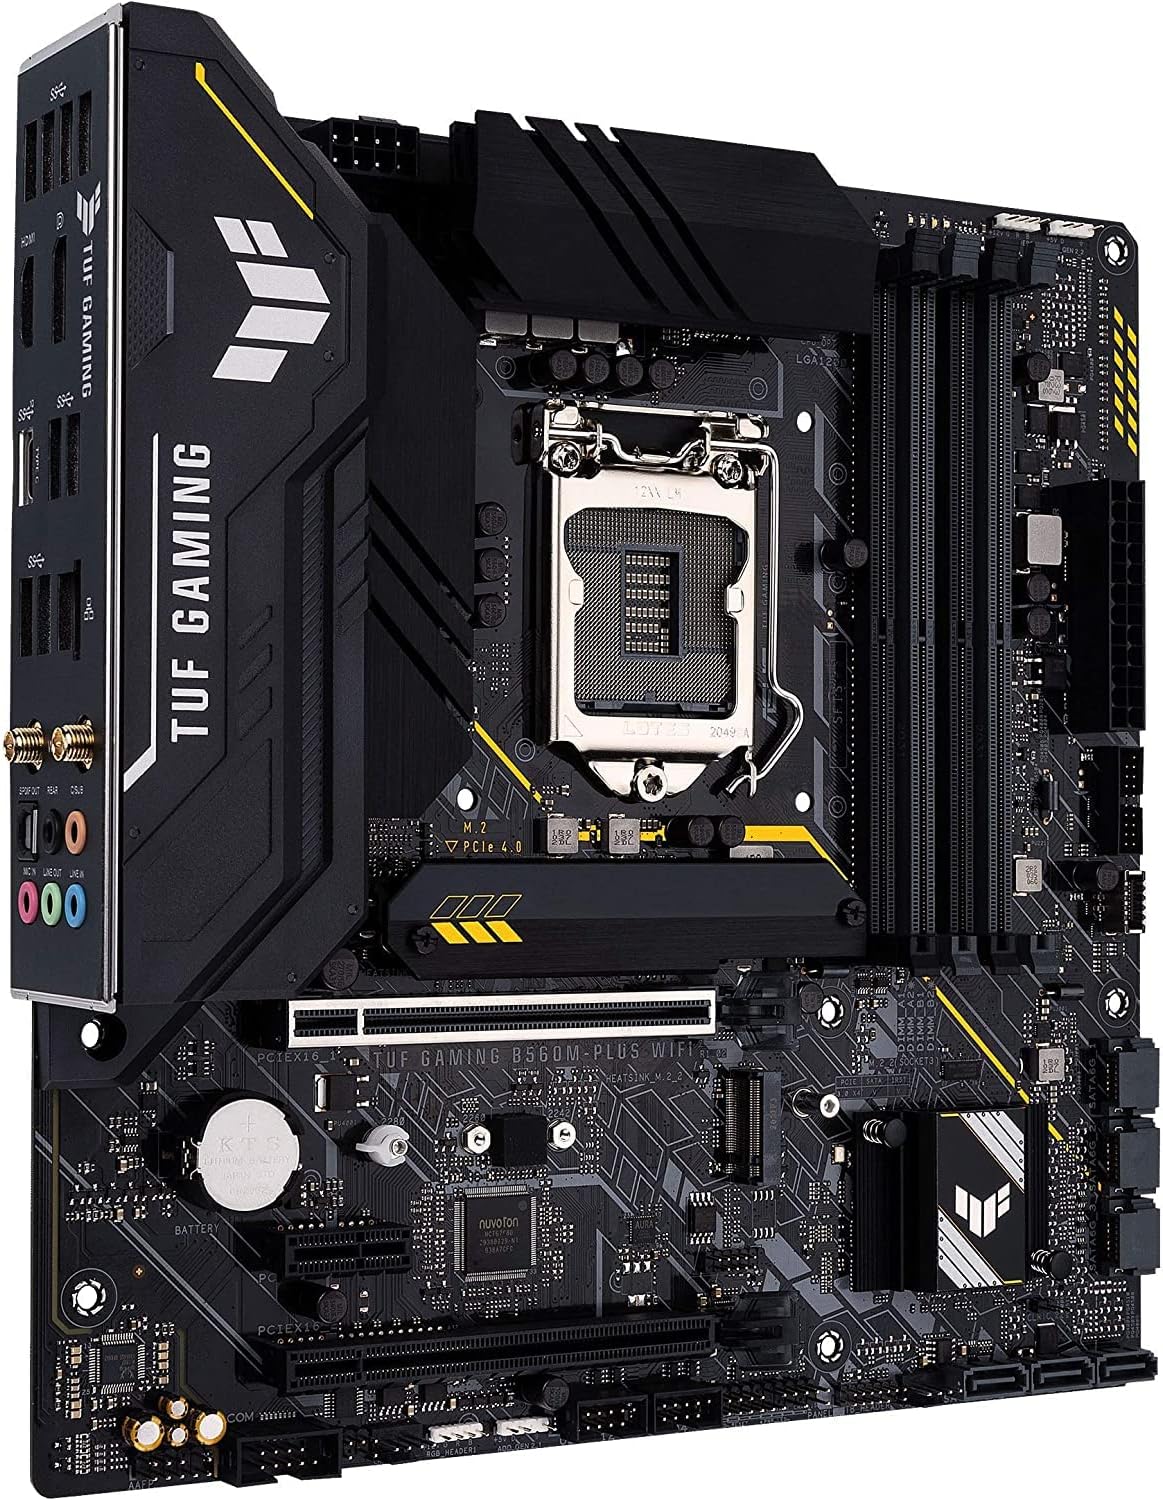
그림 2.2: 각진 view of the motherboard, highlighting the I/O shield, VRM heatsinks, and the overall compact Micro ATX form factor.

그림 2.3: A different angled perspective of the motherboard, showing the M.2 slots and the chipset heatsink.

그림 2.4: Close-up of the rear I/O panel, detailing the USB ports, HDMI, DisplayPort, Ethernet, Wi-Fi antenna connectors, and audio jacks.
3. 주요 특징
- 인텔 LGA 1200 소켓: 11세대 인텔 코어 프로세서를 지원합니다.
- 향상된 전력 솔루션: 8+1 power stages, 6-layer PCB, ProCool socket, and durable capacitors for stable power delivery.
- 종합 냉각: VRM heatsink, flexible M.2 heatsink, PCH heatsink, hybrid fan headers and Fan Xpert 2+.
- Next-gen connectivity: PCIe 4.0, Realtek 2.5Gb Ethernet, Intel Wi-Fi 6, rear USB 3.2 Gen 2, front USB 3.2 Gen 1 Type-C and Thunderbolt 4 support.
- 양방향 AI 노이즈 제거: Reduce background noise from the microphone and audio output for crystal-clear communication in games or video conferences.
4. 설정 및 설치
Proper installation is crucial for the stability and performance of your system. Always ensure your power supply is disconnected before handling components.
4.1. 설치 전 체크리스트
- Ensure you have a compatible CPU (Intel 10th or 11th Gen LGA1200).
- Gather necessary tools: Phillips-head screwdriver, anti-static wrist strap.
- Prepare your PC case and power supply.
4.2. 마더보드 설치
- Install the CPU into the LGA1200 socket, aligning the triangular markers. Secure the retention arm.
- CPU에 써멀 페이스트를 바르고 CPU 쿨러를 설치하세요.
- Install DDR4 RAM modules into the DIMM slots, ensuring they click into place. Refer to the motherboard manual for preferred slot configuration for dual-channel memory.
- Mount the motherboard into the PC case using standoffs and screws.
- 전원 공급 장치의 24핀 ATX 전원 커넥터와 8핀 CPU 전원 커넥터를 마더보드에 연결합니다.
- Install M.2 SSDs into the M.2 slots and secure them.
- Install your graphics card into the primary PCIe x16 slot.
- Connect front panel headers (power button, reset button, USB, audio) according to the motherboard's pinout diagram.
- Connect SATA drives (if any) to the SATA ports.
- 케이스 팬을 팬 헤더에 연결하세요.
5. 메인보드 작동 (BIOS/UEFI)
The BIOS (Basic Input/Output System) or UEFI (Unified Extensible Firmware Interface) is the first software that runs when you power on your computer. It initializes hardware components and loads the operating system.
5.1. BIOS/UEFI 접근
BIOS/UEFI 설정 유틸리티를 시작하려면 다음을 누르세요. 삭제 키 또는 F2 key during the Power-On Self-Test (POST) phase, immediately after turning on your computer.
5.2. Key BIOS/UEFI Settings
- 부팅 순서: Configure the sequence in which the system attempts to boot from storage devices.
- XMP 프로file: 익스트림 메모리 프로를 활성화하세요file for optimal RAM performance.
- 팬 제어: Adjust fan speeds and curves for optimal cooling and noise levels.
- 저장소 구성: Set SATA mode (AHCI, RAID) and manage M.2 devices.
- 펌웨어 업데이트 : Update the BIOS/UEFI firmware for improved compatibility and performance. Refer to the ASUS support website for the latest firmware and update procedures.
6. 유지관리
정기적인 유지보수는 마더보드의 수명을 연장하고 안정적인 작동을 보장하는 데 도움이 됩니다.
- 먼지 제거: 주기적으로 압축 공기를 사용하여 마더보드와 구성 요소의 먼지를 제거하십시오. 시스템 전원을 끄고 전원 케이블을 뽑은 상태여야 합니다.
- BIOS/UEFI 업데이트: Keep your BIOS/UEFI firmware updated to the latest version from the official ASUS web사이트 호환성 및 성능 향상을 위해 테스트합니다.
- 드라이버 업데이트 : Install the latest drivers for your motherboard's chipset, LAN, Wi-Fi, and audio from the ASUS support page.
- 케이블 관리 : Ensure internal cables are neatly routed to improve airflow and prevent obstruction.
7. 문제 해결
이 섹션에서는 마더보드에서 발생할 수 있는 일반적인 문제에 대해 설명합니다.
7.1. 전원 없음 / 부팅 안 됨
- 전원 연결 확인: 24핀 ATX와 8핀 CPU 전원 케이블이 마더보드와 전원 공급 장치에 단단히 연결되어 있는지 확인하세요.
- PSU 확인: Test the power supply unit (PSU) with another system or a PSU tester.
- 구성 요소 재장착: Reseat RAM modules, graphics card, and CPU.
- CMOS 지우기: 잘못된 BIOS 설정으로 인해 발생하는 부팅 문제를 해결할 수 있는 CMOS를 지우는 방법에 대한 지침은 마더보드 설명서를 참조하세요.
7.2. 시스템 불안정성/충돌
- 온도 확인: CPU와 GPU 온도를 모니터링하여 안전한 작동 범위 내에 있는지 확인하십시오. 과열은 시스템 불안정을 초래할 수 있습니다.
- 기억력 테스트: Run a memory diagnostic tool (e.g., MemTest86) to check for RAM errors.
- 드라이버 문제: Ensure all drivers are up-to-date and correctly installed.
- BIOS/UEFI 설정: Reset BIOS/UEFI to default settings if you have made recent changes.
7.3. 주변 장치가 감지되지 않음
- 연결 확인: 주변기기가 올바른 포트에 제대로 연결되었는지 확인하십시오.
- 드라이버 설치: 주변기기에 필요한 드라이버를 설치하십시오.
- BIOS/UEFI 설정: Check if the port or controller for the peripheral is enabled in the BIOS/UEFI.
8. 사양
| 범주 | 사양 |
|---|---|
| 상표 | 아수스 |
| 시리즈 | TUF 게이밍 B560M-PLUS WIFI |
| 모델 번호 | TUF 게이밍 B560M-PLUS WIFI |
| CPU 소켓 | LGA 1200 |
| 호환 프로세서 | Intel 11th Gen / 10th Gen Core Processors, Intel Celeron |
| 칩셋 유형 | 인텔 B560 |
| RAM 메모리 기술 | DDR4 |
| 메모리 속도 | 최대 5000MHz(OC) |
| 메모리 저장 용량(최대) | 128GB (XNUMX기가바이트) |
| 무선형 | 802.11a/b/g/n/ac, 802.11ax(와이파이 6) |
| 제품 크기(LxWxH) | 10.83 x 10.83 x 2.66 인치 |
| 품목 무게 | 1.32파운드 |
| 첫 번째 이용 가능 날짜 | 8년 2021월 XNUMX일 |
9. 보증 및 지원
For warranty information, technical support, and the latest drivers and BIOS updates, please visit the official ASUS support website. You can also refer to the official user guides for more detailed information.
- ASUS 공식 지원: ASUS Official Support Page
- 사용자 매뉴얼(PDF): 사용자 설명서 다운로드
- 사용자 가이드(PDF): 사용자 가이드 다운로드
For further assistance, please contact ASUS customer service.
Ask a question about this manual
Ask about setup, troubleshooting, compatibility, parts, safety, or missing instructions. Manuals+ will review the question and use this page’s manual context to help answer it.