
1. 서론
Thank you for choosing the XTUGA AM6 4/6-Channel Audio Mixer. This professional mixing console is designed for a variety of audio applications, including home music production, live webcasting, and karaoke (K-song). It features Bluetooth connectivity, USB recording capabilities, 48V phantom power for condenser microphones, and integrated effects. Please read this manual thoroughly to understand the mixer's functions and ensure optimal performance.
2. 패키지 내용
다음 품목이 패키지에 포함되어 있는지 확인하세요.
- 1 x XTUGA AM6 Audio Mixer
- 1 x USB 케이블
- 전원 어댑터/충전기 1개
- 1 x 사용자 설명서
3. 제품 특징
The XTUGA AM6 mixer offers a range of features to enhance your audio experience:
- 4-Channel/6-Channel Mixing Console: Features two mono channels and one stereo tape channel.
- USB Recording & Playback: Direct recording to USB or computer, and playback of MP3, FLAC, etc.
- 블루투스 연결: Wireless connection for mobile devices within 4-8 meters (without obstruction).
- 48V 팬텀 파워: Integrated phantom power for condenser microphones.
- Built-in Effects Processor: Includes Delay and Repeat effects.
- Sound Card Function: Acts as an external sound card when connected to a computer via USB.
- 저소음 설계: Ensures clear audio on all microphone inputs.
- 조정 가능한 컨트롤: Gain, 2-band EQ (high/low), signal level, main output, headphone volume, and effect parameters.
- Dedicated Headphone Output: With independent volume control for monitoring.
- 다중 입력 옵션: Supports 6.5mm phone type and RCA type connectors for line-level instruments.
- 소형 및 휴대성: Can be powered directly via PC USB, mobile power bank, or AC/DC adapter.
4. 설정
4.1 전원 연결
Connect the provided power adapter to the mixer's power input and then to a suitable power outlet. Alternatively, the mixer can be powered via a USB connection to a computer or a mobile power bank.
4.2 입력 연결
오디오 소스를 해당 입력 채널에 연결하세요.
- 마이크: Use XLR (card head) or 6.5mm jack connectors for microphone inputs. For condenser microphones requiring phantom power, ensure the 48V phantom power is activated (see Section 5.2).
- 라인 레벨 계측기: Use 6.5mm phone type or RCA type connectors for instruments like electronic keyboards or other audio equipment.

4.3 출력 연결
- 주요 출력 : Connect the main output (L/R) to your amp앰프, 파워드 스피커 또는 레코딩 인터페이스.
- 헤드폰 출력: Connect your headphones to the dedicated headphone jack for monitoring. Adjust the headphone volume using its dedicated control.
5. 사용 설명서
5.1 기본 오디오 믹싱
Each input channel features controls for gain, high/low EQ, and signal level. Adjust these to achieve the desired sound for each input. Use the main output level control to set the overall volume.
5.2 48V 팬텀 전원
To use condenser microphones, activate the 48V phantom power. Locate the 48V switch on the mixer and press it. Ensure condenser microphones are connected before activating phantom power to prevent damage to other equipment.

5.3 블루투스 연결
블루투스를 통해 모바일 기기를 연결하려면:
- 믹서의 전원이 켜져 있는지 확인하십시오.
- Switch the MP3 function to BT (Bluetooth) mode. The display will indicate Bluetooth pairing mode.
- On your mobile device, search for available Bluetooth devices and select "XTUGA AM6" (or similar name).
- Once connected, you can stream audio wirelessly from your device to the mixer.

5.4 USB 녹음 및 재생
5.4.1 컴퓨터에 녹음하기
The mixer can function as a sound card for your computer:
- 제공된 USB 케이블을 사용하여 믹서를 컴퓨터에 연결하십시오.
- Switch the mixer's MP3 function to PC mode. The display will show "PC".
- On your computer, select the mixer as the audio input/output device in your recording software (e.g., GoldWave).
- You can now record audio from the mixer to your computer and play background music from your computer through the mixer.


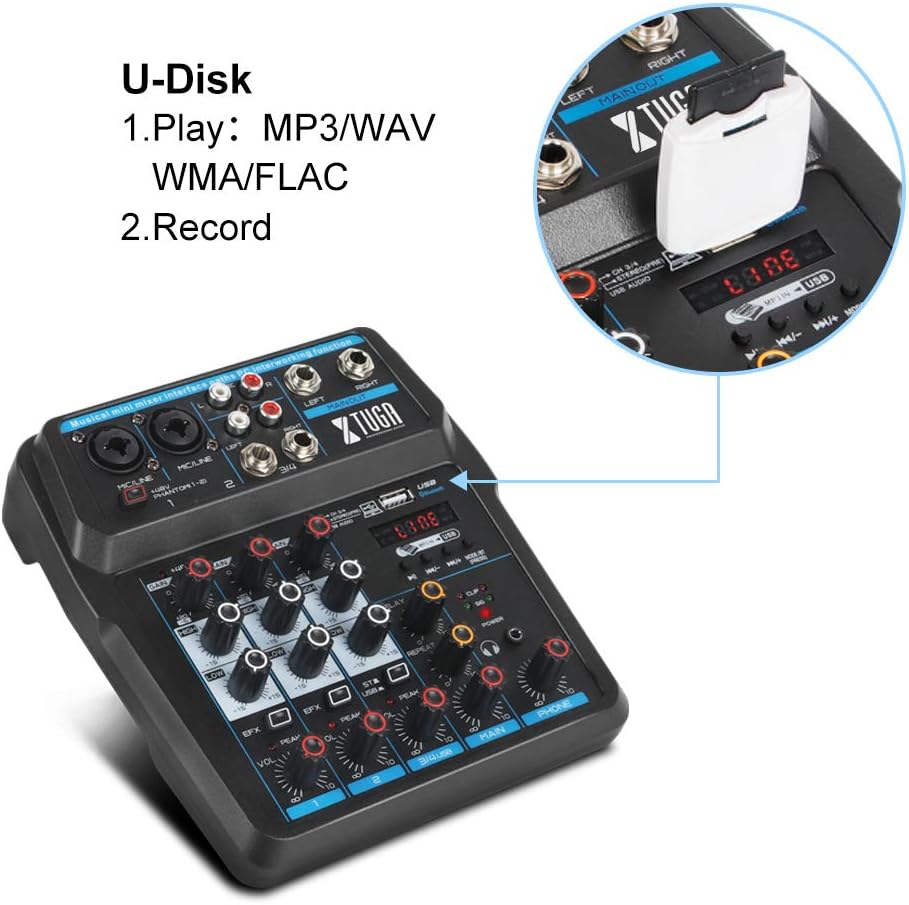
5.4.2 U-Disk (USB Drive) Playback and Recording
Insert a USB flash drive into the USB port on the mixer:
- 재생: The mixer can play MP3, WAV, WMA, FLAC, and other audio formats directly from the U-Disk. Use the MP3 function keys to control playback.
- 녹음: You can also record directly to the U-Disk. Refer to the mixer's display and controls for recording functions.
5.5 이펙트 프로세서
The mixer includes built-in Delay and Repeat effects. Use the dedicated controls to adjust the effect parameters, such as echo repeat frequency and time interval, to achieve your desired sound.
6. 유지관리
To ensure the longevity and optimal performance of your XTUGA AM6 mixer:
- 청소: Use a soft, dry cloth to clean the surface of the mixer. Avoid using liquid cleaners or solvents.
- 저장: 믹서기는 직사광선, 극한 온도, 높은 습도를 피해 서늘하고 건조한 곳에 보관하세요.
- 손질: 믹서를 조심스럽게 다루십시오. 떨어뜨리거나 강한 충격을 가하지 마십시오.
- 통풍: 과열을 방지하려면 믹서 주변을 적절히 환기시키십시오.
7. 문제 해결
If you encounter issues with your XTUGA AM6 mixer, refer to the following common problems and solutions:
- 전원 없음: Ensure the power adapter is securely connected and the power outlet is functional. Try a different USB power source if using USB power.
- 사운드 출력 없음: Check all cable connections (inputs, main output, headphones). Verify that gain controls, channel levels, and the main output level are turned up. Ensure the correct input source is selected (e.g., LINE, BT, PC, USB).
- 마이크가 작동하지 않음: For condenser microphones, ensure 48V phantom power is activated. Check microphone cable connections. Verify microphone gain and channel level.
- 블루투스 연결 문제: Ensure the mixer is in BT mode and discoverable. Turn off and on Bluetooth on your mobile device. Ensure no other devices are connected to the mixer via Bluetooth.
- USB Recording/Playback Problems: Ensure the mixer is in PC or USB mode as appropriate. Check USB cable connection to the computer or U-Disk insertion. Verify computer audio settings if recording to PC.
- 왜곡된 소리: Reduce input gain or channel levels to prevent clipping (indicated by peak LEDs). Check cable quality.
If the problem persists, please contact XTUGA customer support for further assistance.
8. 사양
| 특징 | 사양 |
|---|---|
| 상표 | 엑스투가 |
| 모델 | AM4 |
| 채널 수 | 4 (also described as 4/6-channel) |
| 연결 기술 | 보조, 블루투스, USB |
| 전원 | 코드식 전기 |
| 권tage | 48볼트 (팬텀 전원용) |
| 제조업체 부품 번호 | AM |
| 한국어: | 784124158778 |
9. 보증 및 지원
XTUGA products are designed for reliability and performance. For warranty information, technical support, or service inquiries, please refer to the warranty card included with your product or visit the official XTUGA web사이트. 보증 청구에 대비해 구매 증빙 자료로 구매 영수증을 보관하세요.