
1. 서론
Thank you for choosing the Vivolink VLQICHR QI Wireless Charger. This device provides a convenient and efficient way to charge your QI-compatible devices without the need for cables. Please read this manual carefully before using the product to ensure proper operation and to maximize its lifespan. Keep this manual for future reference.
2. 안전 정보
- 충전기를 물, 습기 또는 극한 온도에 노출시키지 마세요.
- 충전기를 떨어뜨리거나 심한 충격을 주지 마십시오.
- Do not disassemble, repair, or modify the charger. This may void the warranty and pose safety risks.
- Keep the charger away from medical implants (e.g., pacemakers) to prevent potential interference.
- 충전기에는 인증된 전원 어댑터와 케이블만 사용하십시오.
- Ensure there are no metal objects (e.g., coins, keys, credit cards) between the charging surface and your device during charging, as this can cause overheating or damage.
- 번개가 칠 때나 장기간 사용하지 않을 때는 충전기의 플러그를 뽑아 두세요.
3. 패키지 내용
다음 품목이 패키지에 포함되어 있는지 확인하세요.
- Vivolink VLQICHR QI Wireless Charger
- USB Power Cable (Type-C or Micro-USB, depending on model)
- 사용 설명서 (본 문서)
4. 제품 오버view
The Vivolink VLQICHR is a compact and efficient wireless charging solution. It features a charging surface where QI-compatible devices are placed for power transfer. An LED indicator typically signals charging status.
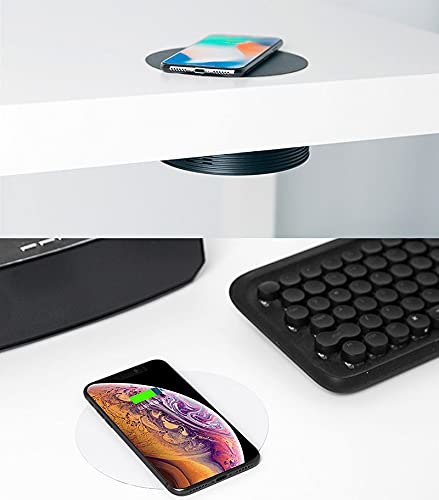
This image illustrates the Vivolink VLQICHR QI Wireless Charger in two common usage scenarios. The top portion shows a smartphone wirelessly charging on a pad seamlessly integrated into a desk surface. The bottom portion displays another smartphone charging on a separate, standalone wireless charging pad, highlighting the versatility of QI wireless charging technology.
5. 설정
- 전원에 연결: Plug the provided USB power cable into the charging port on the Vivolink VLQICHR wireless charger.
- 전원에 연결: Connect the other end of the USB cable to a compatible USB power adapter (not included) or a USB port on a computer. Ensure the power adapter meets the charger's power requirements (e.g., 5V/2A, 9V/1.67A for fast charging).
- 전원 켜기: Once connected, the LED indicator on the charger may light up briefly to confirm it is powered on and ready for use.
6. 사용 설명서
- 장치 배치: Place your QI-compatible smartphone or other device directly onto the center of the Vivolink VLQICHR charging surface.
- 충전 확인: The LED indicator on the charger should change color or illuminate steadily to indicate that charging has begun. Your device's screen should also show a charging icon or notification.
- 최적의 배치: If charging does not start, slightly adjust the position of your device on the charging pad. Some devices may have specific coil locations that require precise alignment.
- 충전 완료: Once your device is fully charged, remove it from the charging pad. The charger's LED indicator may change or turn off.
메모: Charging speed may vary depending on the device, power adapter, and environmental conditions. Thick phone cases may interfere with wireless charging; consider removing them for optimal performance.
7. 유지관리
- 청소: 청소하기 전에 충전기를 전원 콘센트에서 분리하십시오. 부드럽고 마른 천으로 표면을 닦으십시오. 독한 화학 약품이나 연마성 세척제를 사용하지 마십시오.
- 저장: 사용하지 않을 때에는 충전기를 서늘하고 건조한 곳에 보관하십시오.
- 케이블 관리: Avoid bending or twisting the power cable excessively to prevent damage.
8. 문제 해결
- 장치가 충전되지 않음:
- 충전기가 작동하는 전원에 제대로 연결되어 있는지 확인하세요.
- Verify your device is QI-compatible.
- Adjust the placement of your device on the charging pad to ensure proper alignment.
- Remove any thick phone cases or metal objects from your device.
- 다른 USB 케이블이나 전원 어댑터를 사용해 보세요.
- 느린 충전:
- Ensure you are using a power adapter that supports the charger's fast charging capabilities (e.g., Quick Charge 2.0/3.0 or Power Delivery).
- Check for proper device alignment.
- 기기에서 불필요한 애플리케이션을 닫으세요.
- LED 표시등이 깜박임:
- Refer to your device's specific LED indicator guide. Often, flashing indicates a foreign object detection (FOD) or improper device placement.
- Remove the device and any foreign objects, then place the device back on the charger.
9. 사양
| 상표 | 비볼링크 |
| 모델 번호 | VLQICHR |
| 제조업체 | 비볼링크 |
| ASIN | B08NHGFYVC |
| 입력 | (Typical: 5V/2A, 9V/1.67A - check product packaging for exact details) |
| 산출 | (Typical: 5W, 7.5W, 10W, 15W - check product packaging for exact details) |
| 충전 표준 | QI Wireless Charging Standard |
Note: Specific input/output power ratings may vary. Please refer to the product packaging or the device itself for precise specifications.
10. 보증 및 지원
Specific warranty information for the Vivolink VLQICHR QI Wireless Charger is not provided in the available product data. For detailed warranty terms, technical support, or service inquiries, please refer to the documentation included with your purchase or contact Vivolink customer support directly through their official web사이트 또는 연락처 채널.