
1. 서론
구매해주셔서 감사합니다asing the XTUGA ES602 Professional DJ Mixer. This manual provides essential information for the safe and efficient operation of your mixer. Please read it thoroughly before use and retain it for future reference.
The XTUGA ES602 is a versatile 7-channel mixing console designed for stage audio, DJ applications, and music production. It features XLR and LINE inputs, +48V phantom power, a built-in digital effect processor, USB/MP3 playback, and Bluetooth connectivity.
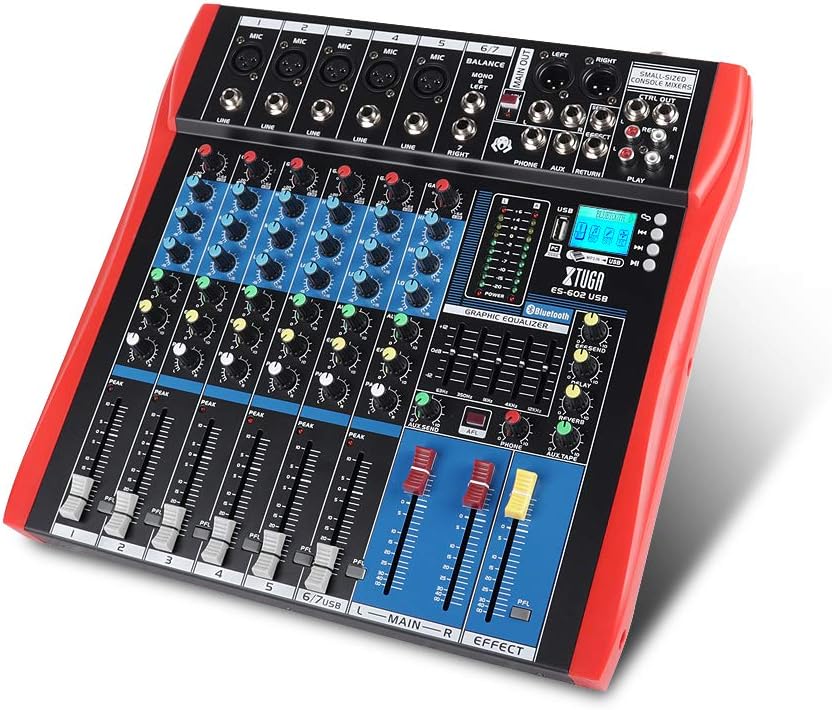
Figure 1: XTUGA ES602 Professional DJ Mixer overview. This image displays the top panel of the mixer, showing all input channels, control knobs, faders, and the master section with the USB/MP3/Bluetooth module.
2. 안전 지침
- 전원 공급 장치: 지정된 전원 어댑터만 사용하세요. 볼륨을 확인하세요.tage는 귀하의 지역 전원 공급 장치와 일치합니다.
- 물과 습기: 기기를 비나 습기에 노출시키지 마십시오. 기기 위에 액체가 담긴 물건을 올려놓지 마십시오.
- 통풍: 충분한 환기를 유지하세요. 환기구를 막지 마세요.
- 열원: 장치를 라디에이터, 난방 조절기, 스토브 또는 기타 열을 발생시키는 기기와 같은 열원으로부터 멀리 두십시오.
- 청소: Clean only with a dry cloth. Avoid liquid cleaners.
- 서비스: 이 장치를 직접 수리하려고 하지 마십시오. 모든 수리는 자격을 갖춘 서비스 담당자에게 맡기십시오.
- 팬텀 파워 : When using condenser microphones, ensure +48V phantom power is activated only after connecting the microphone and before connecting to other devices to prevent damage.
3. 특징
The XTUGA ES602 mixer offers a range of features for professional audio mixing:
- 7채널 믹싱 콘솔: Equipped with XLR and LINE inputs for versatile connectivity.
- +48V 팬텀 전원: Available for condenser microphones.
- 개별 채널 제어: Each channel features GAIN, 3-band EQ (HIGH, MID, LOW), AUX, EFFECT, PAN control knobs, and a volume fader.
- PFL (Pre-Fader Listen) Switch: Allows monitoring of individual channels via headphones.
- Built-in Digital Effect Processor: Includes REPEAT, EFF SEND, DELAY, SEND, and RETURN controls for integrated effects.
- USB/MP3 Playback and Recording: Direct USB input for MP3 playback from U-disk and recording capabilities.
- 블루투스 연결: Seamlessly connect mobile phones, tablets, and other Bluetooth-enabled devices for audio playback.
- 주요 출력 : XLR (L/R) and 1/4" (L/R) stereo output jacks.
- 녹음 출력: Dedicated REC (L/R) output for external recording devices.
- 헤드셋 인터페이스: 오디오 모니터링용입니다.
- LED 표시등: Power and output level indicator lights for easy monitoring.
- 내구성 있는 디자인: Ultra-thin, all-metal chassis for high density dust resistance and durability.
4. 컨트롤 및 기능
This section details the various controls and connections on your XTUGA ES602 mixer.
4.1 Input Channels (Channels 1-7)
- 마이크 입력(XLR): Connects balanced microphones.
- LINE Input (1/4" Jack): Connects line-level instruments or devices.
- +48V PHANTOM Power Switch: Activates phantom power for condenser microphones on XLR inputs.
- 게인 노브: 각 채널의 입력 감도를 조정합니다.
- 고음, 중음, 저음 EQ 노브: 각 채널의 고음, 중음, 저음 주파수를 조절할 수 있는 3밴드 이퀄라이저.
- AUX 노브: Controls the send level to the auxiliary output.
- 효과 노브: Controls the send level to the internal effect processor.
- 팬 손잡이: 채널의 스테레오 위치(좌/우)를 조정합니다.
- PFL 스위치: Engages Pre-Fader Listen for monitoring the channel's signal before the fader.
- 피크 LED: 입력 신호가 너무 높을 때, 즉 클리핑이 발생할 가능성이 있을 때 점등됩니다.
- 채널 페이더: Adjusts the output volume of the individual channel.
4.2 마스터 섹션
- MAIN OUT (XLR & 1/4" Jacks): Balanced stereo main outputs for connecting to amplifiers 또는 전원 스피커.
- REC OUT (RCA Jacks): Stereo output for connecting to recording devices.
- PHONES Jack (1/4"): Stereo headphone output for monitoring.
- AUX SEND/RETURN Jacks: For connecting external effects processors or monitoring systems.
- 메인 페이더(좌/우): 믹서의 전체 출력 볼륨을 조절합니다.
- EFFECT Level Knob: Adjusts the overall level of the internal effects.
- REPEAT, DELAY Knobs: Controls parameters of the digital effect processor.
- LEVEL Meter: LED display showing the main output level.

그림 2: 상세 view of the XTUGA ES602 mixer's channel controls and LED level meters. This image highlights the individual channel knobs for GAIN, EQ, AUX, EFFECT, PAN, and the main output level indicators.
4.3 USB/MP3/Bluetooth Module
- USB 포트: For connecting a USB flash drive for MP3 playback or connecting to a computer for recording/playback.
- LCD 디스플레이: Shows current mode, track information, and Bluetooth status.
- 제어 버튼: Play/Pause, Stop, Previous/Next Track, Mode selection (USB/Bluetooth/PC).
- 블루투스 표시기: Bluetooth 연결 상태를 보여줍니다.

Figure 3: Close-up of the Bluetooth and MP3 connection section on the XTUGA ES602 mixer. This image shows the USB port, LCD display, and control buttons for media playback and Bluetooth pairing.
5. 설정
Follow these steps to set up your XTUGA ES602 mixer.
5.1 전원 연결
- 믹서의 전원 스위치가 꺼짐(OFF) 위치에 있는지 확인하십시오.
- Connect the provided power adapter to the mixer's power input.
- 전원 어댑터를 적절한 AC 전원 콘센트에 꽂으세요.
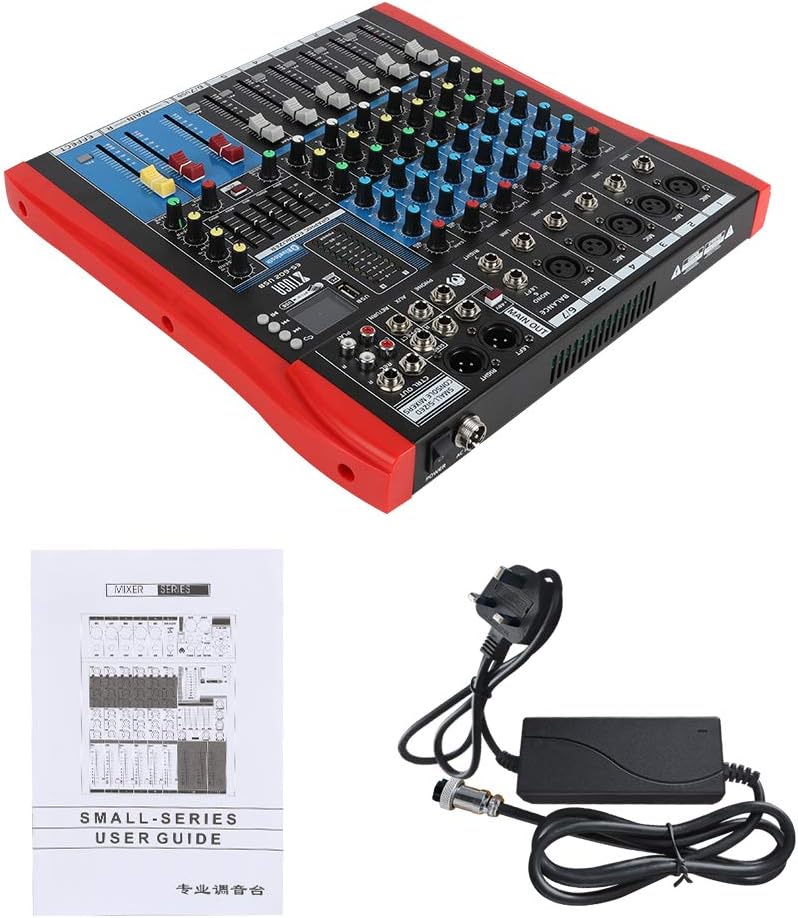
Figure 4: XTUGA ES602 mixer shown with its power adapter and user guide. This illustrates the components included for initial setup.
5.2 마이크 및 악기 연결
- For microphones, connect XLR cables to the 마이크 입력 jacks. If using condenser microphones, activate the +48V PHANTOM Power Switch 각 채널에 대해.
- For line-level instruments (keyboards, guitars with preamps, etc.), connect 1/4" TS/TRS cables to the LINE 입력 잭.
- Ensure all channel GAIN knobs are set to their minimum position before connecting.
5.3 출력 장치 연결
- 메인 스피커를 연결하거나 amp에 대한 리퍼 MAIN OUT (XLR or 1/4") 잭.
- For recording, connect an external recording device to the REC OUT (RCA) 잭.
- 헤드폰을 전화 모니터링용 잭.
5.4 Connecting to a Computer for Recording
- Connect a USB cable from the mixer's USB 포트 귀하의 컴퓨터에.
- 믹서는 운영 체제에서 오디오 장치로 인식되어야 합니다.
- Select the mixer as the input device in your digital audio workstation (DAW) or recording software.
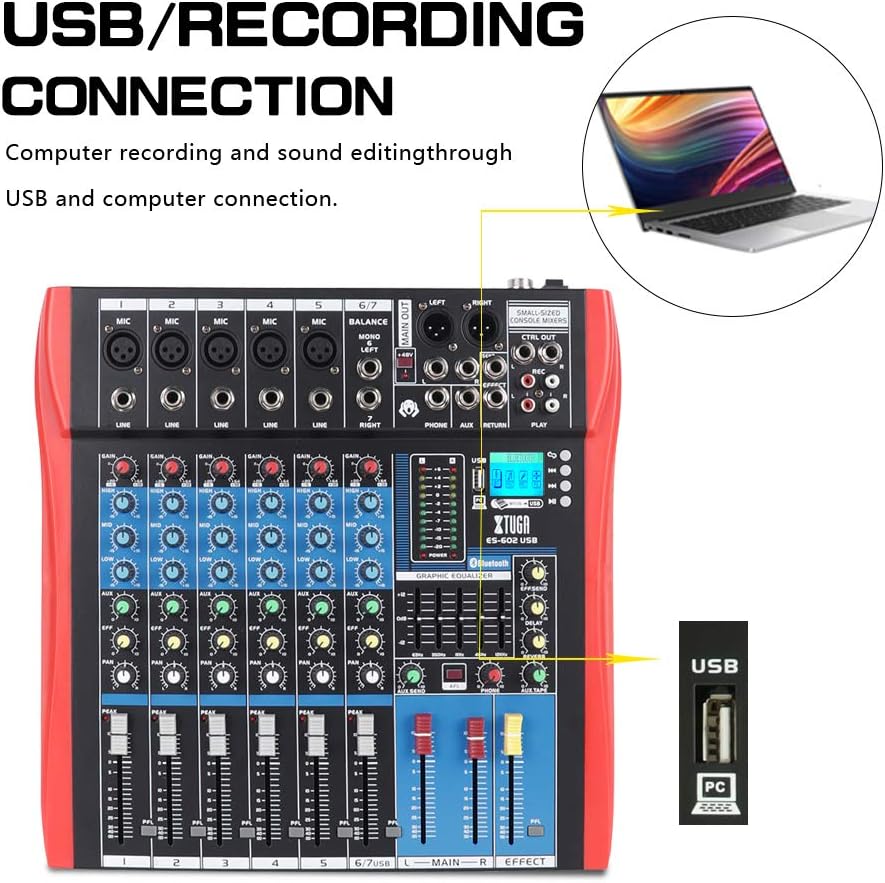
Figure 5: Illustration of the XTUGA ES602 mixer connected to a laptop via USB for recording and sound editing. This highlights the USB input port and its function.
6. 운영
This section covers the basic operation of your XTUGA ES602 mixer.
6.1 Powering On and Initial Level Setting
- After all connections are made, turn on your mixer's power switch.
- 천천히 올려 MAIN Faders 편안한 청취 수준으로.
- For each active input channel, gradually increase the GAIN 노브 까지 PEAK LED flashes only occasionally during the loudest parts of the signal.
- Adjust individual 채널 페이더 to balance the mix.
6.2 블루투스 사용하기
- 를 누르세요 MODE 버튼 on the USB/MP3/Bluetooth module until "Bluetooth" appears on the LCD display. The Bluetooth indicator will flash.
- On your mobile device, search for Bluetooth devices and select "XTUGA MIXER" (or similar).
- Once paired, the Bluetooth indicator will become solid. You can now play audio from your device through the mixer.
- Use the module's control buttons for Play/Pause, Next/Previous track.
6.3 USB/MP3 재생
- MP3 오디오가 포함된 USB 플래시 드라이브를 삽입하세요 file에 s USB 포트.
- The mixer should automatically switch to USB mode and begin playback. If not, press the MODE 버튼 USB를 선택하세요.
- Use the control buttons to navigate tracks and control playback.
6.4 녹음
- To USB Drive: In USB/MP3 mode, press the REC 버튼 on the module to start recording the main mix to the connected USB drive. Press again to stop.
- 컴퓨터로: Ensure the mixer is connected to your computer via USB. Open your recording software and select the mixer as the input device. Start recording within your software.
6.5 효과 사용
- 조정하다 이펙트 노브 on individual channels to send a portion of that channel's signal to the internal effect processor.
- 사용하세요 EFFECT Level knob in the master section to control the overall volume of the applied effect.
- 조정하다 반복하다 그리고 지연 knobs to fine-tune the characteristics of the digital effect.
7. 유지관리
적절한 유지관리는 믹서기의 수명과 최적의 성능을 보장합니다.
- 청소: Use a soft, dry cloth to clean the exterior of the mixer. Do not use abrasive cleaners, solvents, or waxes.
- 먼지 보호 : 사용하지 않을 때는 믹서를 덮어 먼지와 이물질로부터 보호하십시오.
- 저장: 믹서기는 직사광선과 극한의 온도를 피해 서늘하고 건조한 곳에 보관하세요.
- 케이블 관리 : 케이블을 과도하게 구부리거나 압착하지 마십시오. 케이블 자체를 당기지 말고 플러그를 당겨서 케이블을 분리하십시오.
8. 문제 해결
믹서 사용 중 문제가 발생하면 다음의 일반적인 문제 및 해결 방법을 참조하십시오.
- 사운드 출력 없음:
- 믹서의 전원이 켜져 있는지 확인하십시오.
- 모든 것을 확인하십시오 MAIN Faders and individual 채널 페이더 are raised.
- Verify that output cables are securely connected to your amp스피커
- 기기의 볼륨을 확인하세요. amp스피커
- 입력 신호 없음:
- Ensure microphones/instruments are properly connected to the correct input jacks.
- 확인해보십시오 GAIN 노브 for the respective channel is sufficiently turned up.
- If using a condenser microphone, ensure +48V 팬텀 전원 활성화되었습니다.
- Test input sources (microphones, instruments) with another device to confirm they are working.
- 왜곡된 소리:
- 감소하다 GAIN 노브 for the offending channel if the PEAK LED 항상 켜져 있습니다.
- 낮추다 MAIN Faders if the output level meter is consistently in the red.
- 케이블 손상 여부를 확인하십시오.
- 블루투스 연결 문제:
- Ensure the mixer is in Bluetooth mode (LCD shows "Bluetooth").
- 모바일 기기의 블루투스가 켜져 있고 통신 범위 내에 있는지 확인하세요.
- 기기의 페어링을 해제한 후 다시 페어링해 보세요.
- USB 재생이 작동하지 않습니다:
- Ensure the USB drive is properly inserted and contains compatible MP3 files.
- 를 누르세요 MODE 버튼 to ensure the mixer is in USB mode.
- 다른 USB 드라이브를 사용해 보세요.
9. 사양
| 특징 | 사양 |
|---|---|
| 모델 번호 | ES602 (also ES802/1202 series) |
| 채널 수 | 7 |
| 연결 기술 | 보조, 블루투스, USB |
| 오디오 입력 | Auxiliary, USB, XLR |
| 출력 커넥터 유형 | 보조, XLR |
| 전원 | 코드식 전기 |
| 품목 무게 | 3.59kg |
| 제품 치수 | 46 x 46 x 14cm |
| 제조업체 | 엑스투가 |
| 한국어: | 784124158754 |
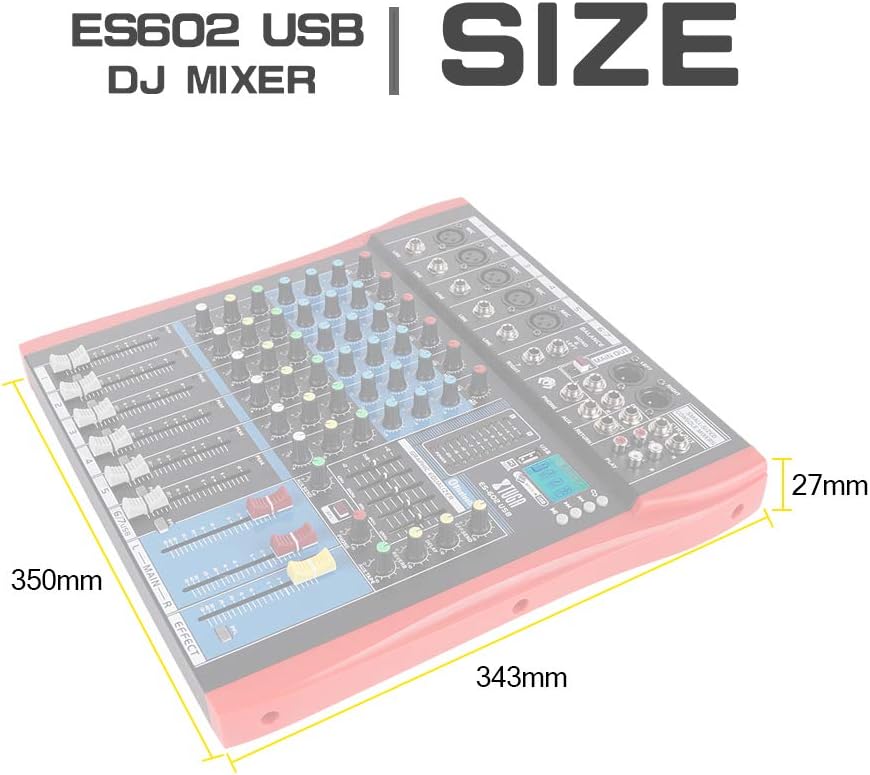
Figure 6: Dimensions of the XTUGA ES602 USB DJ Mixer, showing measurements of 350mm length, 343mm width, and 27mm height.
10. 보증 및 지원
XTUGA products are designed for reliability and performance. For warranty information and technical support, please refer to the warranty card included with your product or visit the official XTUGA web사이트. 보증 청구에 대비해 구매 증빙 자료로 구매 영수증을 보관하세요.