1. 서론
This manual provides essential information for the safe and effective operation, maintenance, and troubleshooting of your Rothenberger RO AG8000 Angle Grinder. Please read these instructions carefully before using the tool and keep them for future reference. Proper use and maintenance will ensure optimal performance and extend the lifespan of your angle grinder.
2. 일반 안전 지침
화재, 감전, 부상의 위험을 줄이기 위해 항상 기본적인 안전 수칙을 준수하십시오. 본 설명서를 항상 가까이에 두어 언제든 참고할 수 있도록 하십시오.
2.1. 작업장 안전
- 작업 구역을 깨끗하고 밝게 유지하세요. 어수선하거나 어두운 구역은 사고를 초래합니다.
- 가연성 액체, 가스 또는 먼지가 있는 폭발성 분위기에서 전동 공구를 작동하지 마십시오. 전동 공구는 먼지나 연기를 점화할 수 있는 불꽃을 생성합니다.
- 전동 공구를 작동하는 동안 어린이와 주변 사람을 멀리하십시오. 주의가 산만해지면 제어력을 잃을 수 있습니다.
2.2. 전기 안전
- 전동 공구 플러그는 콘센트와 일치해야 합니다. 플러그를 어떤 식으로든 변경하지 마십시오.
- 파이프, 라디에이터, 레인지, 냉장고와 같은 접지된 표면과의 신체 접촉을 피하십시오. 신체가 접지되거나 접지된 경우 감전 위험이 증가합니다.
- 전동 공구를 비나 습한 환경에 노출시키지 마십시오. 전동 공구에 물이 들어가면 감전 위험이 커집니다.
2.3. 개인 안전
- 항상 눈 보호 장비를 착용하세요. 보안경, 고글 또는 안면 보호대를 사용하세요.
- 장시간 전동 공구를 작동할 때는 청력 보호 장비를 착용하세요.
- 적절한 복장을 하십시오. 느슨한 옷이나 장신구를 착용하지 마십시오. 머리카락과 옷을 움직이는 부분에서 멀리 두십시오.
- 전동 공구를 작동할 때는 항상 주의를 기울이고, 작업 시 주의하고, 상식에 따라 행동하세요.
3. 제품 오버view
The Rothenberger RO AG8000 is a cordless angle grinder designed for cutting, grinding, and polishing various materials. Its compact design and powerful motor make it suitable for a range of applications.

그림 1: Rothenberger RO AG8000 Angle Grinder. This image displays the main unit of the angle grinder, highlighting its ergonomic design, disc guard, and auxiliary handle attachment point.
주요 구성 요소는 일반적으로 다음과 같습니다.
- 메인 핸들
- Auxiliary Handle (side handle)
- 스핀들 잠금 버튼
- 켜기/끄기 스위치
- 디스크 가드
- Grinding/Cutting Disc (sold separately or included in some kits)
- Battery Pack (sold separately or included in some kits)
- Battery Charger (sold separately or included in some kits)
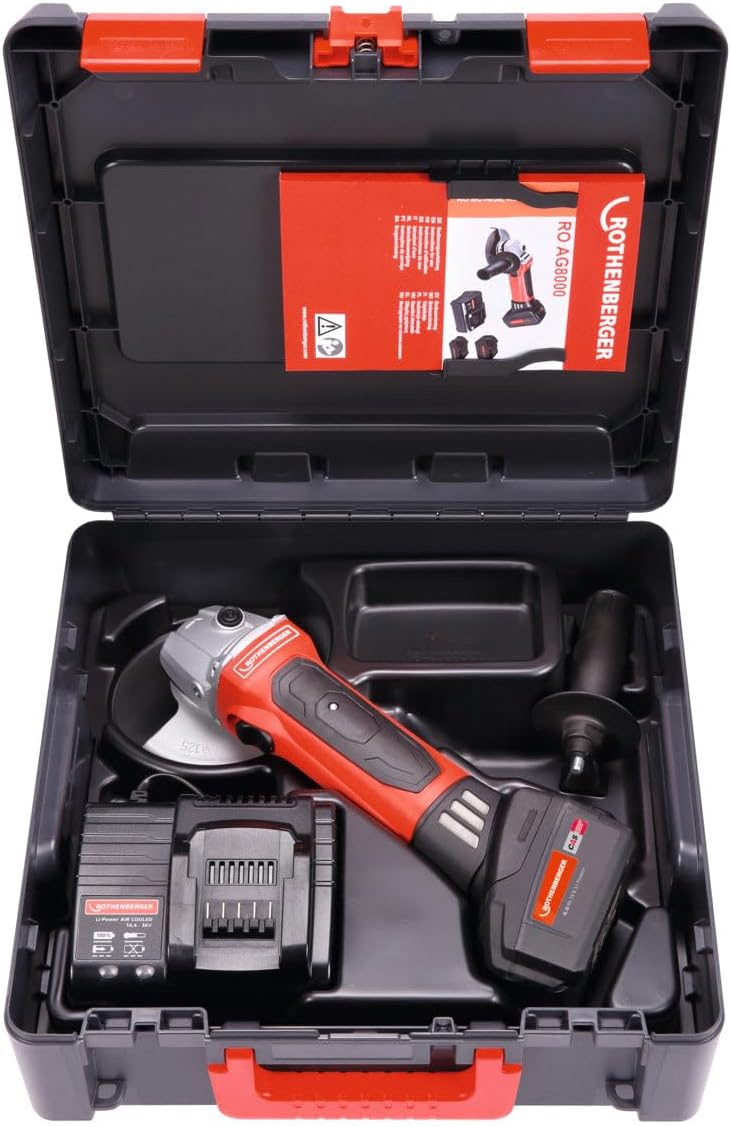
그림 2: Rothenberger RO AG8000 Angle Grinder kit. This image shows the angle grinder, battery, charger, and auxiliary handle neatly organized within its carrying case, illustrating the complete package.
4. 설정
4.1. 배터리 설치 및 충전
- Ensure the battery pack is fully charged before first use. Connect the charger to a power outlet and insert the battery pack. Refer to the charger's manual for specific charging indicators.
- To install the battery, align the battery pack with the receptacle on the tool's base and slide it in until it clicks securely into place.
- 배터리를 제거하려면 배터리 팩의 분리 버튼을 누르고 밀어서 빼냅니다.
4.2. 보조 손잡이 부착
The auxiliary handle can be screwed into either side of the gear housing, depending on user preference and application. Tighten it firmly by hand.
4.3. 연삭 또는 절단 디스크 설치/교체
- 도구의 전원이 꺼져 있고 배터리 팩이 제거되어 있는지 확인하세요.
- 스핀들 잠금 버튼을 누르고 있으면 스핀들이 회전하는 것을 방지할 수 있습니다.
- Use the provided spanner wrench to loosen and remove the outer flange nut.
- Place the desired grinding or cutting disc onto the spindle, ensuring it is correctly seated on the inner flange.
- Re-attach the outer flange nut and tighten it securely with the spanner wrench while holding the spindle lock button.
- Verify the disc is properly installed and rotates freely without wobbling.
4.4. Adjusting the Disc Guard
The disc guard protects against sparks and debris. Loosen the guard's clamping screw, rotate the guard to the desired position for optimal protection, and then firmly tighten the clamp잉 나사.
5. 사용 설명서
5.1. 켜기/끄기
- To switch on: Slide the ON/OFF switch forward. For continuous operation, push the switch forward and then press the front part down until it locks.
- To switch off: For continuous operation, press the rear part of the ON/OFF switch. For momentary operation, simply release the switch.
5.2. 연삭 및 절단 기술
- 공구를 사용할 때는 항상 주 손잡이와 보조 손잡이를 양손으로 단단히 잡으십시오.
- 디스크가 공작물에 닿기 전에 최대 속도에 도달하도록 하십시오.
- 적당한 압력을 가하십시오. 과도한 압력은 디스크 수명과 모터 효율을 저하시킬 수 있습니다.
- For grinding, hold the disc at a slight angle (typically 15-30 degrees) to the workpiece.
- For cutting, hold the disc perpendicular to the workpiece and make straight, steady cuts. Avoid twisting or bending the disc.
- Be aware of kickback, especially when cutting. Ensure the workpiece is securely clamp편집.
6. 유지관리
6.1. 청소
- 청소하기 전에 항상 배터리 팩을 제거하십시오.
- 과열을 방지하기 위해 통풍구를 정기적으로 청소하십시오. 부드러운 브러시나 압축 공기를 사용하십시오.
- 도구 하우징을 광고로 닦으세요amp 옷감. 강한 화학 물질이나 연마성 세제를 사용하지 마십시오.
6.2. 디스크 교체
Replace grinding or cutting discs when they become worn, damaged, or lose their effectiveness. Follow the installation instructions in Section 4.3.
6.3. 보관
Store the angle grinder in a dry, secure place, out of reach of children. Remove the battery pack if storing for extended periods.
7. 문제 해결
| 문제 | 가능한 원인 | 해결책 |
|---|---|---|
| 도구가 시작되지 않음 | 배터리가 충전되지 않았거나 제대로 설치되지 않았습니다. | 배터리를 완전히 충전하세요. 배터리가 제자리에 단단히 고정되었는지 확인하세요. |
| 전력 또는 성능 저하 | Battery charge low; worn or incorrect disc; motor ventilation blocked. | Recharge battery. Replace disc. Clean ventilation slots. |
| 과도한 진동 | Disc improperly installed or damaged; loose auxiliary handle. | Re-install disc correctly or replace if damaged. Tighten auxiliary handle. |
| 도구 과열 | 환기구가 막혔습니다. 지속적으로 많이 사용했습니다. | Clean ventilation slots. Allow tool to cool down during heavy use. |
8. 사양
- 모델 번호: 1000001649
- 상표: 로텐베르거
- 제품 유형: 앵글 그라인더
- 크기(패키지): 1 x 1 x 1cm
- 무게(패키지): 1킬로그램
- 제조업체: 로텐베르거
- 국제 상품 코드(EAN): 04004625406656
Note: Specific operational specifications such as voltage, disc diameter, and RPM are typically found on the product label or in detailed technical documentation. Always refer to these for precise operational limits.
9. 보증 및 지원
For warranty information, technical support, or service inquiries, please refer to the warranty card included with your product or visit the official Rothenberger web사이트. 구매 증빙 자료로 구매 영수증을 보관하세요.
연락처 정보: Please refer to the official Rothenberger web최신 연락처 정보는 해당 웹사이트 또는 지역 대리점에 문의하십시오.