1. 서론
This manual provides comprehensive instructions for the operation and maintenance of the POMIACAM IPC-5200 Plus CCTV Tester. This device is designed for professional use in the installation and maintenance of security camera systems, offering a wide range of testing functionalities for various camera types and network infrastructure.

Figure 1: POMIACAM IPC-5200 Plus CCTV Tester and Wire Receiver.
2. 제품 오버view
2.1 주요 특징
- 지적재산권 검색: Automatically scans network segments for IP cameras and adjusts the tester's IP address for seamless connectivity.
- Multi-format Camera Testing: Supports 8MP CVI, TVI, AHD, SDI, and CVBS analog cameras.
- 고해상도 디스플레이: Features a 5-inch 1080P IPS touch screen for clear video display.
- 미디어 플레이어: Capable of displaying genuine resolution IP camera images and playing 4K H.264/H.265 video files and MKV/MP4 media.
- 다용도 인터페이스: Includes VGA and HDMI input for connecting to NVR/DVR systems as a display monitor.
- Advanced Cable Testing: Performs UTP cable tests, RJ45 TDR cable tests, and includes a cable tracer for network, BNC, and shielded cables.
- PTZ 제어 : Supports Pan/Tilt/Zoom control for compatible cameras.
- 스냅샷 및 녹화: Allows for image snapshots, video recording, and playback.
2.2 장치 레이아웃 및 포트
Familiarize yourself with the various ports and controls on the IPC-5200 Plus tester.

그림 2: 상단 및 하단 views of the IPC-5200 Plus showing power input, RS485, audio in, UTP/SCAN, VGA, ON/OFF button, SD card slot, DC12V/3A out, LAN, HDMI in, SDI, and AHD TVI CVI test ports.
3. 패키지 내용
아래 나열된 모든 품목이 패키지에 포함되어 있는지 확인하세요.

Figure 3: Contents of the IPC-5200 Plus package.
- POMIACAM IPC-5200 Plus CCTV Tester
- 도구 가방
- 비디오 케이블
- 오디오 테스트 케이블
- RS485 control cable
- 전원 출력 케이블
- 안전 코드
- 충전기
- Cable tester (wire receiver)
4. 설정
4.1 장치 충전
Before initial use, fully charge the IPC-5200 Plus using the provided charger. Connect the charger to the DC12V/VIN port on the tester and plug it into a power outlet. The charging indicator will show the charging status.
4.2 전원 켜기/끄기
- 전원을 켜려면: Press and hold the ON/OFF button located on the side of the device until the screen illuminates.
- 전원을 끄려면: Press and hold the ON/OFF button until a power-off prompt appears on the screen, then confirm.
5. 사용 설명서
5.1 인터페이스 탐색
The IPC-5200 Plus features a 5-inch IPS touch screen. Navigate through menus and functions by tapping icons and swiping as you would on a smartphone.
5.2 IP Discovery
This function allows the tester to automatically scan for IP cameras on a network segment and adjust its own IP address to match the camera's segment for easy access.
- From the main menu, select the 'IP Discovery' or 'IP Test pro' icon.
- The tester will automatically scan the network.
- It can also auto-modify the tester's IP to the same network segment as the scanned camera's IP.

Figure 4: IP Discovery interface showing local IP, discovery IP, and scan options.
5.3 Camera Testing (Analog, HD Coaxial, IP)
The tester supports a wide range of camera types:
- CVBS Analog Cameras: Connect the analog camera to the CVBS input port.
- HD Coaxial Cameras (CVI, TVI, AHD, SDI): Connect these cameras to their respective input ports. The tester supports up to 8MP resolution for CVI, TVI, AHD, and SDI.
- IP 카메라: Connect via LAN. The tester supports 4K H.264/H.265 IP cameras and ONVIF protocols.
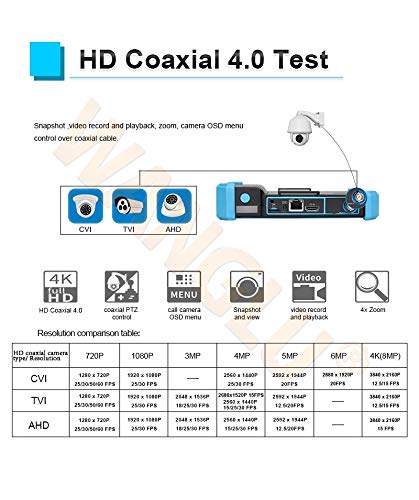
Figure 5: HD Coaxial 4.0 Test features including CVI, TVI, AHD support, PTZ control, OSD menu, snapshot, video record, and 4x zoom. A resolution comparison table is also shown.

Figure 6: Rapid ONVIF interface for 4K camera testing and OSD menu modification.
5.4 VGA and HDMI Input
The IPC-5200 Plus can function as a display monitor for NVRs or DVRs via its VGA and HDMI input ports.
- Connect the NVR/DVR's VGA or HDMI output to the corresponding input port on the tester.
- Select the appropriate input source on the tester's menu to display the NVR/DVR feed.
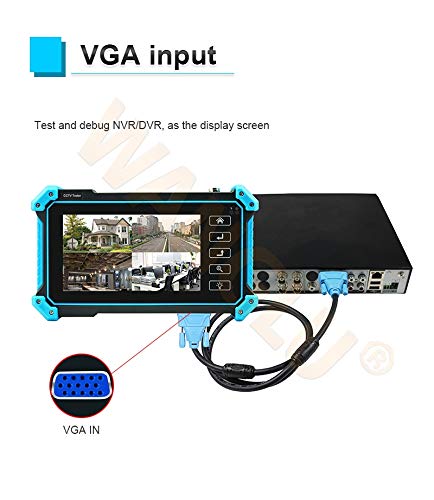
Figure 7: Using the tester as a display for an NVR/DVR via VGA input.
5.5 Cable Testing Functions
The tester provides comprehensive cable testing capabilities:
- UTP Cable Test: Tests sequence and continuity for UTP, BNC, telephone, and shielded cables. It can save testing reports and detect near-end, mid-end, and far-end fault points of RJ45 cable connectors.
- RJ45 TDR Cable Test: Measures cable pair status, length, attenuation, reflectivity, impedance, and skew. Measurement range up to 180m.
- 케이블 추적기: Use the included wire receiver to search for network, BNC, and shielded cables, effectively rejecting noise and false signals.

Figure 8: Advanced UTP cable test interface showing cable sequence and connection diagram.

Figure 9: RJ45 TDR cable test in progress, displaying cable pair status and quality.
5.6 PTZ Control, Snapshot, and Recording
- PTZ 제어 : Access PTZ controls from the camera test interface to adjust camera pan, tilt, and zoom functions.
- 스냅 사진: Capture still images from the live video feed.
- 비디오 녹화 및 재생: Record video streams and play them back directly on the device.
6. 유지관리
6.1 청소
부드럽고 마른 천을 사용하여 기기를 청소하세요. 잘 지워지지 않는 오염의 경우, 약간amp cloth can be used. Avoid abrasive cleaners or solvents that may damage the screen or casing.
6.2 배터리 관리
- 배터리 수명을 연장하려면 배터리를 자주 완전히 방전하지 마세요.
- 장기간 사용하지 않을 때는 기기를 서늘하고 건조한 곳에 보관하세요.
- 장기간 보관할 경우 심하게 방전되는 것을 방지하기 위해 주기적으로 충전하세요.
7. 문제 해결
7.1 장치 전원이 켜지지 않음
- 배터리가 충전되어 있는지 확인하십시오. 충전기를 연결하고 다시 전원을 켜보십시오.
- 전원 버튼이 올바르게 눌린 상태로 유지되고 있는지 확인하십시오.
7.2 IP Camera Not Found During IP Discovery
- Confirm the IP camera is powered on and properly connected to the network.
- Ensure the network cable is functional using the cable test feature.
- Check if the camera and tester are on the same physical network segment. The IP Discovery feature should auto-adjust, but manual verification may be needed.
- Verify the camera's IP address and subnet mask if known, and compare with the tester's settings.
7.3 No Video Display from Camera
- Check all cable connections (BNC, LAN, etc.) for secure fit.
- Ensure the camera is powered on and functioning correctly.
- Verify the correct input mode is selected on the tester (e.g., CVI, TVI, AHD, SDI, CVBS, IP).
- For IP cameras, confirm successful IP discovery and login credentials if required.
7.4 Cable Test Errors
- Ensure the cable is properly terminated and connected to the tester.
- For UTP tests, ensure the remote kit is correctly attached to the other end of the cable.
- 케이블에 눈에 띄는 손상이 있는지 검사하세요.
8. 사양
| 특징 | 사양 |
|---|---|
| 모델 번호 | POMIACAM IPC5200C plus |
| 표시하다 | 5-inch IPS Touch Screen, 1920x1080 Resolution |
| 카메라 지원 | 8MP CVI, TVI, AHD, SDI, CVBS, IP (4K H.264/H.265) |
| 비디오 입력 | VGA, HDMI, BNC (CVI/TVI/AHD/SDI/CVBS) |
| 네트워크 기능 | IP Discovery, ONVIF, LAN, Built-in WiFi |
| 케이블 테스트 | UTP Cable Test, RJ45 TDR Cable Test, Cable Tracer |
| 전원 | 배터리 구동(리튬 이온 배터리 1개 포함) |
| 치수 | 10.2 x 5.79 x 4.17 인치 |
| 무게 | 2.64 파운드 |

Figure 10: Connectivity diagram illustrating the versatile integration of the IPC-5200 Plus with different camera types (IP, TVI, CVI, AHD, CVBS, SDI) and network devices (NVR/DVR, Switch, WiFi).
9. 보증 및 지원
For warranty information and technical support, please refer to the contact details provided with your purchase or visit the official POMIACAM web사이트. 보증 청구를 위해 구매 증빙 자료로 구매 영수증을 보관하세요.