
1. 서론
This manual provides detailed instructions for the setup, operation, and maintenance of your TOPPING D10s USB Digital to Analog Converter. The D10s is designed to enhance your audio experience by converting digital audio signals from your computer or phone into high-fidelity analog sound. It features an XU208 XMOS chip, ES9038Q2M DAC, and supports DSD256 and 32Bit/384kHz audio playback.
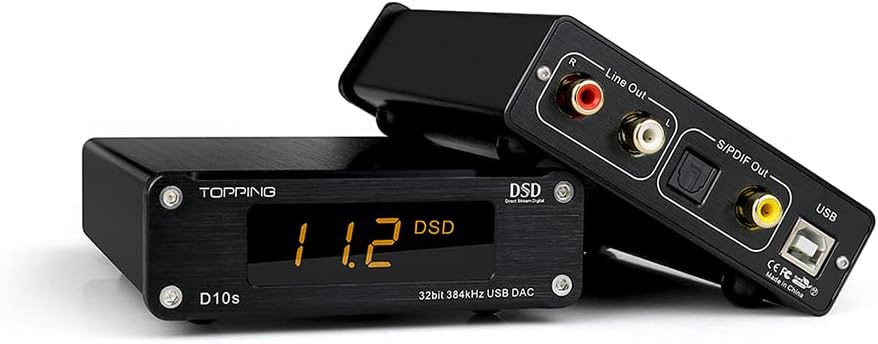
이미지 1.1: 전면 및 후면 view of the TOPPING D10s USB DAC, showcasin컴팩트한 디자인과 다양한 입출력 포트가 특징입니다.
2. 안전 정보
- 기기를 물, 습기 또는 극한 온도에 노출시키지 마세요.
- 열원 근처나 직사광선에 장치를 두지 마십시오.
- 전원 및 데이터 연결에는 제공된 USB 케이블만 사용하세요.
- 장치를 분해하거나 개조하지 마십시오. 모든 정비는 자격을 갖춘 기술자에게 맡기십시오.
- 작동 중에는 장치 주변에 적절한 환기가 이루어지도록 하세요.
3. 패키지 내용
다음 품목이 패키지에 포함되어 있는지 확인하세요.
- 1 x TOPPING D10s Unit
- 1 x USB 케이블
- 1 x 사용자 설명서
- 1 x TOPPING Repair Card (Warranty Card)
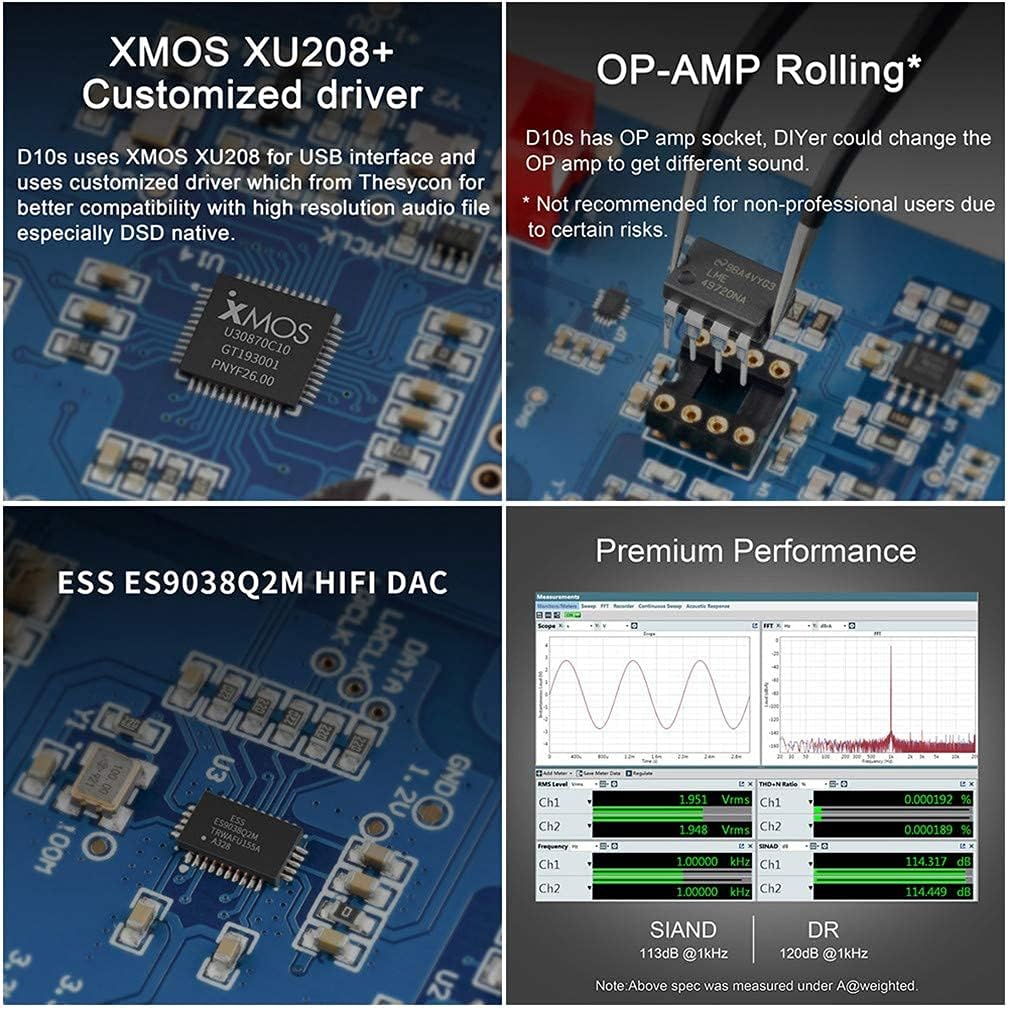
Image 3.1: Visual representation of the items included in the TOPPING D10s package.
4. 제품 오버view
The TOPPING D10s is a compact USB DAC designed for high-resolution audio playback. It features a clear display and multiple output options.
4.1 전면 패널

Image 4.1: Front panel of the D10s, displaying the current sampling rate (e.g., 384 kHz) and audio format (PCM).
- 표시하다: Shows the current audio format (PCM or DSD) and sampling rate. The orange LED is designed to be soft and non-dazzling.
4.2 후면 패널

Image 4.2: Rear panel of the D10s, illustrating the various input and output connections.
- USB 입력 : Connects to your computer or phone for power and digital audio input.
- RCA 출력(라인 출력): Analog audio output for connecting to active speakers or an amp리퍼.
- Optical Output (S/PDIF Out): 디지털 오디오 출력.
- Coaxial Output (S/PDIF Out): 디지털 오디오 출력.
5. 설정
5.1 Connecting to Active Speakers
Connect the RCA Line Out ports of the D10s to the analog input of your active speakers. This configuration allows the D10s to act as a high-quality DAC, bypassing your computer's internal sound card.

이미지 5.1: Example setup connecting the D10s to active speakers and a computer.
5.2 Connecting to a Power/Headphone Amp리퍼
To integrate the D10s into an existing HiFi system, connect the RCA Line Out of the D10s to the input of your power amp리퍼 또는 헤드폰 amplifier. This setup utilizes the D10s for digital-to-analog conversion, improving the sound quality of high-resolution audio files.
5.3 Using as a USB Interface (Digital Output)
If you possess a separate, higher-end DAC, the D10s can function as a USB interface. Connect the USB input of the D10s to your computer, and then connect the Coaxial or Optical output of the D10s to the digital input of your other DAC. The D10s will convert the USB audio stream into a Coaxial or Optical signal. Note that Coaxial and Optical outputs support up to 24bit/192kHz and DSD64 (DoP).
5.4 PC Connection and Driver Installation
For basic plug-and-play functionality, connect the D10s directly to your PC via the included USB cable. For optimal performance and DSD playback, especially on Windows systems, driver installation may be required.
- Connect the D10s to your computer using the supplied USB cable. The D10s will power on automatically with your PC.
- For Windows systems, it is recommended to install the customized Thesycon driver. This driver package and setup tutorial can typically be found on the manufacturer's support web대지.
- For macOS, the D10s is generally plug-and-play and does not require additional drivers.
- After driver installation (if applicable), select the D10s as your audio output device in your operating system's sound settings.
- For advanced playback of high-resolution files, especially DSD, consider using dedicated audio playback software (e.g., Audirvana Plus for Mac, or other compatible players for Windows) that can output the original bit rate to the D10s.

Image 5.2: Illustrates PC audio settings and software for configuring the D10s.
6. 운영
6.1 전원 켜기/끄기
The D10s is USB-powered and will automatically power on when connected to an active USB port on your computer. It will also synchronously power off when your PC shuts down, even if the USB port continues to supply power.
6.2 Audio Format and Samp링율 지표
The front display of the D10s accurately indicates the audio format (PCM or DSD) and the sampling rate of the music currently playing. This allows for immediate verification of the audio stream's characteristics.

Image 6.1: D10s display showing DSD playback at 11.2 MHz.
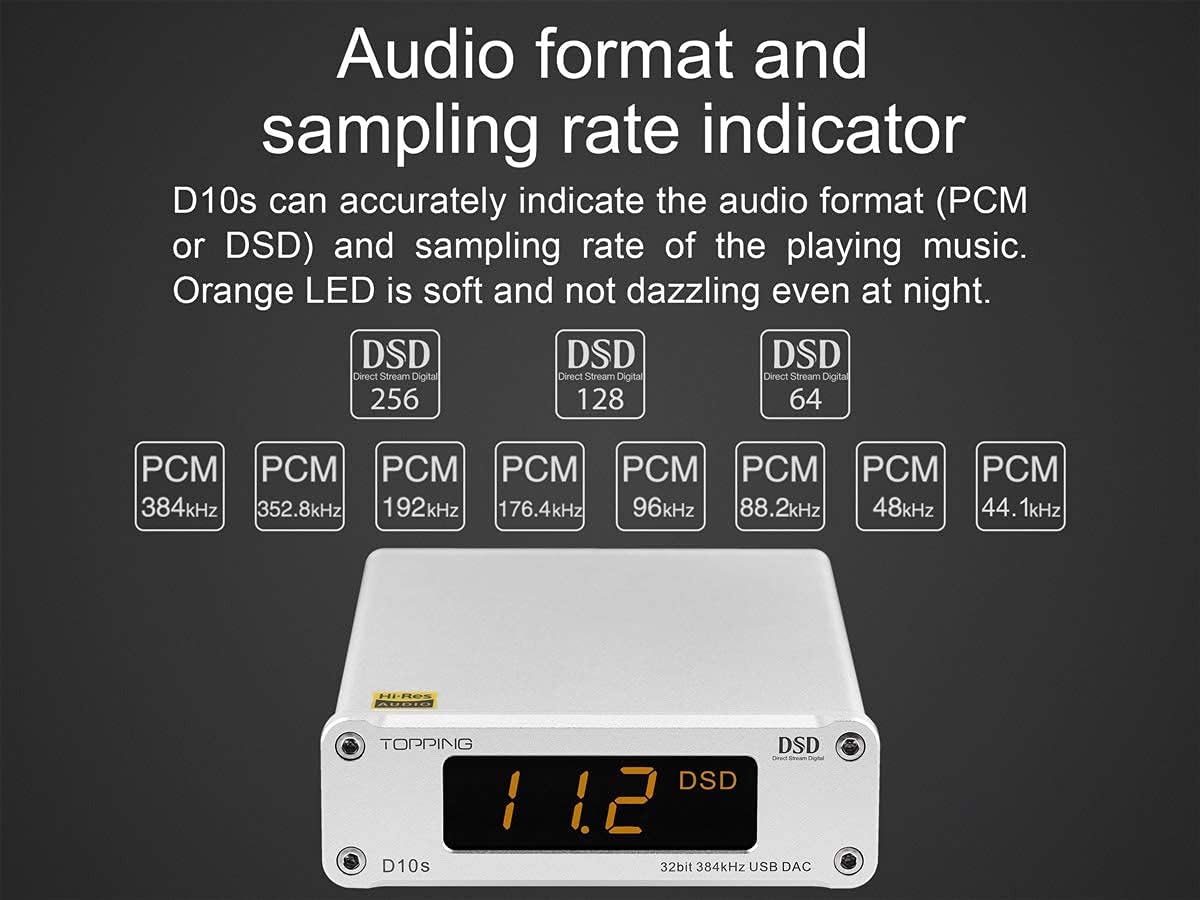
Image 6.2: Internal components of the D10s, highlighting the XMOS XU208 chip, ESS ES9038Q2M DAC, and the replaceable OP-AMP 소켓.
6.3 Replaceable OP-AMP 구르는
The TOPPING D10s features an OP-AMP socket, allowing experienced users to replace the operational amplifier to achieve different sound characteristics. This feature is intended for advanced users with knowledge of audio electronics.
Warning: Replacing the OP-AMP is not recommended for non-professional users due to potential risks of damaging the device or voiding the warranty. Proceed with caution and at your own risk.
7. 유지관리
- 청소: 부드럽고 마른 천을 사용하여 기기 외부를 닦으세요. 액체 세척제나 연마재를 사용하지 마세요.
- 저장: When not in use for extended periods, store the D10s in a cool, dry place away from direct sunlight and dust.
- 통풍: Ensure that the device has adequate airflow around it to prevent overheating.
8. 문제 해결
| 문제 | 가능한 원인 | 해결책 |
|---|---|---|
| 소리가 출력되지 않습니다. |
|
|
| Display shows incorrect sampling rate or format. |
|
|
| PC에서 장치를 인식하지 못합니다. |
|
|
9. 사양
| 특징 | 세부 사항 |
|---|---|
| 모델 | D10s |
| 치수 | 10.3 x 14.6 x 3.7 cm (4.06"W x 5.75"L x 1.46"H) |
| 무게 | 323g(10.6온스) |
| 색상 | 검은색 |
| 전원 입력 | DC5V/0.5A (USB powered) |
| 입력 | USB |
| 디지털 출력 | Optical (OPT), Coaxial (COAX), RCA (Line Out) |
| 표시하다 | Customized Digital Tube |
| USB 입력(PCM) | 44.1kHz-384kHz / 16Bit-32Bit |
| USB 입력(DSD) | DSD64-DSD256 (Native); DSD128 (DoP) |
| 선택/동축 출력 | 44.1kHz-192kHz / 16Bit-24Bit, DSD64 (DoP) |
| THD+N @1kHz A-wt (Line Out/USB In@96kHz) | <0.0002% |
| SNR @1kHz A-wt | 120데시벨 |
| 다이내믹 레인지 @1kHz A-wt | 120데시벨 |
| Frequency Response @1kHz A-wt | 20Hz-20kHz(±0.1dB), 20Hz-40kHz(±0.4dB) |
| 출력 레벨 | 2Vrms @0dBFS |
| Noise @1kHz A-wt | <2.5uVrms |
| 채널 누화@1kHz | -135데시벨 |
| 채널 밸런스 | <0.02데시벨 |
| 출력 임피던스 | 20Ω |
| 재료 | 알류미늄 |
10. 보증 및 지원
The TOPPING D10s comes with a TOPPING repair card, which serves as your warranty document. Please refer to the terms and conditions specified on the repair card for details regarding warranty coverage and service procedures.
For technical support, troubleshooting assistance beyond this manual, or warranty claims, please contact your authorized dealer or the manufacturer's customer service. Contact information can typically be found on the TOPPING official website or the repair card.
Keep your purchase receipt and the repair card in a safe place as proof of purchase for warranty purposes.