
1. 서론
The Massive Audio Primo Series P8 Monoblock Mega Amp이 앰프는 고성능 클래스 D 앰프입니다. amplifier designed for car audio systems. This manual provides essential information for proper installation, operation, and maintenance of your P8 amplifier는 최적의 성능과 수명을 보장합니다.

이미지 1.1: 상단 view of the Massive Audio Primo Series P8 Monoblock Amp리파이어, 쇼크asin세련된 디자인과 컴팩트한 폼팩터를 자랑합니다.
2. 안전 지침
Please read and understand all safety instructions before installing or operating this amp증폭기. 이 지침을 따르지 않을 경우 제품이나 차량에 부상이나 손상이 발생할 수 있습니다.
- 전기 연결 작업을 하기 전에 항상 차량 배터리의 음극 단자를 분리하십시오.
- 적절한 환기를 확보하세요 amp과열을 방지하는 lifier.
- 본 설명서에 명시된 대로 전원, 접지 및 스피커 연결에는 적절한 굵기의 전선을 사용하십시오.
- 마운트하다 amp차량 운행 중 움직임을 방지하기 위해 증폭기를 단단히 고정하십시오.
- 설치를 피하십시오 amp습기나 과도한 진동에 노출되는 장소에는 증폭기를 설치하지 마십시오.
- 최적의 안전과 성능을 위해서는 전문가 설치를 권장합니다.
3. 패키지 내용
포장을 풀 때 모든 품목이 있는지 확인하세요.
- One (1) Massive Audio Primo Series P8 Monoblock Mega Amp리퍼
- 사용 설명서 (본 문서)
- 장착 하드웨어(포함된 경우)
4. 주요 특징
P8 amp이 앰프는 뛰어난 오디오 성능과 신뢰성을 위한 고급 기능을 통합하고 있습니다.
- Input Sensitivity Low Level: 400mVrms ~ 10Vrms
- Auto Hi-Level Input via RCA Input
- 12v Remote Output When Hi-level Signal is Used
- Parametric EQ with 0 - 12 dB Boost
- All Models Linkable with Single RCA for easy upgrade
- Short Circuit, Thermal, Reverse Voltage, and Over Voltage 보호
- N-Channel Circuitry for High-Efficiency
- 24 dB Low Pass Crossovers with an adjustable range of 30Hz - 220Hz
- Heavy Duty Power Supply
- 조명 로고
- Heavy-Duty Aluminum Heat Sink
- 미국에서 설계 및 엔지니어링
- Proprietary "Bass Kompressor" Circuitry provides Low-Frequency Enhancement
- Extreme Power in a Small Footprint
- "Q Control" to fine-tune the curve on the bass boost
- "Clip Limit Switch" allows the amplifier to take up to 16.5 volts
- Adjustable Low Pass 18dB Sub Harmonic Filter with a range of 0Hz - 60Hz
- Adjustable center frequency range of 30-80 Hz
- Nickel-Plated Connectors
- High-Efficiency Class "D" Design
5. 설정 및 설치
적절한 설치는 성능과 안전을 위해 매우 중요합니다. amplifier. Consult a professional installer if you are unsure about any steps.
5.1. 장착 위치
- Choose a dry, well-ventilated area away from direct sunlight or heat sources.
- 설치 표면이 하중을 견딜 수 있을 만큼 튼튼한지 확인하십시오. amp증폭기의 무게.
- 주변에 충분한 공간을 확보하세요 amp공기 순환을 위한 리파이어.
5.2. 배선 연결
Refer to the diagram below for proper wiring of power, ground, remote, and speaker connections.

Image 5.1: Rear panel of the P8 amp앰프의 전원, 접지, 원격 및 스피커 단자를 보여줍니다.
5.2.1. Power Connection (+12V)
Connect a heavy-gauge power cable (e.g., 4 AWG or larger) from the amplifier's +12V terminal to the positive terminal of the vehicle's battery. Install an appropriate fuse (not supplied) within 18 inches (45 cm) of the battery.
5.2.2. Ground Connection (GND)
Connect a heavy-gauge ground cable (e.g., 4 AWG or larger) from the amp앰프의 접지 단자를 차량 섀시의 깨끗하고 도색되지 않은 금속 표면에 연결하십시오. 견고하고 저항이 낮은 연결이 이루어지도록 하십시오.
5.2.3. Remote Turn-On (REM IN/OUT)
Connect a 18-gauge wire from your head unit's remote output to the amplifier's REM IN terminal. The REM OUT terminal can be used to daisy-chain the remote signal to other amp정수기.
5.2.4. Speaker Connection (SPEAKER)
Connect your subwoofer(s) to the SPEAKER terminals. Ensure the total impedance of the connected speakers is not below 0.5 Ohm. Observe correct polarity (+ to + and - to -).
5.2.5. Signal Input (LINE IN)
헤드 유닛의 사전에서 RCA 케이블을 연결하세요.amp 출력하다 amplifier's LINE IN RCA inputs. The amplifier also supports auto hi-level input via the RCA inputs.
6. 작동 및 조정
P8 amplifier features various controls to fine-tune your audio system. Familiarize yourself with these controls for optimal sound.
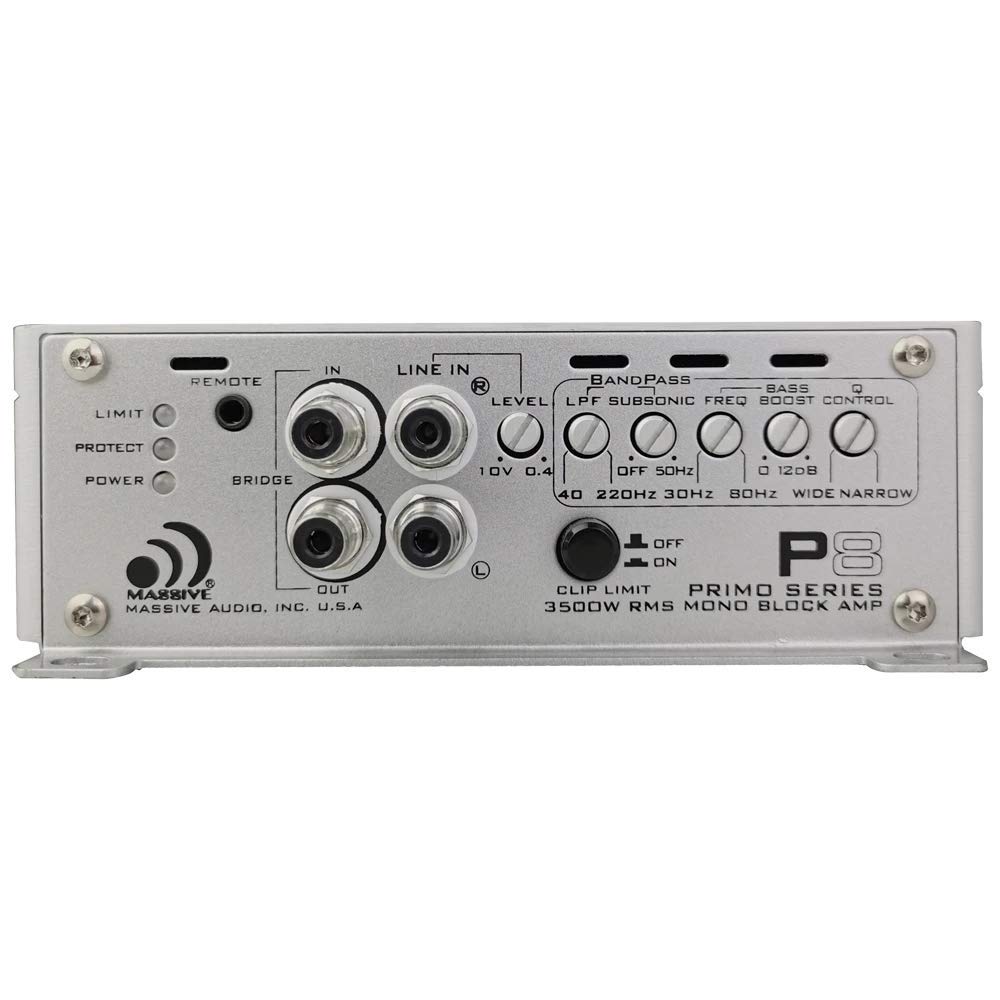
Image 6.1: Front panel of the P8 amplifier displaying the control layout for audio adjustments.
6.1. 제어판 오버view
- 먼: Input for optional remote bass control knob.
- LIMIT/PROTECT/POWER Indicators: LEDs indicating amp리퍼 상태.
- 라인 입력 : RCA inputs for audio signal.
- LEVEL (Input Sensitivity): Adjusts the input gain to match the head unit's output. Range: 400mVrms - 10Vrms.
- LPF(저역 통과 필터): Adjusts the upper frequency limit for the subwoofer. Range: 30Hz - 220Hz (24 dB/octave).
- SUBSONIC FREQ (High Pass Filter): Filters out ultra-low frequencies below the audible range to protect subwoofers. Range: 0Hz - 60Hz (18 dB/octave).
- 베이스 부스트: Increases bass output at a specific frequency. Range: 0 - 12 dB.
- Q CONTROL: Fine-tunes the bandwidth of the bass boost.
- CLIP LIMIT SWITCH: 허용합니다 amplifier to handle up to 16.5 volts, preventing clipping at high input levels.
6.2. 초기 설정 및 조정
- 모두 설정 amplifier controls (LEVEL, LPF, SUBSONIC, BASS BOOST) to their minimum or off positions.
- 헤드 유닛 볼륨을 최대치의 약 75% 정도로 낮추세요.
- 천천히 증가 amp앰프의 LEVEL 컨트롤을 약간의 왜곡이 들릴 때까지 높인 다음, 약간 낮추십시오.
- Adjust the LPF to suit your subwoofers and personal preference, typically between 60Hz and 100Hz for subwoofers.
- Set the SUBSONIC FREQ to protect your subwoofers from frequencies below their resonant frequency, usually around 20Hz to 30Hz.
- Use the BASS BOOST and Q CONTROL sparingly to enhance bass, avoiding excessive boost that can lead to distortion or speaker damage.
7. 유지관리
정기적인 유지보수는 제품의 수명과 성능을 보장하는 데 도움이 됩니다. amp리퍼.
- 유지하다 amp세척기를 깨끗하고 먼지나 이물질이 없도록 하세요. 세척 시에는 부드럽고 마른 천을 사용하세요.
- 모든 배선 연결부의 견고성과 부식 여부를 주기적으로 점검하세요.
- 다음을 확인하세요. amp증폭기의 냉각 핀은 적절한 열 방출을 유지하기 위해 막히지 않습니다.
8. 문제 해결 가이드
문제가 발생하는 경우 amplifier의 경우, 일반적인 문제와 해결책은 아래 표를 참조하세요.
| 문제 | 가능한 원인 | 해결책 |
|---|---|---|
| 전원 없음 / 전원 LED 꺼짐 | Blown fuse, poor power/ground connection, faulty remote wire. | Check inline fuse near battery. Verify +12V, GND, and REM connections. Ensure remote wire has +12V when head unit is on. |
| No Sound / Protect LED On | Speaker short circuit, impedance too low, overheating, faulty RCA cables. | Check speaker wiring for shorts. Verify speaker impedance is 0.5 Ohm or higher. Ensure adequate ventilation. Check RCA cable integrity. |
| 왜곡된 소리 | Gain set too high, improper LPF/Subsonic settings, poor signal quality, low voltage. | Reduce LEVEL (gain) control. Adjust LPF and Subsonic filters. Check RCA cables. Verify vehicle's electrical system. |
| Amp리파이어 과열 | 환기가 불충분하고, 임피던스가 너무 낮으며, 출력이 장시간 높게 유지되는 경우. | 고쳐 놓다 amplifier for better airflow. Check speaker impedance. Reduce listening volume or duration. |
9. 기술 사양
| 사양 | 값 |
|---|---|
| RMS 전력(1옴) | 2300와트x1 |
| RMS 전력(2옴) | 1400와트x1 |
| RMS 전력(0.5옴) | 3500와트x1 |
| 피크 파워 | 7000와트x1 |
| 최소 임피던스 | 0.5옴 |
| 베이스 부스트 주파수 | 30Hz - 120Hz |
| 총 고조파 왜곡률(THD) | 0.03 % 미만 |
| 신호 대 잡음비(S/N) | 100dB 이상 |
| Subsonic Filter (HPF) | 0~60Hz |
| RCA 입력 볼륨tage | 400mV - 10V |
| 주파수 응답 | 10Hz - 220Hz |
| 치수(길이 x 너비 x 높이) | 19.9인치 x 6.5인치 x 2.1인치 |
| 권tage | 12볼트(DC) |
| 최대 공급량tage | 12 볼트 |
| 장착 유형 | 독립형 |
| 모델 번호 | P8 |
| 제조업체 | Massive Audio |
10. 보증 정보
Massive Audio products typically come with a limited manufacturer's warranty. Please refer to the official Massive Audio website or your purchase documentation for specific warranty terms and conditions, including coverage period and claim procedures. Keep your proof of purchase for warranty validation.
11. 고객 지원
For technical assistance, service, or further inquiries regarding your Massive Audio Primo Series P8 Monoblock Amplifier, please visit the official Massive Audio website or contact their customer support department. You can also visit the Massive Audio Store on Amazon for product information: