
Newgoal DC2-Tuya
Newgoal 2채널 WiFi 스마트 스위치 릴레이 모듈(모델: DC2-Tuya) - 사용 설명서
설치, 작동, 유지관리에 대한 포괄적인 지침입니다.
1. 서론
This manual provides detailed instructions for the installation, configuration, and operation of your Newgoal 2-Channel WiFi Smart Switch Relay Module, model DC2-Tuya. This device allows for remote control of electrical appliances via the TUYA/Smart Life App, and integrates with voice assistants like Alexa and Google Assistant. It supports various working modes including momentary and self-locking, offering flexibility for diverse smart home applications.

Image 1.1: The Newgoal 2-Channel WiFi Smart Switch Relay Module alongside a smartphone displaying the control application.
2. 제품 오버view
The Newgoal DC2-Tuya module is a versatile smart relay designed for integration into existing electrical systems. It features two independent channels, enabling control of two separate devices. Key components and their functions are outlined below:

Image 2.1: Detailed diagram illustrating the components of the Newgoal DC2-Tuya module, including the 2.4GHz WiFi chip, WiFi antenna, manual switches, LEDs, and input/output terminals.
- 2.4GHz WiFi Chip: Enables wireless connectivity to your home network.
- WiFi 안테나: For stable wireless communication.
- Manual Switches (Key1, Key2): Physical buttons for local control and pairing.
- LED 표시등: Provide status feedback for WiFi connection and relay operation (CH1 ON-OFF LED, CH2 ON-OFF LED, Work Mode LED, WiFi LED).
- 입력 단자: Micro USB 5V/500mA or AC/DC 7-32V/500mA for power supply.
- Relay Load Terminals: NC (Normally Closed), COM (Common), NO (Normally Open) for connecting electrical devices.
- Work Modes Toggle Button: Used to switch between momentary, self-locking, and interlock modes.
3. 사양
| 특징 | 세부 사항 |
|---|---|
| 모델 | DC2-Tuya |
| 상표 | 뉴골 |
| 입력 Voltage | Micro USB 5V or AC/DC 7-32V |
| 릴레이 부하 | AC 250V 10A, DC 30V 10A |
| 연결성 | 2.4GHz WiFi(IEEE 802.11 b/g/n) |
| 앱 호환성 | TUYA / Smart Life App |
| 음성 지원 | 알렉사, 구글 어시스턴트 |
| 작업 모드 | Momentary (Inching), Self-locking, Interlock |
| 치수 | 67mm(길이) x 41mm(폭) x 20mm(높이) |
| 재료 | Copper (Contact Material: Silver Copper) |
4. 설정 및 설치
4.1 안전 예방 조치
- Ensure power is disconnected before any wiring.
- Installation should be performed by qualified personnel if you are unfamiliar with electrical wiring.
- Do not exceed the specified maximum load for the relays.
- Only connect to a 2.4GHz WiFi network. 5GHz networks and Mesh WiFi systems are not supported.
4.2 앱 설치 및 계정 등록
- 다운로드 투야 스마트 or 스마트 라이프 application from your smartphone's app store (available for Android and iOS).
- Open the app and register for a new account if you do not already have one.
- 귀하의 계정에 로그인하세요.
4.3 배선도
The module supports various wiring configurations depending on the application and desired working mode. Always ensure correct polarity and voltage.
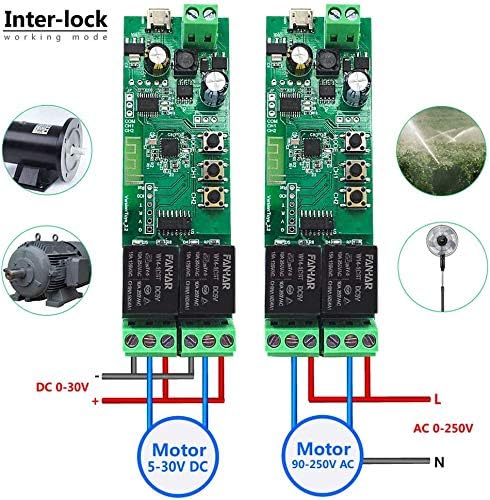
Image 4.1: Wiring for Interlock mode, demonstrating connections for both DC (5-30V) and AC (90-250V) motors or appliances. This mode ensures only one relay is active at a time.

Image 4.2: Wiring for Momentary mode, suitable for applications like garage door openers or momentary button presses. Input power is typically 5V via Micro USB.

Image 4.3: Wiring for Self-locking mode, ideal for controlling lights or other devices that require a sustained ON/OFF state. Input power can be AC/DC 7-32V.
Refer to the specific application's voltage requirements and connect the load to the appropriate COM and NO (Normally Open) or NC (Normally Closed) terminals on the relay. The module can be powered via a Micro USB 5V input or directly through the AC/DC 7-32V terminals.
4.4 Device Pairing with App
- Power on the Newgoal DC2-Tuya module using either the Micro USB 5V or AC/DC 7-32V input.
- Open the TUYA Smart or Smart Life App.
- Press and hold the "Work Modes Toggle Button" (often labeled Key1 or Key2, or a dedicated pairing button) on the module for approximately 6 seconds until the WiFi LED indicator starts blinking rapidly. This indicates the module is in pairing mode.
- In the app, tap the "Add Device" (+) icon, usually located in the top right corner.
- Select the device type (e.g., "Switch" or "Electrical Switch"). The app may automatically discover the device.
- Follow the on-screen instructions to connect the module to your 2.4GHz WiFi network. You will need to enter your WiFi network password.
- Once successfully paired, the WiFi LED on the module will stop blinking and remain solid. You can then rename the device and individual channels within the app for easier identification.
5. 사용 설명서
5.1 작업 모드
The module supports three primary working modes, configurable via the app or the physical "Work Modes Toggle Button" (long press for 6 seconds to enter setting mode, then short press to cycle through modes: 1 time for Momentary, 2 times for Self-locking, 3 times for Interlock). The Work Mode LED will indicate the selected mode.
- Momentary Mode (Inching Mode): When activated, the relay turns on for a set duration (adjustable from 0.5 to 60 seconds) and then automatically turns off. This is suitable for applications requiring a brief pulse, such as garage door openers or electric strikes.
- 자체 잠금 모드: Each relay acts as a standard ON/OFF switch. Pressing the button (in app or physical) toggles the relay state (ON or OFF). This is ideal for controlling lights or other devices that need to remain in a continuous state.
- 인터록 모드: In this mode, only one relay can be active at a time. If one relay is turned ON, any other active relay will automatically turn OFF. This is useful for controlling devices where simultaneous operation is undesirable, such as motor direction control.

Image 5.1: App interface showing the adjustable momentary time setting, allowing users to configure the duration from 0.5 to 60 seconds.
5.2 앱을 통한 원격 제어
Once paired, you can control the module from anywhere using the TUYA Smart or Smart Life App.
- Open the app and select your Newgoal DC2-Tuya device.
- You will see individual controls for each channel (Switch 1, Switch 2). Tap to toggle the state of each relay.
- The app also provides features such as:
- 실시간 상태: View the current ON/OFF state of each relay.
- 타이머 설정: Schedule relays to turn ON/OFF at specific times.
- 카운트 다운 : Set a countdown timer for a relay to change state.
- 공유 제어: Share device control with other family members.
- 자동화/장면: Create custom automation rules based on conditions (e.g., time of day, other smart devices).

Image 5.2: The Smart Life app interface, demonstrating individual control for each channel and access to advanced features.
5.3 음성 제어 (알렉사/구글 어시스턴트)
The Newgoal DC2-Tuya module is compatible with Amazon Alexa and Google Assistant for convenient voice control.
- Ensure your module is successfully paired with the TUYA Smart or Smart Life App.
- 스마트폰에서 Alexa 또는 Google Home 앱을 엽니다.
- "스킬 및 게임"(Alexa) 또는 "Google과 호환"(Google Home) 섹션으로 이동합니다.
- 검색 and enable the "TUYA Smart" or "Smart Life" skill/service.
- Link your TUYA/Smart Life account with your Alexa/Google account.
- Discover devices. Your Newgoal DC2-Tuya module and its channels should appear.
- 이제 다음과 같은 음성 명령을 사용할 수 있습니다.
- "Alexa, turn on [Device Name] Switch 1."
- "Hey Google, turn off [Device Name] Switch 2."
- "Alexa, set [Device Name] Switch 1 to momentary mode." (Functionality may vary by voice assistant and app version).
6. 유지관리
- 청소: Disconnect power before cleaning. Use a dry, soft cloth to wipe the module. Do not use liquid cleaners or solvents.
- 펌웨어 업데이트: Periodically check the TUYA Smart or Smart Life App for available firmware updates for your device. Updates can improve performance and add new features.
- 연결 확인: 모든 배선 연결이 안전하게 유지되고 부식되지 않았는지 확인하세요.
- 환경: Operate the module within its specified temperature and humidity ranges to ensure longevity. Avoid exposure to extreme conditions.
7. 문제 해결
| 문제 | 가능한 원인 | 해결책 |
|---|---|---|
| 기기가 Wi-Fi에 연결할 수 없습니다. | Incorrect WiFi password; 5GHz WiFi network; weak signal; module not in pairing mode. | Verify WiFi password. Ensure you are connecting to a 2.4GHz network. Move the module closer to the router or use a WiFi extender. Re-enter pairing mode (rapidly blinking WiFi LED). |
| Relay does not respond to app commands. | No internet connection; module offline; incorrect wiring; power issue. | Check your home internet connection. Verify the module's WiFi LED is solid. Inspect wiring for loose connections. Ensure the module is receiving power. Restart the app. |
| 음성 제어가 작동하지 않습니다. | Skill/service not enabled; account not linked; incorrect device name. | Ensure the TUYA Smart/Smart Life skill is enabled and linked in your Alexa/Google Home app. Verify the device name used in voice commands matches the name in the app. Try rediscovering devices. |
| Momentary mode duration is incorrect. | Incorrect setting in the app. | Access the device settings in the TUYA Smart/Smart Life App and adjust the "Momentary time" parameter. |
8. 보증 및 지원
8.1 보증 정보
Newgoal products are designed for reliability and performance. For specific warranty details, please refer to the product packaging or contact Newgoal customer service. Keep your purchase receipt as proof of purchase for warranty claims.
8.2 고객 지원
If you encounter any issues or have questions regarding your Newgoal 2-Channel WiFi Smart Switch Relay Module, please contact our customer support team. For the most up-to-date contact information, visit the official Newgoal web사이트를 방문하거나 제품 설명서를 참조하세요.
온라인 리소스: For additional guides, FAQs, and community support, visit the Tuya Smart official web대지 또는 Smart Life support pages.
Ask a question about this manual
Ask about setup, troubleshooting, compatibility, parts, safety, or missing instructions. Manuals+ will review the question and use this page’s manual context to help answer it.