
1. 서론
This manual provides detailed instructions for the safe and effective installation, operation, and maintenance of your Invision MX450 Monitor Arm. Please read this manual thoroughly before installation and retain it for future reference. The Invision MX450 is designed to provide an ergonomic and flexible mounting solution for monitors ranging from 24 to 49 inches, supporting weights from 2kg to 15kg.

Image 1.1: The Invision MX450 Monitor Arm supporting a display.
2. 안전 정보
Always ensure the monitor arm is securely fastened to the desk and the monitor is correctly attached to the VESA plate. Do not exceed the maximum weight capacity of 15kg. Improper installation or use may result in equipment damage or personal injury. Keep children and pets away from the installation area. Avoid placing fingers or hands near moving parts during adjustment.
3. 패키지 내용
설치를 시작하기 전에 모든 구성 요소가 있는지 확인하세요.
- Invision MX450 Monitor Arm Assembly
- 하드웨어 키트(나사, 와셔, VESA 마운팅용 스페이서)
- 데스크 Clamp 구성 요소
- Grommet Mount components
- 설치 설명서(본 문서)
4. 설정 및 설치
The Invision MX450 offers two primary installation methods: C-clamp for desk edges and grommet mount for through-desk installation.
4.1. 호환성 확인
- Monitor Size & Weight: Compatible with 24" to 49" screens, weighing between 2kg and 15kg.
- VESA 표준 : Supports VESA patterns 75mm x 75mm and 100mm x 100mm. Measure your monitor's bolt hole pattern (horizontal then vertical) to confirm compatibility.
- Curved Monitor Note: For 49-inch curved screens, compatibility is limited to models with a 3000R radius rating or above. Deeply curved screens (e.g., Samsung G9 49") are not compatible due to potential leverage issues on the tilt mechanism.
- 책상 두께: For C-clamp, desk thickness must be between 10mm and 90mm. For grommet mount, desk thickness must be between 20mm and 90mm.

Image 4.1: Technical specifications and VESA measurement guide.
4.2. 장착 옵션
Choose the appropriate mounting method for your desk:
- C-Clamp 설치: C-cl을 부착하세요amp base to the edge of your desk. Ensure it is tightened securely to prevent movement.
- 그로밋 마운트 설치: If your desk has a pre-drilled hole, use the grommet components to secure the arm through the desk. This method provides enhanced stability.
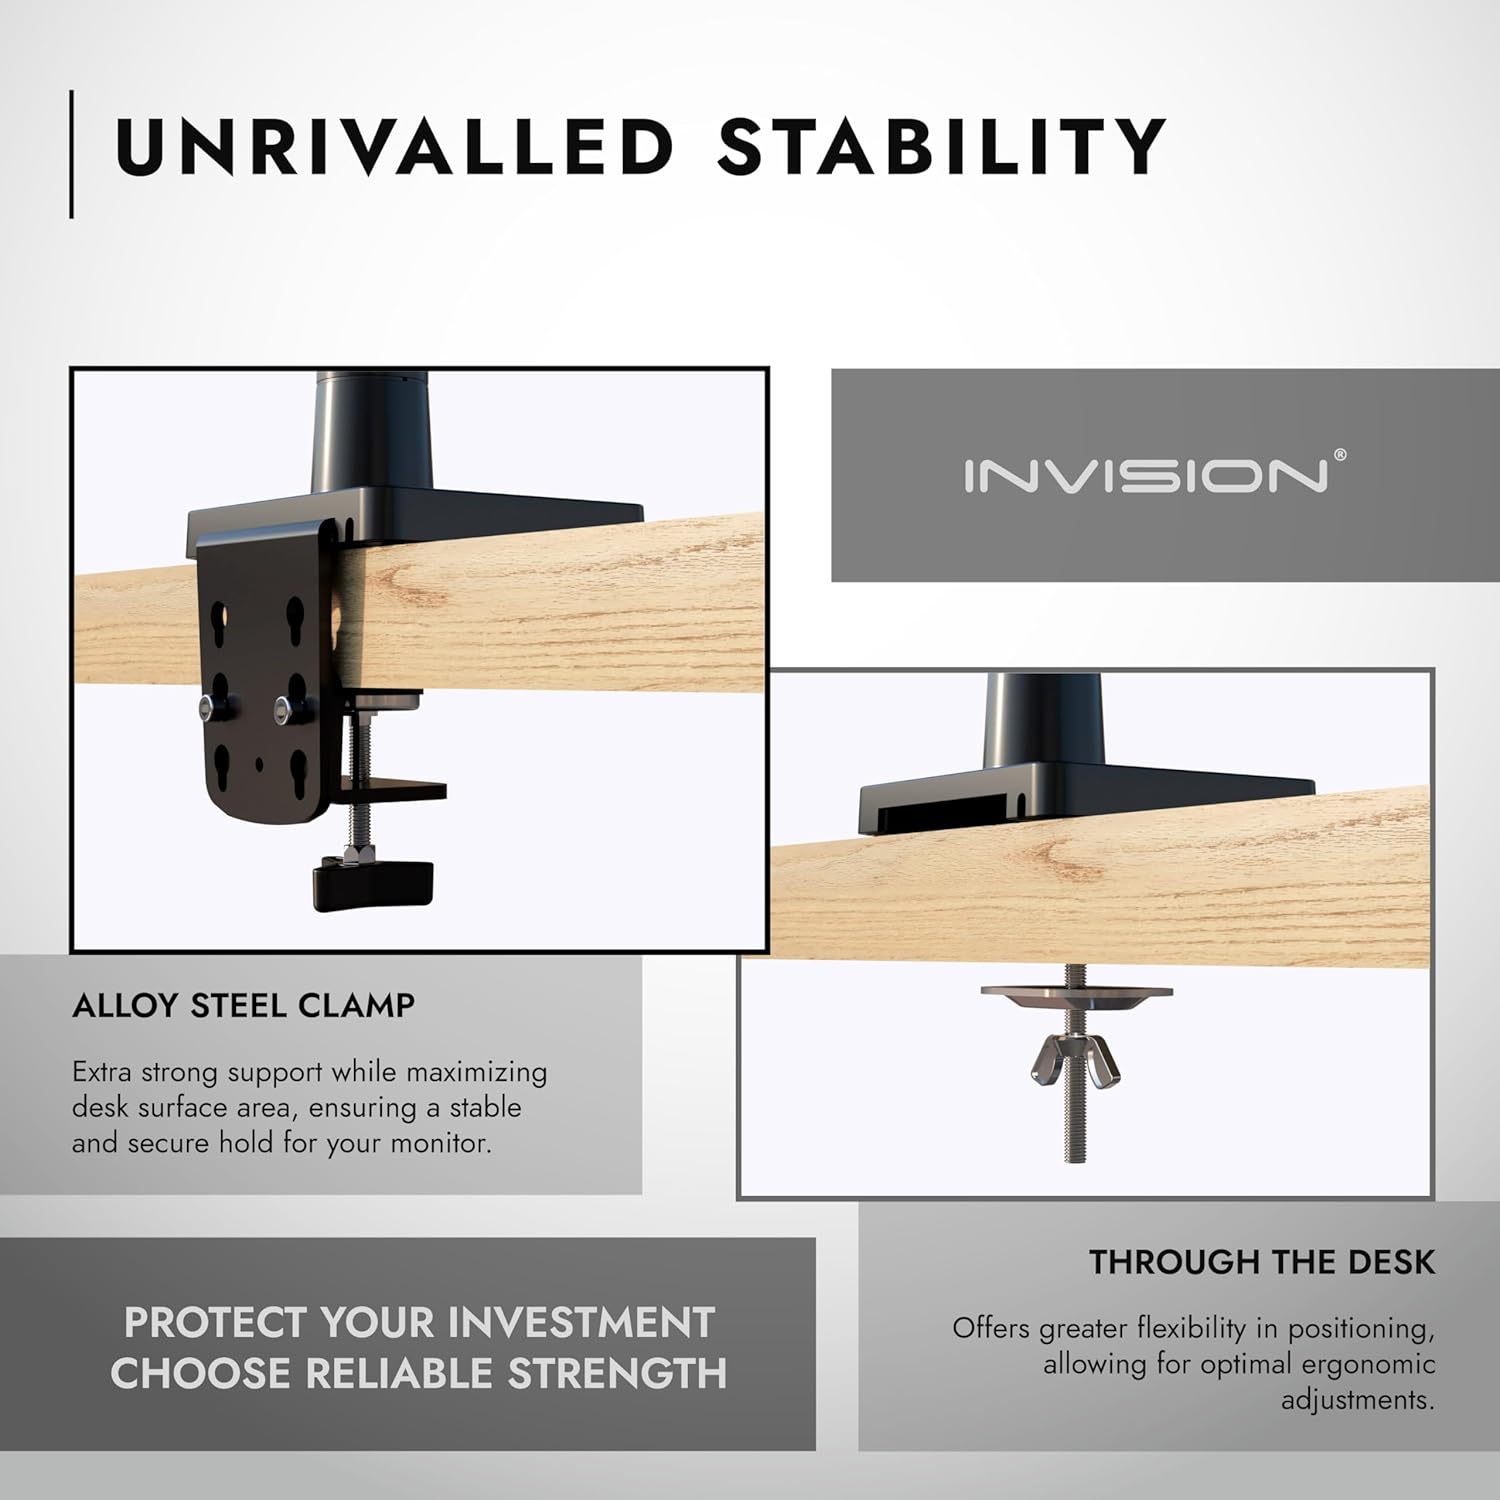
Image 4.2: C-clamp and Grommet mounting methods.
4.3. 모니터 연결
- Carefully attach the VESA plate to the back of your monitor using the provided screws. Ensure the screws are tightened firmly but do not overtighten.
- Slide the monitor (with VESA plate attached) onto the arm's mounting head until it clicks into place. Secure with any additional locking mechanisms if present.
5. 사용 설명서
The Invision MX450 features a gas spring mechanism for smooth and effortless adjustments, allowing you to optimize your view경험.
5.1. 모니터 위치 조정
- 높이 조정: Gently push or pull the monitor up or down to achieve the desired height. The gas spring will hold it in position.
- Reach/Extension: Extend or retract the arm to bring the monitor closer or further away from you. The maximum reach is 650mm (25.6 inches).
- 경사: Tilt the monitor +85° upwards or -30° downwards to reduce glare or adjust for standing/sitting positions.
- 받침: Swivel the monitor 180° left or right at the VESA plate connection.
- 회전: Rotate the screen 360° from landscape to portrait orientation.

Image 5.1: Ergonomic monitor positioning with the MX450.

Image 5.2: Maximum reach and height capabilities.
5.2. 케이블 관리
The MX450 includes integrated cable management channels on both the lower and upper arms. Open the removable panels, route your cables through them, and close the panels to maintain a tidy and organized workspace.
6. 유지관리
The Invision MX450 is designed for durability and minimal maintenance. Regular checks can ensure continued optimal performance.
- 청소: 부드러운 천으로 팔을 닦으세요.amp 천으로 닦으세요. 연마성 세제나 용제는 사용하지 마세요.
- 연결 확인: Periodically check all screws and connections (desk clamp/grommet, VESA plate) to ensure they remain tight and secure.
- 가스 스프링 조정: If the monitor sags or is difficult to adjust, the gas spring tension may need fine-tuning. Refer to the specific adjustment mechanism on your arm (usually a screw on the arm joint) and adjust according to your monitor's weight.
7. 문제 해결
- 모니터가 처지거나 제대로 고정되지 않음: The gas spring tension may be too low for your monitor's weight. Increase the tension using the adjustment screw on the arm.
- 모니터를 옮기기가 어렵습니다. The gas spring tension may be too high. Decrease the tension using the adjustment screw.
- 팔이 불안정하게 느껴져요: 책상이 깨끗한지 확인하세요amp or grommet mount is securely tightened to the desk. Verify that the monitor is correctly attached to the VESA plate.
- Monitor Not VESA Compatible: If your monitor lacks VESA mounting holes or has an incompatible pattern, an Invision NV100 Non-VESA Monitor Adapter Mount Kit (ASIN B076QB3VRD) may be required.
8. 사양
| 특징 | 사양 |
|---|---|
| 모델 | MX450 |
| 호환되는 화면 크기 | 24" - 49" (Note: 49" curved screens require 3000R radius or above) |
| 하중 용량 | 2kg ~ 15kg |
| VESA 호환성 | 75mmx75mm, 100mmx100mm |
| 수직 기울기 각도 | +85° / -30° |
| Upright Maximum Elevation | 525mm(20.7인치) |
| Maximum Reach/Extension | 650mm(25.6인치) |
| Minimum Reach/Extension | 185mm(7.3인치) |
| Screen Face Plate Rotation | 360° (가로에서 세로로) |
| Screen Face Plate Swivel | 180° |
| Elbow Rotation | 360° |
| Base Swivel/Rotation | 360° |
| 책상 두께(C-Cl)amp) | 10mm - 90mm |
| 책상 두께(그로밋) | 20mm - 90mm |
| 재료 | Alloy Steel, Aluminium Alloy, SPCC |
| 색상 | 검은색 |

Image 8.1: Invision MX450 construction and performance comparison.

Image 8.2: Key features of the Invision MX450 design.
9. 보증 정보
The Invision MX450 Monitor Arm comes with a 2년 보증 on all parts. This warranty covers manufacturing defects and material faults under normal use. Please retain your proof of purchase for warranty claims.
10. 고객 지원
For any questions, installation assistance, or troubleshooting not covered in this manual, please contact Invision customer support. Our team is available to provide assistance and ensure a trouble-free experience.
Refer to your product packaging or the Invision web구체적인 연락처 정보는 해당 사이트를 참조하세요.