
1. 서론
Thank you for choosing the HiLook HIKVISION 204U-K1 4-Channel 5MP HD DVR. This manual provides essential information for the proper installation, operation, and maintenance of your digital video recorder. Please read this manual thoroughly before using the product and retain it for future reference.
2. 중요 안전 지침
- 전원 공급 장치: Use only the power adapter specified for this device. Ensure the power voltage is stable and meets the requirements.
- 통풍: 환기구를 막지 마십시오. 제조업체의 지침에 따라 설치하십시오.
- 물과 습기: Do not expose the device to rain or moisture. Do not place objects filled with liquids, such as vases, on the apparatus.
- 온도: Operate the device within the specified temperature range. Avoid extreme hot or cold environments.
- 청소: 마른 천으로만 청소하십시오. 액체 세제나 에어로졸 세제를 사용하지 마십시오.
- 서비스: 이 제품을 직접 수리하려고 하지 마십시오. 모든 서비스는 자격을 갖춘 서비스 담당자에게 문의하십시오.
- 하드 드라이브: Handle the hard drive with care. Improper installation or removal can cause data loss or damage.
3. 패키지 내용
포장을 뜯을 때 모든 품목이 있는지, 그리고 양호한 상태인지 확인하십시오. 누락되거나 손상된 품목이 있는 경우 판매점에 문의하십시오.
- HiLook HIKVISION 204U-K1 DVR Unit
- 전원 어댑터
- USB 마우스
- SATA Data Cable (for HDD connection)
- SATA Power Cable (for HDD connection)
- 빠른 시작 가이드

Figure 3.1: The HiLook HIKVISION 204U-K1 DVR unit, shown with an optional hard drive and included accessories such as a mouse and cables.
4. 초기 설정
4.1. DVR 연결
Follow these steps to connect your DVR to cameras, a monitor, and the network.
- 하드 드라이브 설치(선택 사항): DVR에 하드 드라이브가 미리 설치되어 있지 않은 경우 DVR 케이스를 여십시오.asing, connect the SATA data and power cables to the HDD, and secure the HDD inside the DVR.
- 카메라 연결: Connect your surveillance cameras to the BNC video input ports on the rear panel of the DVR. This model supports 4 channels.
- 모니터 연결: 후면 패널의 HDMI 또는 VGA 출력 포트에 모니터를 연결하십시오.
- 네트워크 연결: Connect an Ethernet cable from the DVR's LAN port to your router or network switch for remote access and network features.
- USB 마우스 연결: 내비게이션을 위해 동봉된 USB 마우스를 USB 포트 중 하나에 연결하십시오.
- 전원 연결: Connect the power adapter to the DVR's power input and then plug it into a power outlet.

Figure 4.1: Rear panel of the DVR, illustrating the various input and output ports including video in, audio in/out, VGA, HDMI, USB, network interface, and power supply.
4.2. 전원 켜기
After all connections are made, the DVR will power on automatically. The system will boot up, and you should see the HiLook logo on your connected monitor. Follow the on-screen prompts for initial setup, including setting up an administrator password and configuring network settings.
5. 운영 가이드
5.1. 사용자 인터페이스 오버view
The DVR's graphical user interface (GUI) can be navigated using the USB mouse. Right-click to access the main menu, and left-click to select options. The live view displays feeds from connected cameras.
5.2. 녹음 및 재생
- 수동 녹음: 라이브에서 view, click the record icon to start or stop manual recording for a specific channel.
- 예약 녹화 : 메인 메뉴에 접속하여 다음으로 이동하세요. 기록 > 일정 to set up continuous or motion-triggered recording schedules for each camera.
- 재생: 메인 메뉴에서 선택하세요 재생. Choose the date, time, and camera channel to review 기록된 footage.
5.3. 동작 감지 및 알림
The DVR supports smart motion detection and can send alerts via email or push notifications to a mobile application.
- 동작 감지 설정: 이동하다 Main Menu > Alarm > Motion Detection. Select the camera channel, enable motion detection, and define the detection area and sensitivity.
- Set Up Email Alerts: In Main Menu > Network > Email, configure your SMTP server settings and recipient email addresses. Enable email linkage for motion detection events.
- 모바일 앱 알림: Download the official HiLook mobile application. Add your DVR to the app and enable push notifications for alarm events.

Figure 5.1: A smartphone screen showing a real-time email notification triggered by smart motion detection.

Figure 5.2: A smartphone displaying multiple smart motion-triggered alerts, indicating movement detected in specific areas monitored by surveillance cameras.
6. 유지관리
- 청소: Regularly clean the exterior of the DVR with a soft, dry cloth. Ensure ventilation openings are free from dust.
- 펌웨어 업데이트: HiLook 공식 웹사이트를 확인하세요. website for the latest firmware updates. Updating firmware can improve performance and add new features. Follow the provided instructions carefully.
- 하드 드라이브 관리: Periodically check the health of your hard drive through the DVR's system settings. Ensure sufficient storage space is available for recordings.
- 비밀번호 보안: Regularly change your administrator password to maintain system security.
7. 문제 해결
If you encounter issues with your DVR, refer to the table below for common problems and solutions.
| 문제 | 가능한 원인 | 해결책 |
|---|---|---|
| 모니터에 비디오 출력이 없습니다 | Loose HDMI/VGA cable; Incorrect monitor input; DVR not powered on. | Check cable connections; Select correct input on monitor; Verify power supply. |
| 카메라 이미지 없음 | Camera not powered; Loose BNC cable; Faulty camera. | Ensure camera power; Check BNC connections; Test camera with another input if possible. |
| DVR에 원격으로 접속할 수 없습니다. | Network cable disconnected; Incorrect network settings; Firewall blocking access. | Verify Ethernet connection; Check IP address, gateway, DNS settings; Configure router/firewall. |
| 녹음 없음 | Hard drive not installed/initialized; Recording schedule not set; HDD full. | Install/initialize HDD; Configure recording schedule; Check HDD status and capacity. |
| 동작 감지가 작동하지 않음 | Motion detection disabled; Sensitivity too low; Detection area not set. | Enable motion detection; Adjust sensitivity; Define detection area. |
8. 기술 사양
Below are the key technical specifications for the HiLook HIKVISION 204U-K1 DVR.
| 특징 | 사양 |
|---|---|
| 모델 | 204U-K1 |
| 비디오 입력 | 4-channel BNC interface (supports HDTVI/AHD/CVI/CVBS/IP) |
| 비디오 압축 | H.265 Pro+/H.265 Pro/H.265/H.264 |
| 비디오 출력 | HDMI 1개, VGA 1개 (동시 출력) |
| HDMI 출력 해상도 | Up to 4K (3840 × 2160) for 204U-K1 |
| 오디오 입력/출력 | 1-ch RCA (2-way audio) / 1-ch RCA |
| 하드 디스크 드라이브(HDD) | SATA 인터페이스 1개, 최대 10TB 용량 |
| 네트워크 인터페이스 | 1개의 RJ45 10M/100M 자동 적응형 이더넷 인터페이스 |
| USB 인터페이스 | 2 × USB 2.0 |
| 전원 공급 장치 | 12VDC |
| 치수(폭 × 깊이 × 높이) | 약 200 × 200 × 45 mm (7.9 × 7.9 × 1.8 인치) |
| 무게(HDD 제외) | 약 1kg(2.2파운드) |
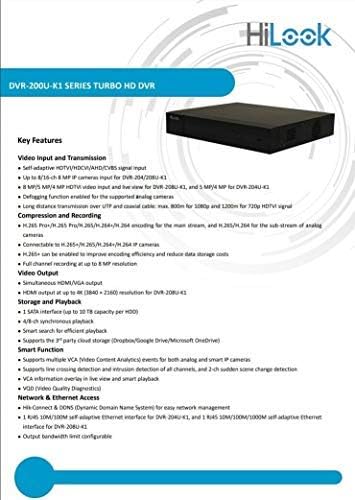
Figure 8.1: A detailed list of key features for the DVR-200U-K1 series, including video input/transmission, compression, video output, storage, smart functions, and network access.
9. 보증 및 고객 지원
Your HiLook HIKVISION 204U-K1 DVR comes with a limited warranty. Please refer to the warranty card included in your package or visit the official HiLook website for detailed warranty terms and conditions. For technical assistance, troubleshooting, or service inquiries, please contact your authorized HiLook dealer or customer support.
온라인 리소스: For additional support, firmware downloads, and FAQs, please visit the official HiLook support web대지.


