1. 서론
The Kinter A7BT is a compact 2-channel mini amplifier designed for various audio applications, including home, automotive, and motorcycle setups. It features Bluetooth connectivity, USB and TF card playback, FM radio, and multiple control options. This manual provides detailed instructions for the proper installation, operation, and maintenance of your A7BT amp리퍼.
2. 패키지 내용
Verify that all items listed below are included in your package. If any items are missing or damaged, please contact Kinter customer support.
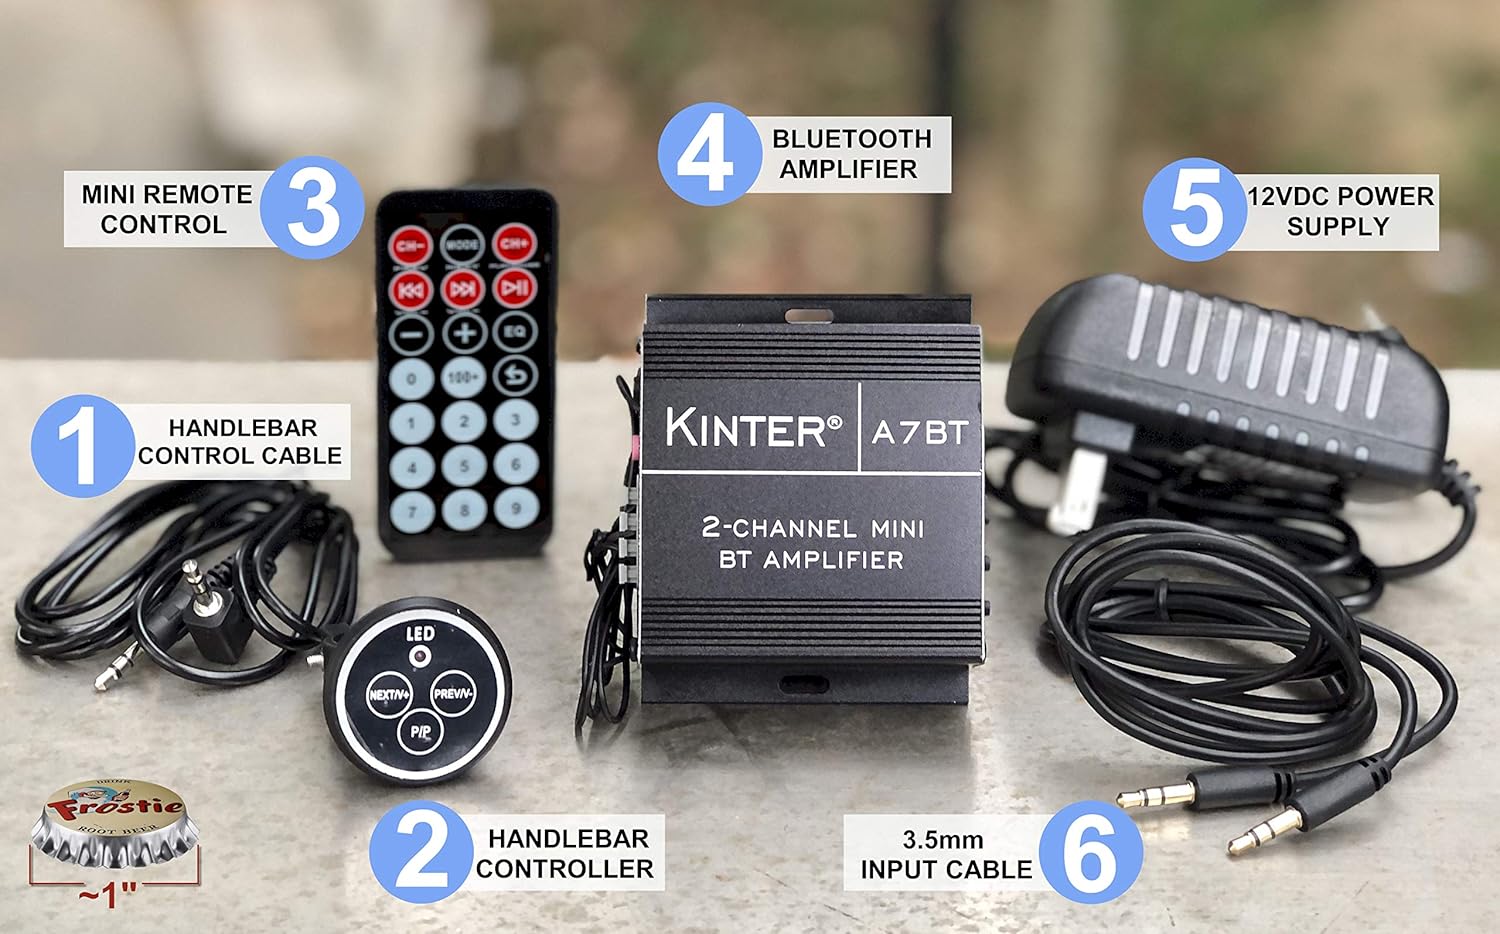
Image: Kinter A7BT amplifier, handlebar controller, IR remote, 12V power supply, and cables.
- Kinter A7BT 2-Channel Mini Bluetooth Amp리퍼
- Wired Handlebar Controller
- Wireless Infrared (IR) Remote Control
- 3.5mm Audio Input Cable (59 inches length)
- 12V DC Power Supply (34 inches length)
3. 제품 오버view
3.1 전면 및 후면 패널
본체에 있는 다양한 제어 장치와 연결 단자에 익숙해지십시오. amp리퍼.
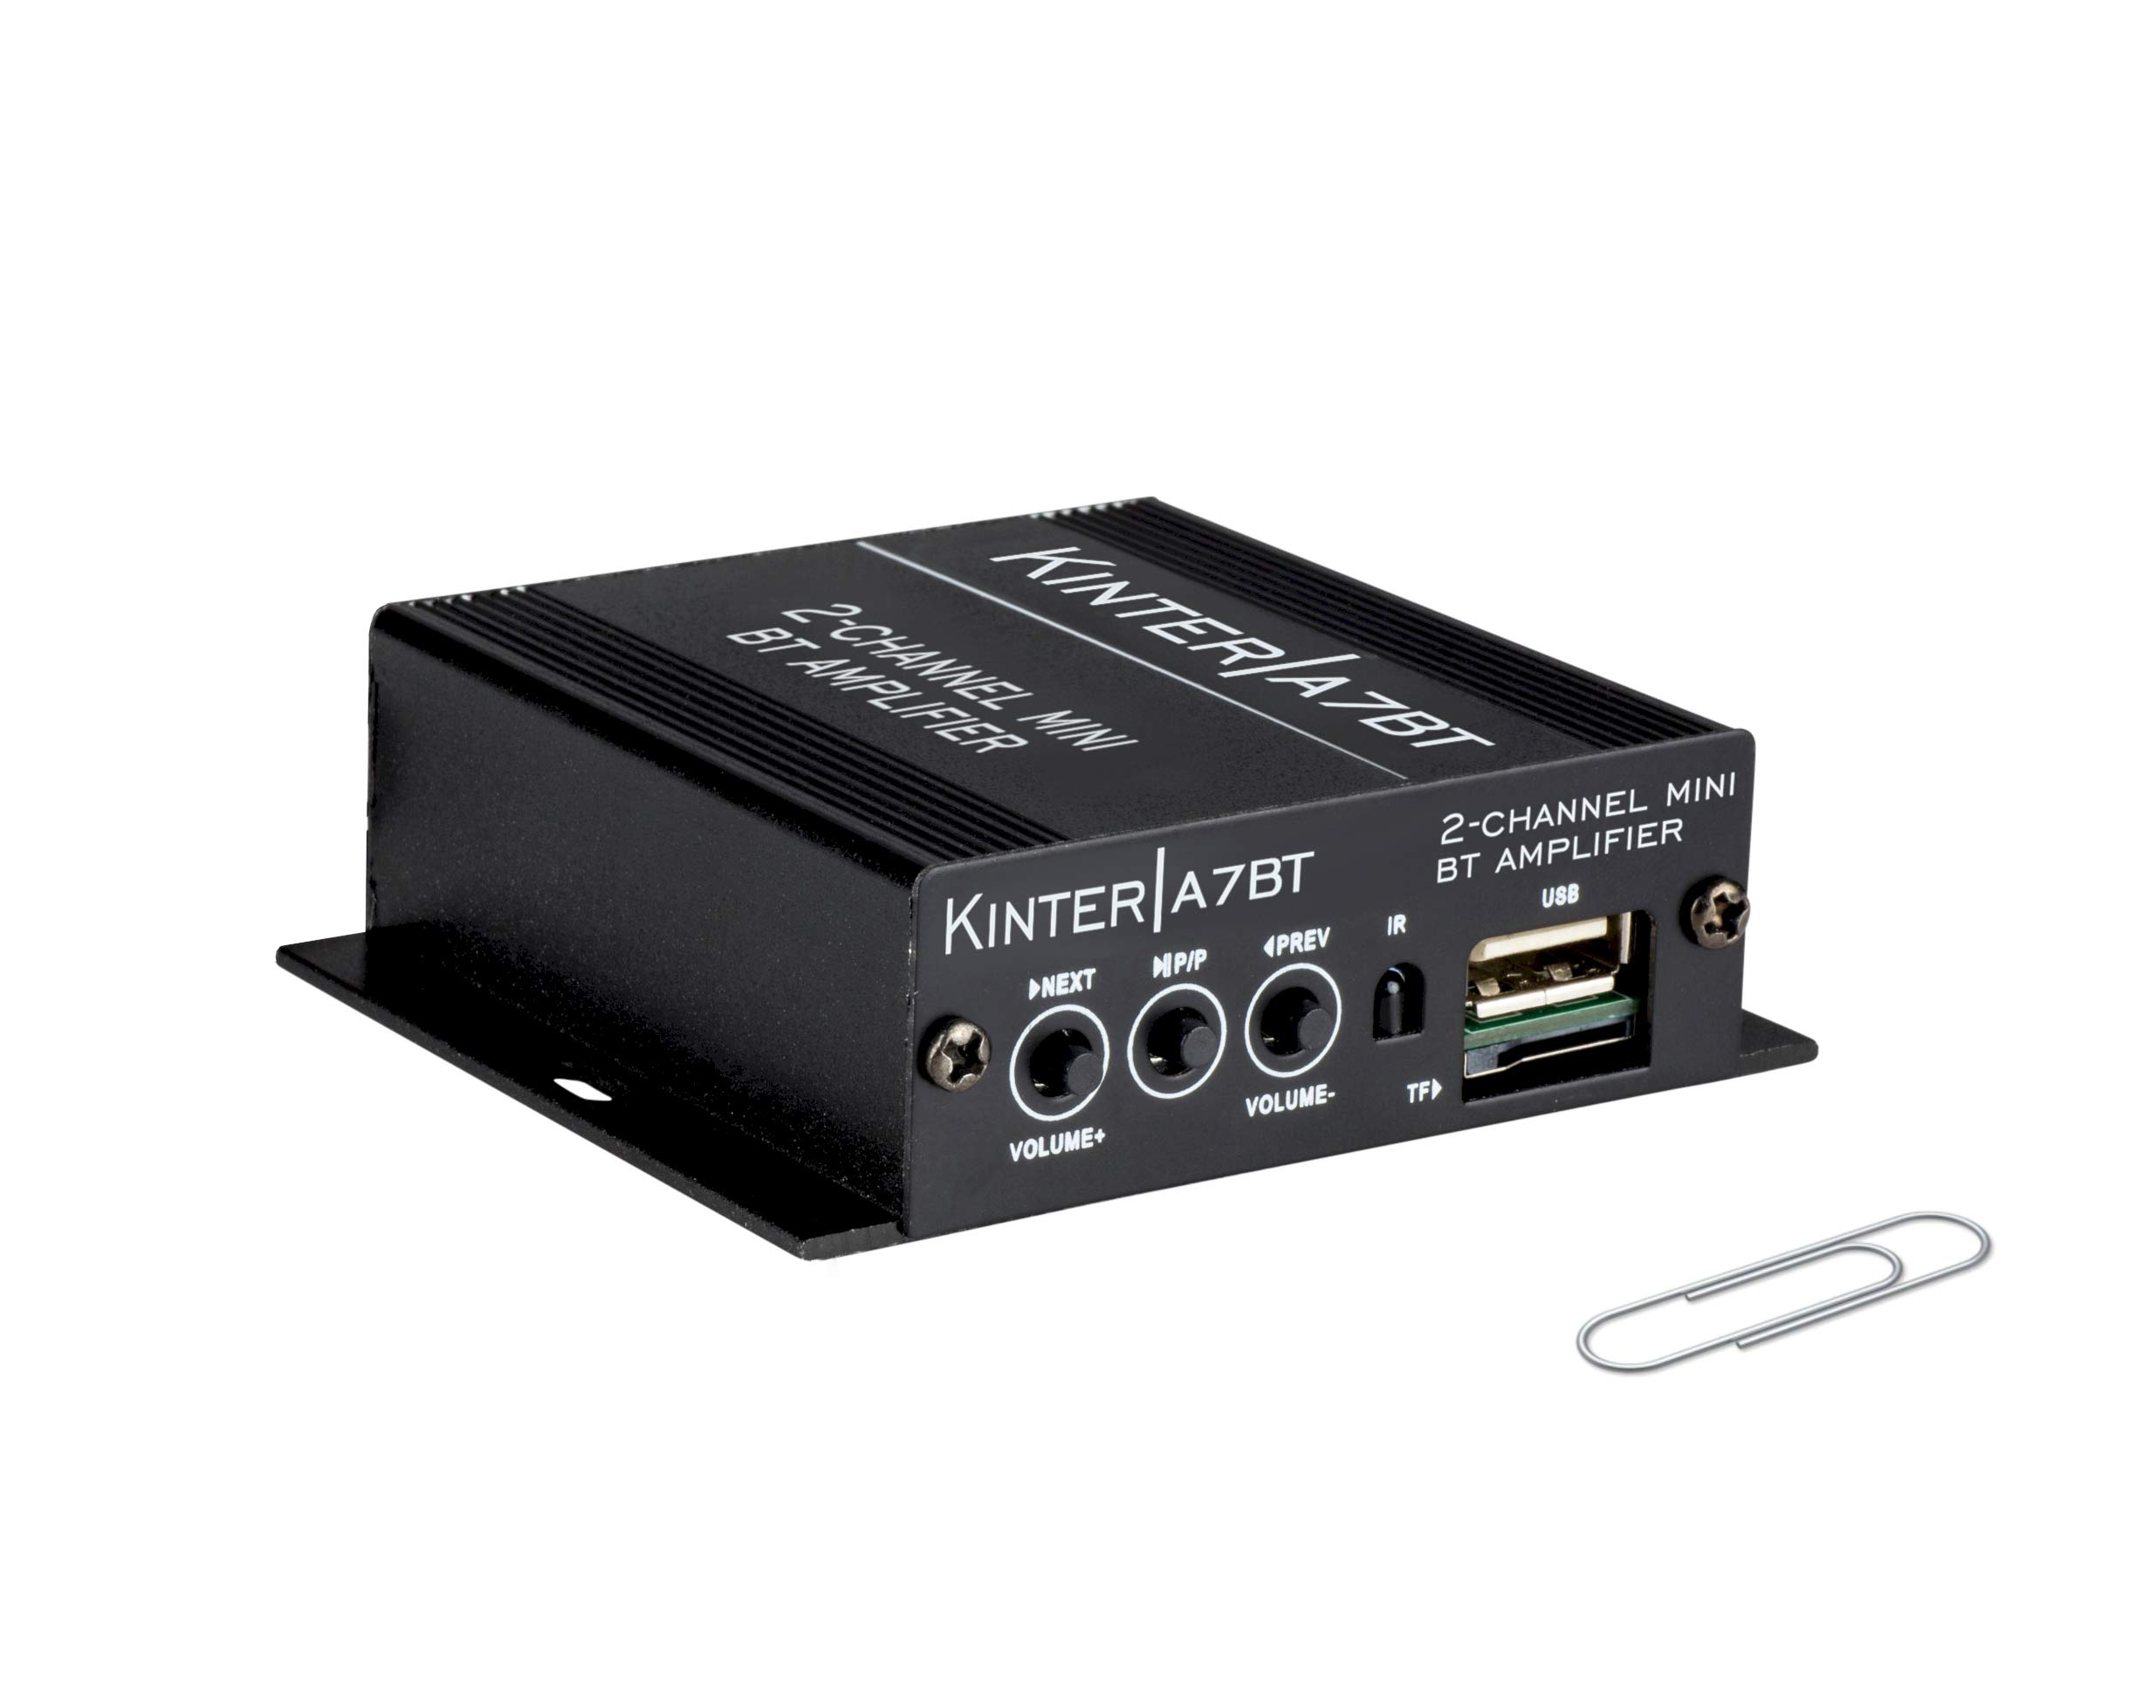
Image: Detailed diagram showing the front and rear panels of the Kinter A7BT amp번호가 매겨진 부품으로 구성된 증폭기.
- NEXT/P (Next Song / Volume Up): 짧게 누르면 다음 곡으로, 길게 누르면 볼륨이 커집니다.
- M/P/P (Mode / Play / Pause): Short press for play/pause, long press to change input mode (Bluetooth, AUX, USB/TF, FM).
- PREV/V (Previous Song / Volume Down): 짧게 누르면 이전 트랙, 길게 누르면 볼륨이 줄어듭니다.
- IR(적외선 수신기): For wireless remote control signals.
- TF (TransFlash / Micro SD Card Slot): 오디오 재생을 위해 fileTF 카드에서.
- USB (USB Port): 오디오 재생을 위해 fileUSB 플래시 드라이브에서 s. Note: This is not a charging port.
- AUX IN (3.5mm Stereo Audio Input Jack): 3.5mm 케이블을 통해 외부 오디오 장치를 연결합니다.
- FM 안테나: Connection point for the FM antenna wire.
- REMOTE LINE IN: Input for the wired handlebar remote control.
- SPEAKER OUT (R/L): Terminals for connecting passive speakers (Right and Left channels).
- DC12V (12V DC Power Input): For connecting the 12V DC power supply.
- Bluetooth Operation Indicator: LED indicator for Bluetooth status.
3.2 Handlebar Controller
The wired handlebar controller provides convenient access to essential functions.
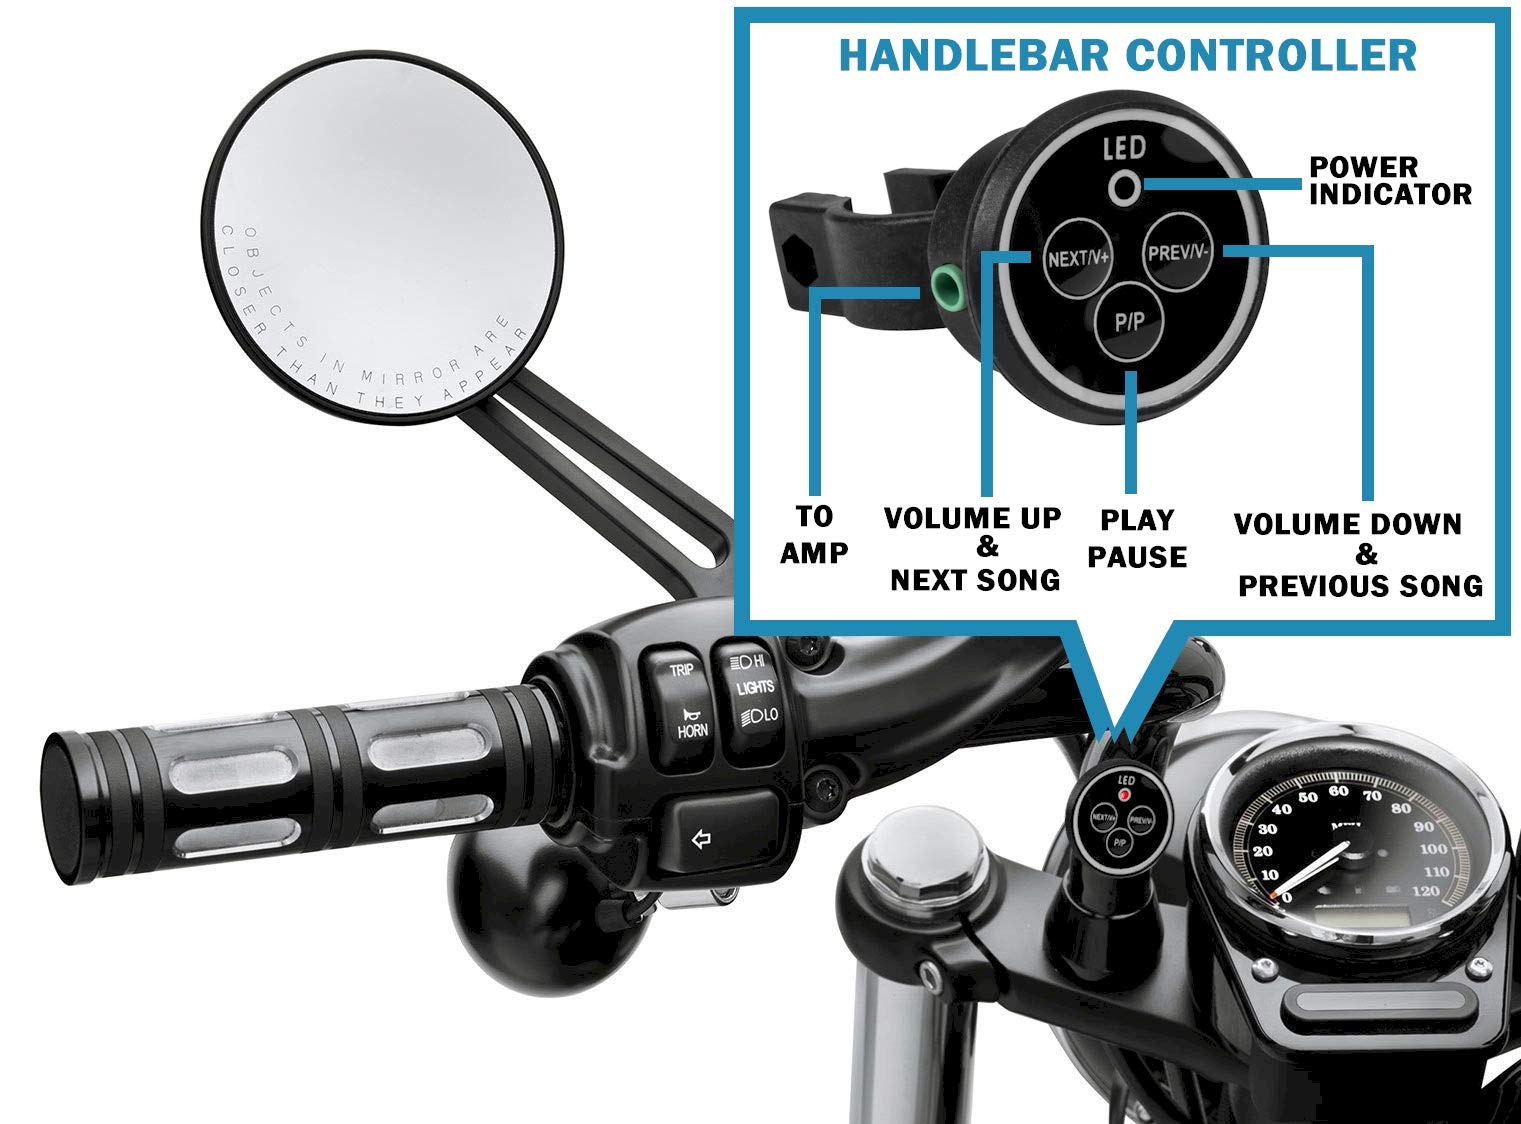
Image: Close-up of the handlebar controller showing LED power indicator, Next/Volume Up, Previous/Volume Down, and Play/Pause buttons.
- 주도의: 전원 표시기.
- NEXT/V+: Next Song / Volume Up.
- PREV/V-: Previous Song / Volume Down.
- P/P: 재생 / 일시 중지.
4. 설정
4.1 전원 연결
Connect the included 12V DC power supply to the DC12V input on the amplifier. Plug the power supply into a standard wall outlet.
For automotive or motorcycle applications, you can hardwire the amplifier to a 12V battery system. Use the included PSU's wire and connector. Strip the wire as shown in the diagram below. The white wire is POSITIVE (+), and the bare wire is GROUND (-). It is recommended to install a 2 Amp fuse inline (not included) for protection.
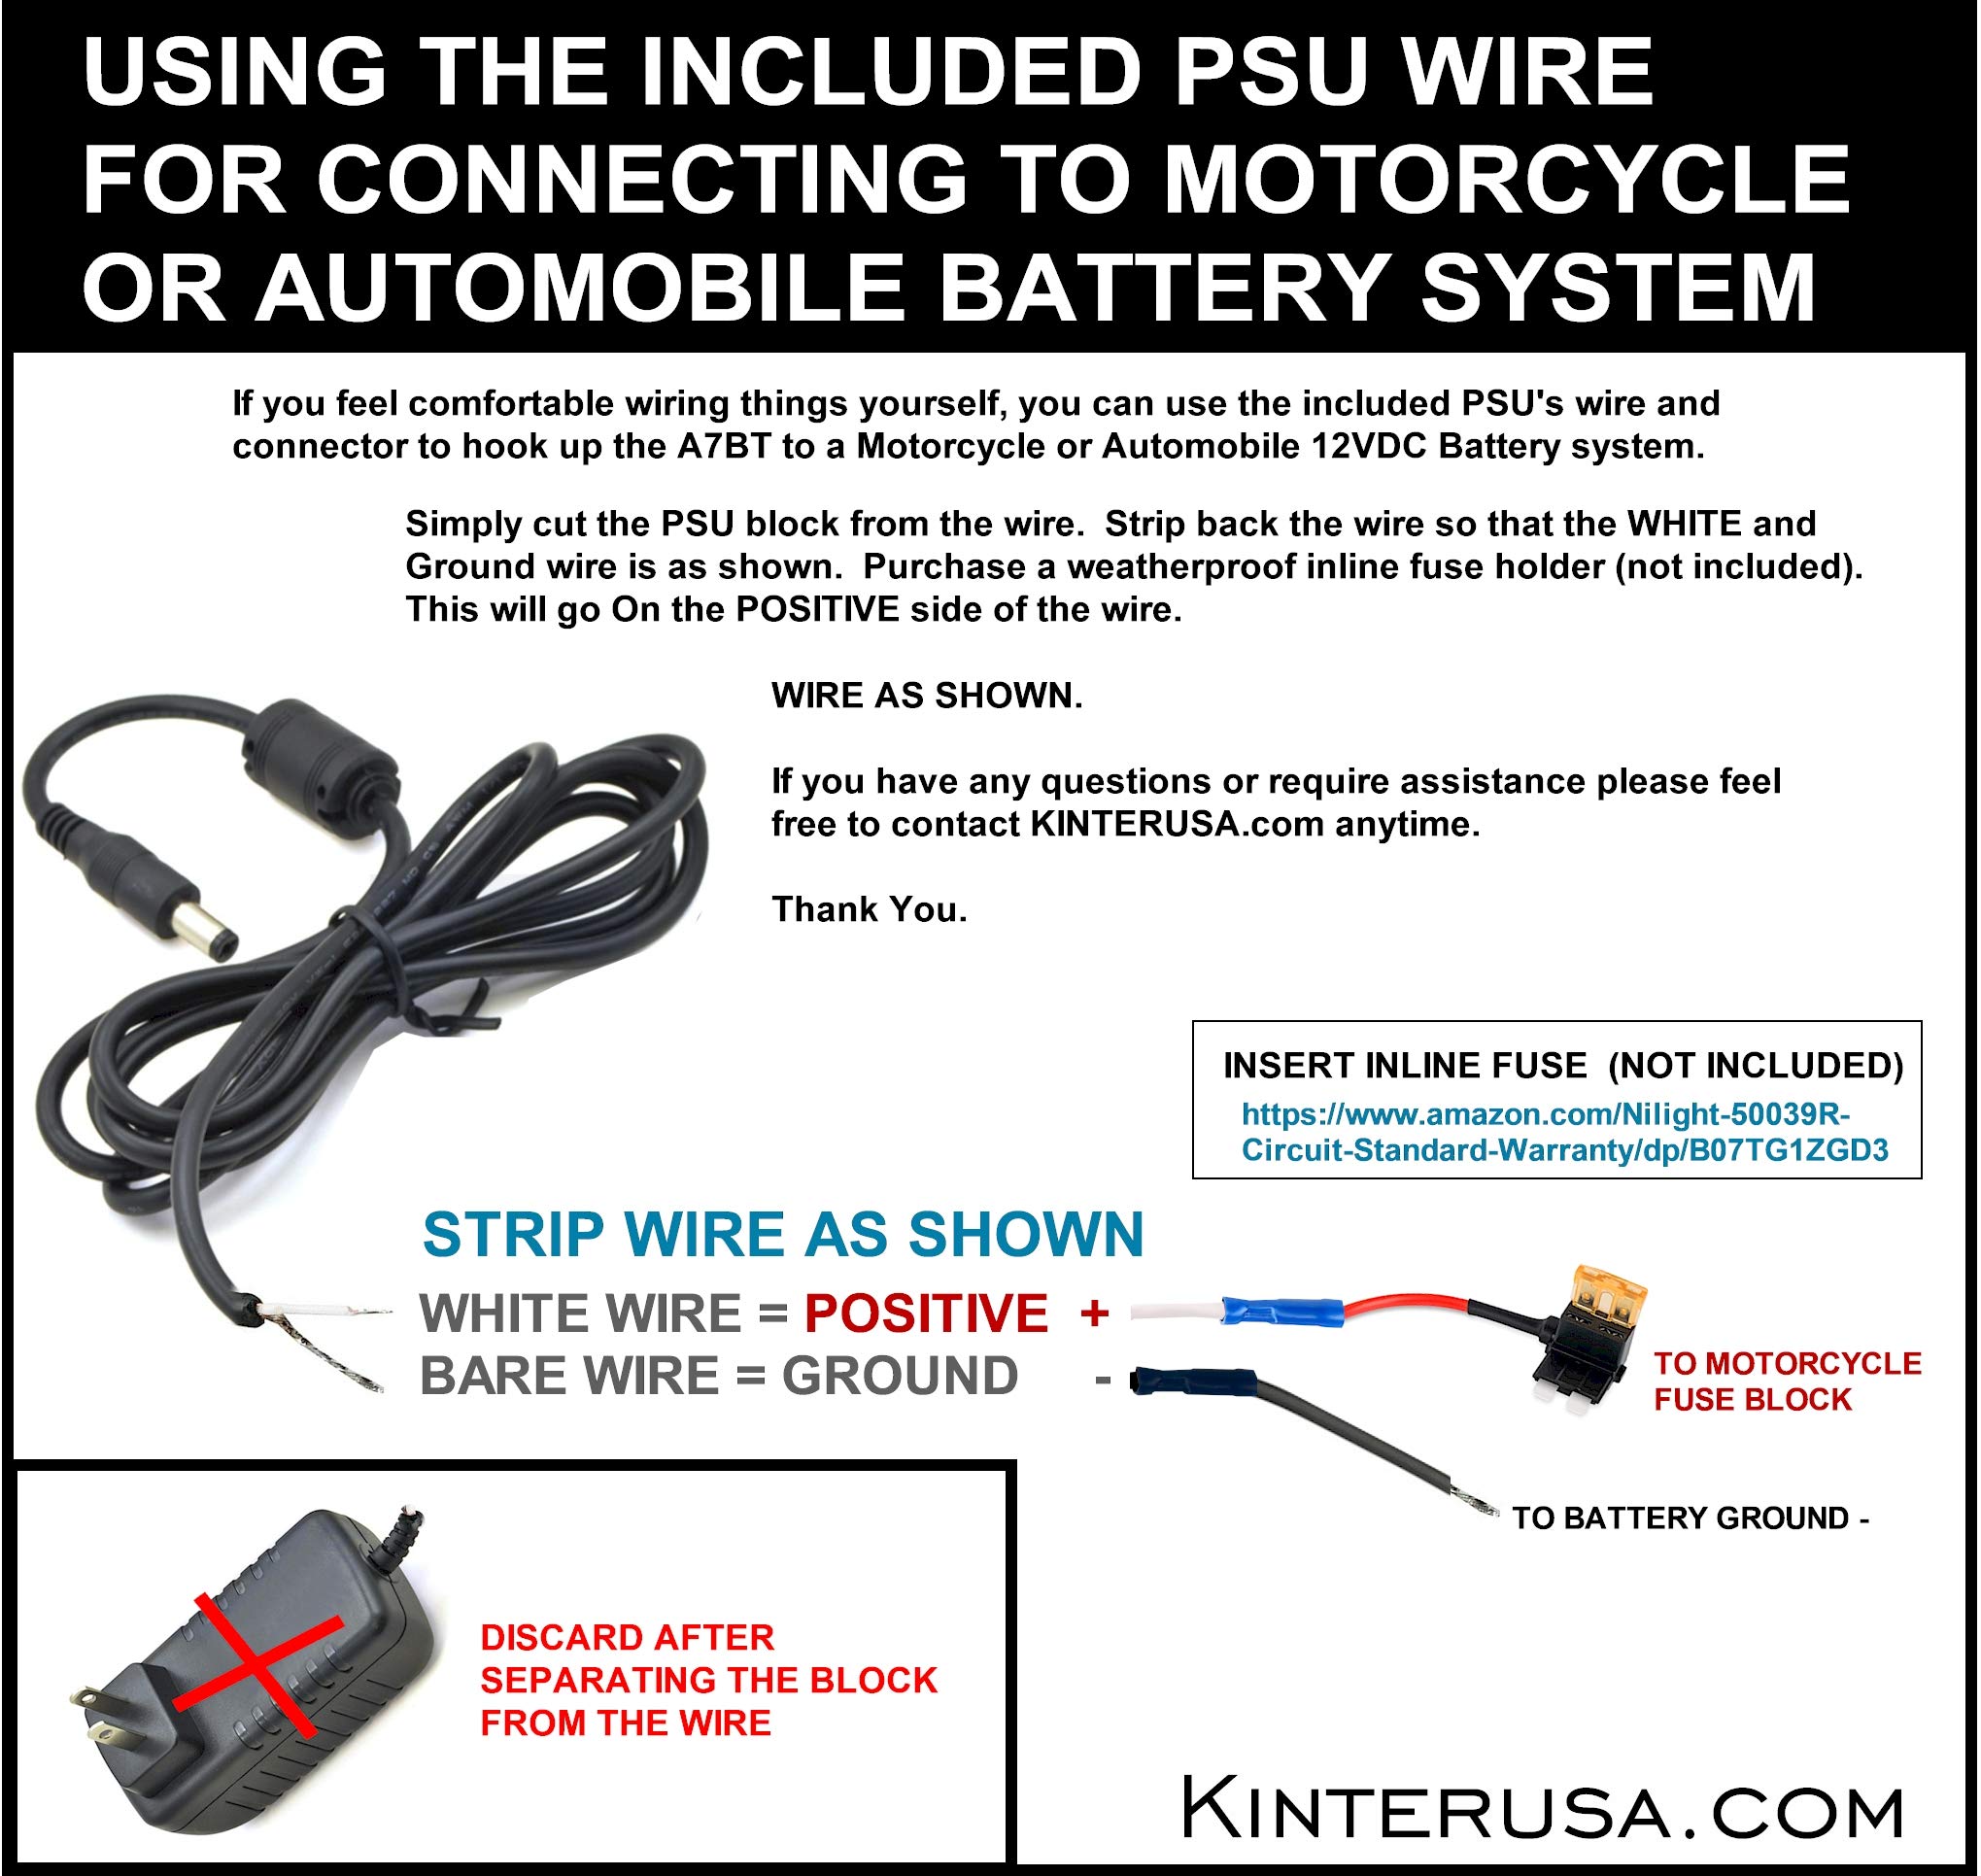
Image: Instructions for connecting the amplifier to a motorcycle or automobile battery, including wire stripping and fuse recommendation.
4.2 스피커 연결
Connect your passive speakers to the SPEAKER OUT terminals on the rear panel. Ensure correct polarity (positive to positive, negative to negative) for each channel (Left and Right). Use a small screwdriver to press the terminal tabs, insert the speaker wire, and then release the tab to secure the wire.
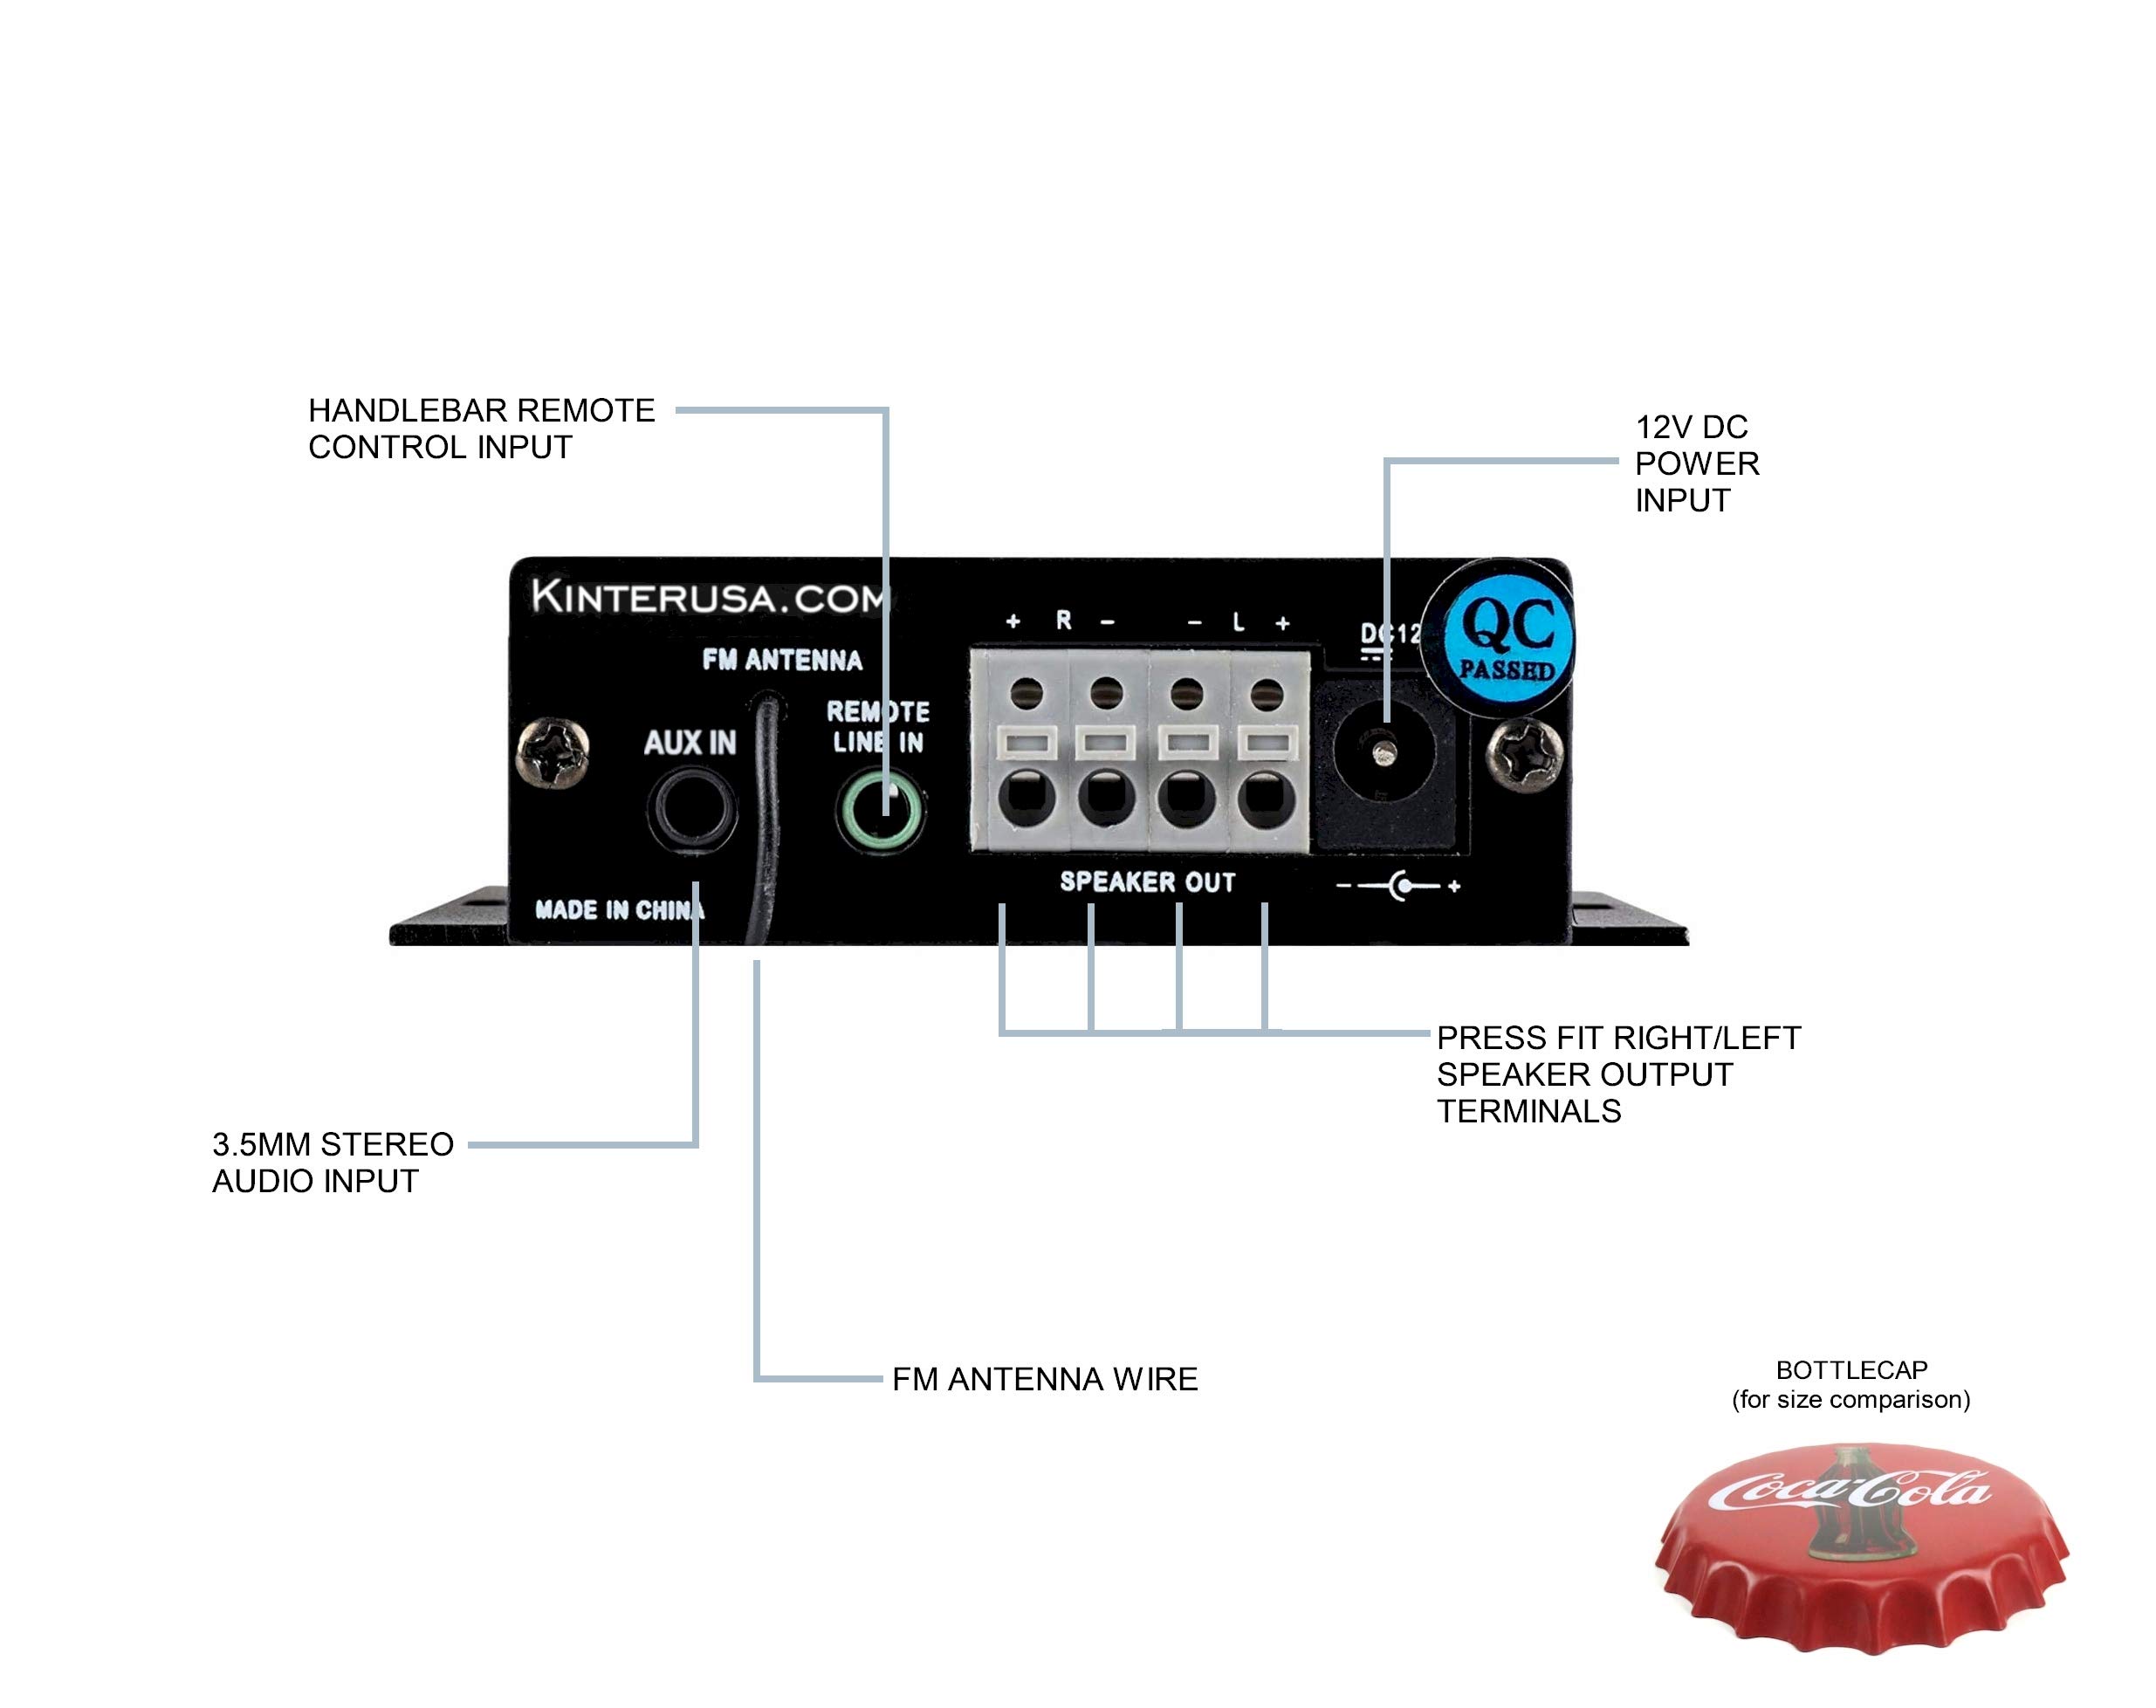
Image: A finger pressing a speaker terminal tab while inserting a speaker wire.
메모: Avoid using excessively large speaker wire that may cause shorts. Soldering the ends of the speaker wires can prevent stray strands and improve connection reliability.
4.3 오디오 입력 연결
- 보조 입력: Connect external audio devices (e.g., smartphone, MP3 player) using the included 3.5mm audio cable to the AUX IN jack.
- USB/TF 카드: Insert a USB flash drive or a TF (Micro SD) card containing MP3 audio files into the respective ports. The amplifier will automatically detect and play compatible files.
- FM 안테나: Connect the FM antenna wire to the FM ANTENNA input for radio reception.
4.4 원격 제어 연결
- Wired Handlebar Controller: Plug the handlebar controller cable into the REMOTE LINE IN jack on the amp리파이어의 후면 패널.
- Wireless IR Remote: Ensure the IR receiver on the front panel (labeled 'IR') has a clear line of sight to the remote control.
5. 운영
5.1 전원 켜기/끄기
The Kinter A7BT amplifier does not have a dedicated power on/off button. It powers on automatically when connected to a 12V DC power source and powers off when the power source is disconnected.
5.2 모드 선택
를 누르고 계세요 M/P/P button on the front panel or the 'MODE' button on the IR remote to cycle through the available input modes: Bluetooth, AUX, USB, TF, and FM radio.
5.3 볼륨 조절
Adjust the volume using the:
- 전면 패널: 길게 누르세요 NEXT/P button for Volume Up, and long press the PREV/V button for Volume Down.
- Handlebar Controller: 사용하세요 다음/V+ button for Volume Up, and 이전/V- button for Volume Down.
- IR 리모트: 볼륨 높이기 및 볼륨 낮추기 버튼을 사용하십시오.
5.4 재생 제어
Control audio playback using the:
- 전면 패널: 짧은 프레스 NEXT/P for next track, short press PREV/V for previous track, short press M/P/P 재생/일시 정지용.
- Handlebar Controller: 사용 다음/V+ 다음 트랙을 위해, 이전/V- for previous track, and 인/피 재생/일시 정지용.
- IR 리모트: Use the dedicated track skip and play/pause buttons.
5.5 블루투스 페어링
When the A7BT amplifier is powered on, it is ready for Bluetooth pairing. Follow these steps:
- Ensure Bluetooth is enabled on your audio device (e.g., smartphone, tablet).
- 기기의 Bluetooth 설정을 엽니다.
- 새 장치를 검색합니다.
- Select "A7BT" from the list of available devices to connect.
- Once connected, the Bluetooth operation indicator will confirm the status.
5.6 FM 라디오 작동
In FM mode, use the track skip buttons on the front panel, handlebar controller, or IR remote to scan for and select radio stations.
5.7 USB/TF 카드 재생
When a USB drive or TF card is inserted, the amplifier will automatically switch to the corresponding mode and begin playing audio files. The unit will resume playback from where it left off when powered off and on again. Fast-forwarding within a song is not supported.
6. 유지관리
To ensure optimal performance and longevity of your Kinter A7BT amplifier, observe the following maintenance guidelines:
- 통풍: 확인하십시오 amplifier is placed in a well-ventilated area. The aluminum casing acts as a heatsink, and proper airflow is crucial to prevent overheating. Avoid enclosing the unit in tight spaces without ventilation.
- 청소: 부드럽고 건조한 천을 사용하여 청소하십시오. amp증폭기 외부에는 액체 세척제나 용제를 사용하지 마십시오.
- 환경: 노출을 피하십시오 amplifier to extreme temperatures, direct sunlight, high humidity, or dusty environments.
- 사이: 모든 케이블 연결부를 주기적으로 점검하여 안전하고 부식되지 않았는지 확인하세요.
7. 문제 해결
If you encounter issues with your Kinter A7BT amplifier의 경우, 다음의 일반적인 문제와 해결책을 참조하세요.
| 문제 | 가능한 원인 | 해결책 |
|---|---|---|
| 전원이 없습니다 | Power supply not connected or faulty; vehicle battery issue. | Check power supply connection and outlet. If hardwired, check battery connection and inline fuse (if installed). |
| 소리가 나지 않습니다 | Incorrect input mode; speaker wires loose or incorrectly connected; volume too low; faulty audio source. | Verify correct input mode. Check speaker wire connections and polarity. Increase volume. Test with a different audio source. |
| 블루투스가 연결되지 않습니다 | Amplifier not in Bluetooth mode; device too far; device already paired to another unit. | 보장하다 amplifier is in Bluetooth mode. Move device closer. Forget "A7BT" on your device and re-pair. |
| USB/TF 카드가 작동하지 않습니다. | 지원되지 않음 file 포맷; 카드/드라이브가 올바르게 삽입되지 않음; 손상됨 files. | 보장하다 file파일은 MP3 형식입니다. 카드/드라이브를 다시 삽입하세요. 다른 카드/드라이브를 사용해 보세요. |
| Amplifier 과열 | Poor ventilation; impedance mismatch with speakers. | Ensure adequate airflow around the unit. Verify speaker impedance matches amp라이저 사양. |
| 리모컨이 작동하지 않습니다 | IR receiver blocked; remote battery low (for wireless IR remote); wired remote connection loose. | Ensure clear line of sight to IR receiver. Replace remote battery. Check wired remote connection. |
8. 사양
Detailed technical specifications for the Kinter A7BT amp리퍼.
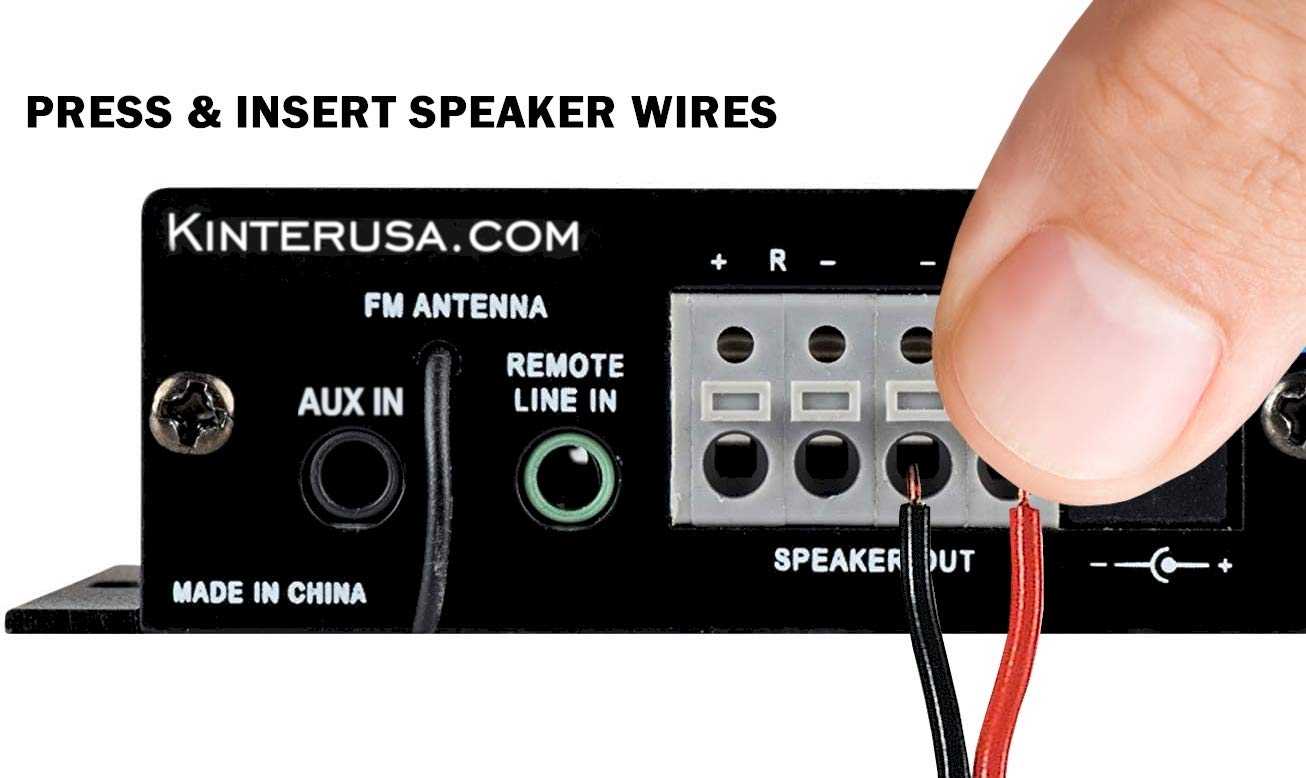
Image: The Kinter A7BT amplifier with its length, width, and height dimensions indicated.
| 특징 | 사양 |
|---|---|
| 모델 번호 | A7BT |
| 채널 수 | 2 |
| 출력 전력 | 2 x 20W (4Ω, 10% THD Max) |
| 입력 Voltage | 9-14.4V DC |
| 정격 입력 Voltage | 12 볼트 |
| 정격 입력 전류 | ≤3A |
| 주파수 응답 | 20Hz-20kHz |
| 출력 임피던스 | 4-8옴 |
| 신호 대 잡음비 (SNR) | ≥80dB |
| 총 고조파 왜곡률(THD) | ≤0.02% 4W |
| FM 주파수 범위 | 87.5-108.0MHz |
| Input Impedance (FM) | 47K 옴 |
| 외부 제어 | 적외선 원격 제어 |
| 작동 온도 | 0-46°C(32-115°F) |
| 보관 온도 | 0-60°C(32-140°F) |
| 습기 | 10-85% (Operating), 10-95% (Storage) |
| 품목 치수(L x W x H) | 가로 6.4cm, 세로 6.4cm, 두께 2.5cm (약 2.5cm, 세로 2.5cm, 두께 1cm) |
9. 보증 및 지원
The Kinter A7BT amplifier comes with a one-year warranty from the date of purchase. This warranty covers manufacturing defects under normal use. It does not cover damage caused by misuse, accidents, unauthorized modifications, or improper installation.
For technical support, warranty claims, or any questions regarding your Kinter A7BT amplifier, please visit the official KinterUSA web사이트를 방문하거나 고객 서비스에 직접 문의하세요.