
1. 서론
Thank you for choosing the Ahuja DPA-570 Mixer Amplifier. This manual provides essential information for the safe and efficient operation of your device. Please read it thoroughly before use and retain it for future reference. The DPA-570 is designed for public address applications, offering versatile audio mixing and amp소화 능력.
2. 안전 지침
- 전원: 연결하다 amp앰프는 지정된 AC 볼륨으로만 작동합니다.tage or a compatible 12V DC car battery. Ensure the power outlet is properly grounded.
- 통풍: 환기구를 막지 마십시오. 과열을 방지하기 위해 장치 주변에 충분한 공기 흐름을 확보하십시오.
- 수분: 유지하다 amplifier away from water, rain, and excessive humidity. Do not operate with wet hands.
- 놓기: Place the unit on a stable, flat surface. Avoid direct sunlight, heat sources, or areas with high vibration.
- 서비스: 이 제품을 직접 수리하려고 하지 마십시오. 모든 서비스는 자격을 갖춘 서비스 담당자에게 문의하십시오.
- 청소: 청소하기 전에 전원을 차단하십시오. 부드럽고 마른 천을 사용하십시오. 액체 세척제나 스프레이형 세척제는 사용하지 마십시오.
3. 패키지 내용
귀하의 패키지에 다음 품목이 포함되어 있는지 확인하세요.
- Ahuja DPA-570 Mixer AmpLIFIER 단위
- AC 전원 코드
- Remote Control for MP3 Player
- 사용 설명서 (본 문서)
누락되거나 손상된 품목이 있는 경우 즉시 판매점에 문의하십시오.
4. 제품 오버view
The Ahuja DPA-570 is a robust mixer amplifier designed for various public address needs. It features multiple inputs and controls for flexible audio management.
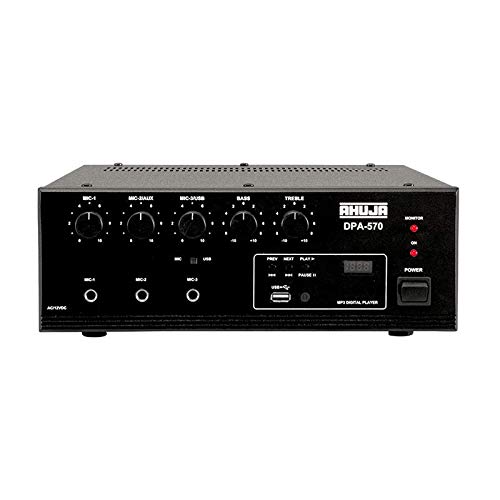
그림 1: 전면 view of the Ahuja DPA-570 Mixer Amplifier, showing input jacks, control knobs, and the MP3 player interface.
주요 특징:
- 3 Microphone Inputs & 1 Auxiliary Input: Allows connection of multiple audio sources.
- 내장 MP3 플레이어: Features a USB reader for playing audio files directly, controlled via the front panel or remote.
- 라인 출력: Provides an output for connecting to an external booster amplifier for expanded sound coverage.
- Active Bass & Treble Controls: Independent controls for adjusting the low and high frequencies of the audio output.
- AC/DC 동작: Automatically switches to DC power (car battery) if AC power fails, ensuring uninterrupted operation.
5. 설정
Follow these steps to set up your Ahuja DPA-570 Mixer Amp정수기:
- 놓기: 위치 amplifier on a stable, flat surface in a well-ventilated area, away from direct heat or moisture.
- 스피커 연결: Connect your speakers to the appropriate speaker output terminals on the rear panel. Ensure correct polarity (+ to + and - to -) and impedance matching. Refer to the amplifier's specifications for compatible speaker impedance.
- 마이크 연결: Plug your microphones into the MIC 1, MIC 2, or MIC 3 input jacks on the front panel.
- Auxiliary Device Connection: Connect external audio sources (e.g., CD player, smartphone) to the AUX input jack using an appropriate cable.
- 전원 연결:
- AC 전원: 제공된 AC 전원 코드를 콘센트에 연결하십시오. amp앰프의 AC 입력 단자에 연결한 다음 적절한 벽면 콘센트에 연결하십시오.
- DC Power (Optional): For battery operation, connect a 12V DC car battery to the DC input terminals on the rear panel, observing correct polarity. The unit will automatically switch to DC power if AC power is interrupted.
- 초기 전원 켜기: 전원을 켜기 전에 모든 볼륨 조절 장치가 최소로 설정되어 있는지 확인하십시오. amp리퍼.
6. 사용 설명서
6.1 기본 작업
- 전원 켜기: 전원 스위치를 눌러 전원을 켜세요 amp앰프. 전원 표시등이 켜집니다.
- 볼륨 조절: Gradually increase the MASTER volume control to the desired listening level. Adjust individual MIC and AUX volume controls as needed.
- 톤 컨트롤: Use the BASS and TREBLE knobs to adjust the low and high frequencies of the audio output to your preference.
6.2 Using the MP3 Player
- USB 드라이브를 삽입하세요: MP3 오디오가 포함된 USB 플래시 드라이브를 삽입하세요 file전면 패널의 USB 포트에 꽂습니다.
- 모드 선택: 그만큼 amplifier should automatically switch to USB mode. If not, press the 'MODE' button on the front panel or remote control until USB mode is selected.
- 재생 컨트롤: Use the play/pause, next, and previous track buttons on the front panel or remote control to manage playback.
- 용량: Adjust the MP3 player's volume using its dedicated control or the main volume control.
7. 유지관리
- 청소: 정기적으로 외부를 닦아주세요 amp부드럽고 마른 천으로 닦아주세요. 연마성 세제나 용제를 사용하지 마세요.
- 통풍: Ensure that the ventilation grilles are free from dust and debris to maintain proper cooling.
- 저장: 장기간 사용하지 않을 경우 보관하세요 amplifier in a cool, dry place, protected from dust and extreme temperatures.
- 케이블 검사: 주기적으로 모든 케이블의 마모 또는 손상 여부를 점검하십시오. 손상된 케이블은 즉시 교체하십시오.
8. 문제 해결
| 문제 | 가능한 원인 | 해결책 |
|---|---|---|
| 전원이 없습니다 | 전원 코드가 연결되지 않았습니다. 전원 콘센트에 결함이 있습니다. Amp앰프 전원 스위치가 꺼져 있습니다. | 전원 코드 연결을 확인하세요. 다른 콘센트를 사용해 보세요. 전원 스위치가 켜져 있는지 확인하세요. |
| 사운드 출력이 없습니다 | Speaker cables disconnected; Volume controls too low; Input source not selected or faulty. | Check speaker connections; Increase MASTER and input volume; Verify input source is active and correctly connected. |
| 왜곡된 소리 | Volume too high; Incorrect impedance speakers; Faulty cables. | Reduce volume; Ensure speaker impedance matches amplifier; Replace faulty cables. |
| MP3 플레이어가 작동하지 않음 | USB drive not inserted correctly; USB drive corrupted; Incorrect file 체재. | Reinsert USB drive; Try a different USB drive; Ensure files는 MP3 형식입니다. |
9. 사양
| 특징 | 사양 |
|---|---|
| 상표 | Ahuja |
| 모델 번호 | DPA-570 |
| 채널 수 | 4 |
| 제품 크기(D x W x H) | 34D x 36W x 32H 센티미터 |
| 품목 무게 | 6900그램 |
| 연결 기술 | 보조, USB |
| 전원 유형 | AC (Mains), Battery Powered (12V DC) |
| 출력 커넥터 유형 | 1/4" TRS (balanced) |
| 오디오 입력 | USB |
| 원산지 | 중국 |
10. 보증 및 지원
Ahuja products are manufactured to high-quality standards. For warranty information, please refer to the warranty card included with your product or visit the official Ahuja web사이트. 보증 청구를 위해 구매 증빙 자료로 구매 영수증을 보관하세요.
For technical support, service, or inquiries, please contact Ahuja customer service through their official channels. Contact details can typically be found on the product packaging or the manufacturer's web대지.