
1. 서론
The Korg Nu:Tekt NTS-1 is a unique digital synthesizer kit designed for enthusiasts to build and customize. This compact and portable instrument features a powerful sound engine with analog modeling and digital effects, offering a wide range of sonic possibilities. It is compatible with Korg's logue-SDK for custom oscillators and effects, providing extensive creative freedom.
주요 특징은 다음과 같습니다.
- Easy-to-assemble DIY digital synthesizer kit.
- Compact and portable design for music creation anywhere.
- Powerful sound engine with analog modeling and digital effects.
- Versatile oscillator section for diverse sounds and textures.
- Integrated arpeggiator for dynamic and rhythmic patterns.
- Logue-SDK compatibility for custom oscillators and effects.
- Single-oscillator monosynth with a distinctive sound profile.
- Built-in multimode filter for precise sound shaping.
- Multiple modulation sources, including LFO and envelope generator.
- Onboard effects section with reverb, delay, and modulation effects.
2. 설치 및 조립
The Korg Nu:Tekt NTS-1 is a DIY kit that requires assembly. Follow these steps to build your synthesizer:
2.1. 부품 목록
시작하기 전에 모든 구성 요소가 있는지 확인하세요.
- 메인 PCB (인쇄회로기판)
- 전면 패널
- 후면 패널
- Side Panels (metal)
- Corner Pieces (metal)
- Touch Keyboard Ribbon Cable
- 나사(다양한 크기)
- 드라이버
- USB 케이블
- 사용 설명서
오버view of the kit components is shown below:

2.2. 조립 단계
- 섀시 준비: Carefully detach the front, back, and side panels from their perforated sheets. Ensure all edges are smooth.
- 측면 패널 조립: Attach the metal side panels to the main PCB using the provided screws.
- Connect Touch Keyboard: Secure the touch keyboard ribbon cable to the designated connector on the main PCB.
- 전면 패널 부착: Align the main PCB with the front panel, ensuring all knobs and buttons fit correctly. Secure with screws.
- 뒷면 패널 부착: Place the back panel onto the assembled unit and secure it with the remaining screws.
- Add Rubber Feet: Apply the self-adhesive rubber feet to the designated spots on the bottom of the back panel for stability.
Once assembled, your Korg Nu:Tekt NTS-1 will resemble the image below:

2.3. 장치 전원 공급
The NTS-1 can be powered via USB. Connect the included USB cable to the USB port on the device and to a compatible USB power source (e.g., a computer, USB wall adapter, or power bank).

3. 사용 설명서
The NTS-1 offers a range of controls for sound synthesis and manipulation. Familiarize yourself with the layout and functions:
3.1. 통제view
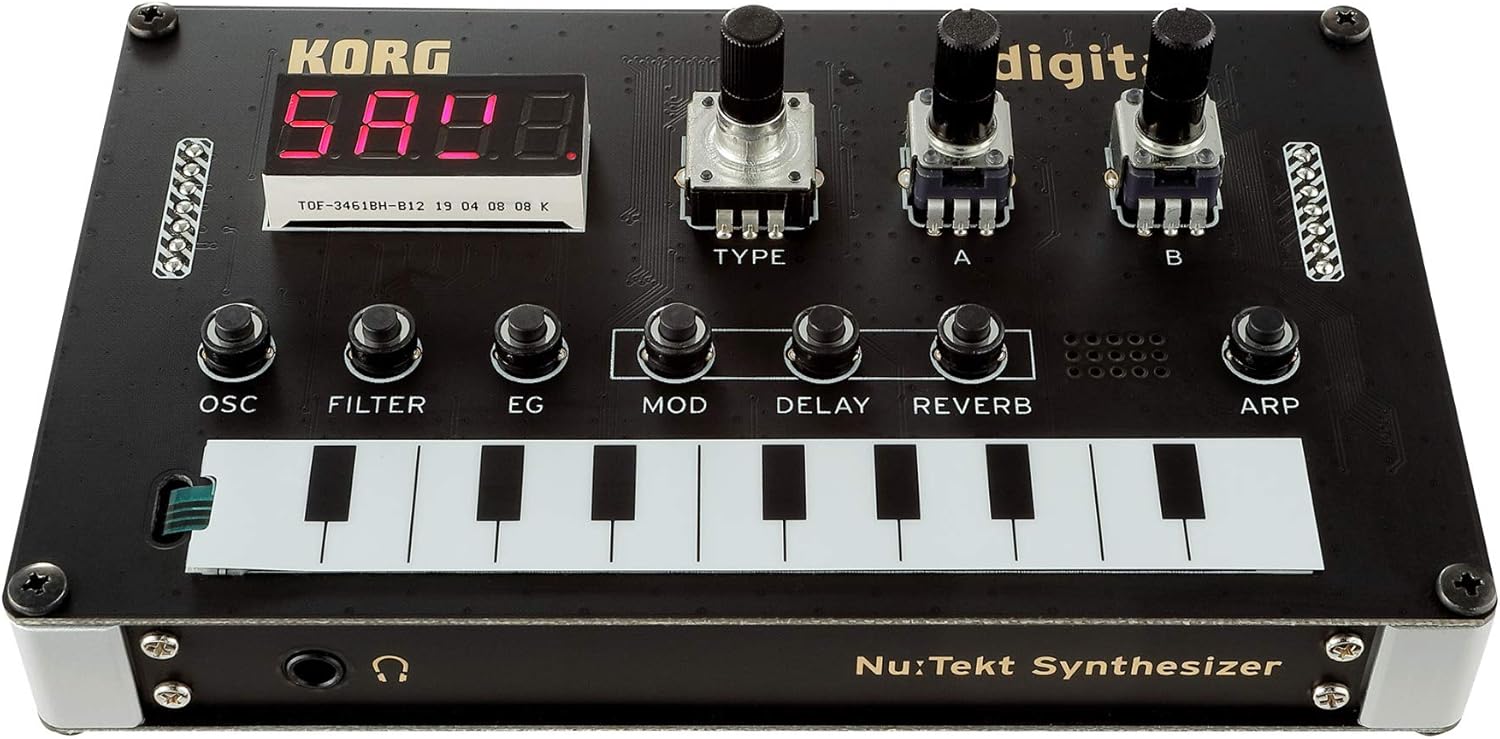
- OSC (Oscillator): Controls the primary sound source. Adjust TYPE, A, and B knobs to select and modify oscillator types and parameters.
- 필터: Shapes the tonal characteristics of the sound. Use the dedicated knob to adjust the multimode filter.
- EG (Envelope Generator): 제어 amp소리의 폭 포락선.
- MOD(변조): Adjusts modulation sources and destinations, including LFO.
- 지연: Controls the delay effect parameters.
- 리버브: Controls the reverb effect parameters.
- ARP(아르페지오): Activates and controls the arpeggiator for rhythmic patterns.
- 터치 키보드: A ribbon controller for playing notes and inputting sequences.
- LED 디스플레이: Shows current parameter values and settings.
3.2. 기본 동작
- 전원 켜기: Connect the NTS-1 to a USB power source. The LED display will light up.
- 플레이 노트: Use the touch keyboard to play notes. Experiment with different pressure and slide techniques.
- Adjust Oscillator: Turn the OSC TYPE knob to select different oscillator types. Use knobs A and B to modify their characteristics.
- Apply Filter: Adjust the FILTER knob to change the cutoff frequency and resonance, shaping the sound.
- 사용 효과: Experiment with the DELAY and REVERB knobs to add spatial effects to your sound.
- 아르페지에이터: Press the ARP button to activate the arpeggiator. Adjust its parameters for varied rhythmic patterns.
3.3. 연결성

- USB: For power and MIDI communication with a computer.
- MIDI 입력: Connect external MIDI controllers or sequencers.
- OUT/SYNC-IN: Audio output and synchronization input for other Korg Volca series devices.
- 오디오 입력: Input for processing external audio signals through the NTS-1's effects.
3.4. 공식 제품 영상
Watch these official videos from the seller for more insights into the Korg Nu:Tekt NTS-1:
4. 유지관리
To ensure the longevity and optimal performance of your Korg Nu:Tekt NTS-1, follow these maintenance guidelines:
- 청소: Use a soft, dry cloth to wipe down the surface of the synthesizer. Avoid abrasive cleaners or solvents, as they may damage the finish.
- 저장: Store the NTS-1 in a cool, dry place away from direct sunlight, extreme temperatures, and high humidity.
- 손질: Handle the device with care to prevent physical damage. Avoid dropping it or exposing it to excessive force.
- 힘: Always use the recommended USB power source. Disconnect power when the device is not in use for extended periods.
5. 문제 해결
If you encounter issues with your Korg Nu:Tekt NTS-1, try the following troubleshooting steps:
- 전원 없음: Ensure the USB cable is securely connected to both the NTS-1 and a working power source. Try a different USB cable or power source.
- 소리 없음: Check that the volume is turned up. Ensure headphones or speakers are properly connected to the output jack. Verify that an oscillator type is selected and the filter cutoff is open.
- MIDI 관련 문제: Confirm that MIDI cables are correctly connected. Check MIDI settings on both the NTS-1 and your external device/software.
- 예상치 못한 동작: Try resetting the device to its factory settings (refer to the owner's manual for specific instructions).
6. 사양
| 특징 | 세부 사항 |
|---|---|
| 품목 무게 | 10.2온스(290그램) |
| 제품 치수 | 5.08 x 3.07 x 1.54 인치 |
| 본체 소재 | 알루미늄, 탄소 섬유 |
| 마무리 유형 | 우아한 |
| 색상 | 검은색 |
| 전원 | Corded Electric (USB Type B) |
| 권tage | 9볼트(AC) |
| 키보드 키 수 | 49 (virtual ribbon keyboard) |
| 제조업체 | 코르그 |
| 첫 번째 이용 가능 날짜 | 3년 2019월 XNUMX일 |
7. 보증 및 지원
KORG offers various protection plans for your Nu:Tekt NTS-1 Digital Synthesizer Kit:
- 3년 보호 계획: 21.99달러를 일회성으로 결제하시면 이용 가능합니다.
- 4년 보호 계획: 29.99달러를 일회성으로 결제하시면 이용 가능합니다.
- 완벽한 보호: A monthly plan covering all eligible past and future purchases for $16.99.
For returns, a 30-day refund/replacement policy is typically available. For detailed warranty information and technical support, please refer to the official KORG web사이트를 방문하거나 고객 서비스에 문의하세요.