
1. 서론
구매해주셔서 감사합니다asing the UHAPPY U18 Portable Mini HD LED Projector. This manual provides essential information for the safe and efficient operation of your device. Please read it thoroughly before use and retain it for future reference.
안전 예방 조치
- l을 사용할 때 프로젝터 렌즈를 직접 쳐다보지 마십시오.amp 켜져있습니다.
- 과열을 방지하려면 프로젝터 주변을 적절하게 환기시키십시오.
- 프로젝터를 비나 습기에 노출시키지 마십시오.
- 프로젝터와 함께 제공된 전원 어댑터만 사용하세요.
- 프로젝터를 직접 열거나 수리하려고 하지 마십시오. 모든 서비스는 자격을 갖춘 전문가에게 맡기십시오.
2. 제품 오버view
Familiarize yourself with the components and ports of your UHAPPY U18 projector.
패키지 내용
The following items are included in your projector package:

Image: Contents of the UHAPPY U18 projector package, including the projector, power adapter, AV cable, remote control, and user manual.
- UHAPPY U18 Mini LED Projector
- 전원 어댑터
- AV 케이블
- 원격 제어
- 사용 설명서 (본 문서)
프로젝터 구성 요소 및 포트

Image: Angled top-down view of the UHAPPY U18 projector, highlighting the lens, focus adjustment, and control panel.

이미지: 상단 view of the UHAPPY U18 projector, showing the integrated control buttons.

이미지: 앞면 view of the UHAPPY U18 projector, focusing on the projection lens.
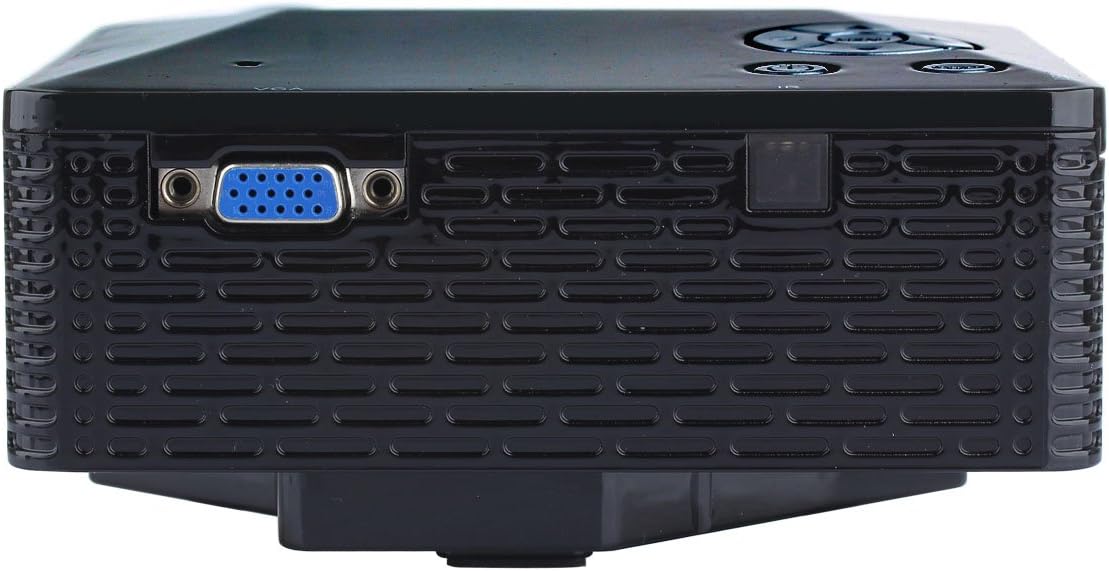
이미지: 측면 view of the UHAPPY U18 projector, illustrating the VGA input port.
The projector features various input ports for connectivity:
- HDMI 입력: For connecting devices like laptops, gaming consoles, or media players.
- USB 포트: For connecting USB storage devices to play media directly.
- SD 카드 슬롯: For inserting SD memory cards to play media directly.
- AV 입력: 동봉된 AV 케이블을 사용하여 구형 기기를 연결할 수 있습니다.
- VGA 입력: For connecting computers or laptops with a VGA output.
- DC 입력: 전원 입력 포트.
- 헤드폰 출력: 외부 오디오 장치 또는 헤드폰을 연결하는 데 사용합니다.
- 초점 손잡이: 렌즈 근처에 위치하여 이미지 선명도를 조절합니다.
3. 설정
3.1 배치
Place the projector on a stable, flat surface. Ensure there is adequate space around the projector for ventilation. The ideal projection distance is between 1 to 4 meters, yielding an image size of 20 to 80 inches.
3.2 전원 연결
- Connect the power adapter to the DC-IN port on the projector.
- 전원 어댑터를 적합한 전기 콘센트에 연결하십시오.
3.3 입력 장치 연결
Choose the appropriate cable and port based on your source device:
- HDMI : Connect an HDMI cable from your device (e.g., laptop, DVD player) to the projector's HDMI port.
- VGA : 컴퓨터의 VGA 포트와 프로젝터의 VGA 포트를 VGA 케이블로 연결하세요.
- 유명인 : Use the provided AV cable to connect devices with AV output (e.g., older DVD players, set-top boxes) to the projector's AV port.
- USB/SD 카드: USB 포트에 USB 드라이브를 삽입하거나 SD 카드 슬롯에 SD 카드를 삽입하세요.
4. 사용 설명서
4.1 전원 켜기/끄기
- 전원을 켜려면: Press the power button on the projector or the remote control. The LED indicator will light up.
- 전원을 끄려면: Press the power button again. It is recommended to allow the projector to cool down for a few minutes before unplugging it.
4.2 소스 선택
After powering on, you may need to select the input source:
- Press the 'Source' button on the projector or the remote control.
- Use the navigation buttons to select the desired input (HDMI, VGA, AV, USB, SD) and press 'OK' or 'Enter'.
4.3 초점 조정
투영된 이미지가 흐릿하게 보이는 경우:
- Rotate the focus knob located near the projector lens until the image becomes clear and sharp.
4.4 메뉴 탐색
Use the 'Menu' button on the projector or remote to access settings. Use the navigation arrows to move through options and 'OK' or 'Enter' to confirm selections. The projector supports multiple languages including English, Czech, Slovak, Danish, German, Spanish, French, Croatian, Italian, Hungarian, Dutch, Norwegian, Polish, Portuguese, Romanian, Slovene, Serbian, Finnish, Swedish, Bulgarian, Greek, Russian, and Chinese.
4.5 지원되는 미디어 형식
When playing media directly from USB or SD card, the projector supports the following formats:
- 영상: BMP, JPEG, PNG
- 동영상: MPEG1, MPEG2, MPEG4, RM, RMVB, AVI, FLV, WMV
5. 유지관리
5.1 렌즈 청소
광학 렌즈 전용으로 제작된 부드럽고 보풀 없는 천으로 프로젝터 렌즈를 살살 닦아주세요. 연마성 재질이나 독한 화학 약품은 사용하지 마십시오.
5.2 일반 청소
Wipe the projector's exterior with a soft, dry cloth. Do not use liquid cleaners directly on the device. Ensure ventilation openings are free from dust and obstructions.
5.3 보관
When not in use, store the projector in a cool, dry place, away from direct sunlight and extreme temperatures. It is advisable to cover the lens to protect it from dust.
6. 문제 해결
프로젝터에 문제가 발생하면 다음의 일반적인 문제와 해결 방법을 참조하세요.
| 문제 | 가능한 원인 | 해결책 |
|---|---|---|
| 화면에 이미지가 없습니다. | 잘못된 입력 소스가 선택되었습니다. 느슨한 케이블 연결 소스 장치의 전원이 켜져 있지 않습니다. | 올바른 입력 소스를 선택하십시오. 모든 케이블 연결을 확인하십시오. 소스 장치의 전원이 켜져 있고 신호를 출력하고 있는지 확인하세요. |
| 이미지가 흐릿함 | 초점이 조정되지 않았습니다. | Rotate the focus knob until the image is clear. |
| 소리가 나지 않습니다 | 볼륨이 너무 낮습니다 External audio device not connected 소스 장치 오디오 설정 | 프로젝터 볼륨을 높이세요. Connect external speakers/headphones to the audio output. 음원 기기의 오디오 설정을 확인하세요. |
| 프로젝터가 과열되어 꺼집니다 | 막힌 환기 더운 환경에서 장시간 사용 | 통풍구가 깨끗한지 확인하세요. Allow the projector to cool down. Operate in a well-ventilated area. |
7. 사양
Technical specifications for the UHAPPY U18 Portable Mini HD LED Projector:
- 이미지 시스템 : 액정표시장치
- 네이티브 해상도: 320x240
- Lamp: 주도의
- LED 수명: 20,000시간
- 명도: 60 LM
- 차이: 300시 1분
- 렌즈: 여=125
- 이미지 크기: 20-80 인치
- 투사 거리: 1-4 미터
- 프로젝션 모드: 전면 영사
- 작동 모드: 수동/원격 제어
- 입력 단자: AV, VGA, USB, SD, HDMI
- 산출: 헤드폰
- 힘: 24와트
- 색상: 16.77 만 색상
- 스피커: 1.0W*2
- 작동 온도: 10~35도
- 치수: 135 x 132 x 52mm
- 무게: 0.44kg
8. 보증 및 지원
This product is manufactured by Generic. For warranty information and technical support, please refer to the documentation provided at the time of purchase or contact your retailer. Keep your purchase receipt as proof of purchase.