
1. 서론
Thank you for choosing the XTUGA EW240 UHF 4-Channel Wireless Microphone System. This professional wireless microphone system is designed to deliver clear and powerful audio performance for various applications, including family parties, stages, churches, and karaoke. This manual provides detailed instructions for setup, operation, maintenance, and troubleshooting to ensure optimal performance and longevity of your system.
2. 중요한 안전 정보
- 제품을 사용하기 전에 모든 지침을 주의 깊게 읽으십시오.
- 이 설명서를 향후 참고용으로 보관하세요.
- 화재나 감전을 방지하기 위해 장치를 비나 습기에 노출시키지 마십시오.
- 적절한 환기를 확보하고 통풍구를 막지 마십시오.
- 장치와 함께 제공된 전원 어댑터만 사용하십시오.
- 장치를 분해하거나 개조하지 마십시오. 모든 정비는 자격을 갖춘 기술자에게 맡기십시오.
- 현지 규정에 따라 배터리를 폐기하십시오.
3. 패키지 내용
모든 품목이 들어 있는지 확인하려면 패키지를 확인하세요.
- 1 x 4-Channel Receiver
- 1 x 사용자 설명서
- 4 x 바디팩 송신기
- 4 x 라발리에 마이크
- 4 x 헤드셋 마이크
- 1 x 110V/220V 전원 어댑터
4. 제품 오버view
4.1 수신기 유닛
The receiver is the central unit of the wireless microphone system, featuring a durable metal design and individual volume controls for each of its four channels. It includes four receiving antennas for stable signal reception and an LCD display for monitoring operating status.


4.2개의 바디팩 송신기
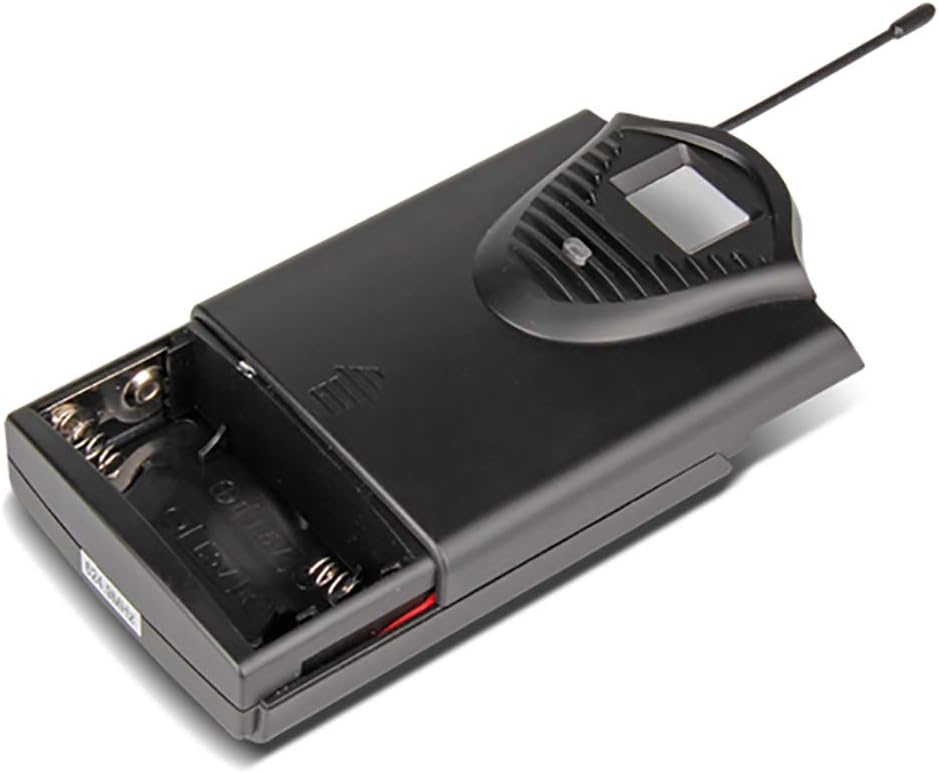
The system includes four bodypack transmitters, each designed for use with either a lavalier or headset microphone. These transmitters are compact, feature an LCD display for battery and operating status, and are powered by two 1.5V batteries, offering up to 8 hours of continuous use.



5. 설정 지침
5.1 수신기 설정
- 놓기: Place the receiver on a stable, flat surface, away from potential sources of interference (e.g., computers, Wi-Fi routers). Ensure adequate ventilation around the unit.
- 안테나 연결: Screw the four included antennas onto the ANT A, ANT B, ANT C, and ANT D connectors on the rear panel of the receiver. Position them vertically for optimal signal reception.
- 전원 연결: Connect the supplied power adapter to the DC 16V, 400mA input on the rear of the receiver, then plug it into a suitable power outlet.
- 오디오 출력: 수신기를 믹서에 연결하고, amplifier, or sound system using either the 6.3cm (1/4 inch) mixed output or the individual 6.3cm (1/4 inch) outputs for each channel (OUT A, OUT B, OUT C, OUT D).


5.2 송신기 설정
- 배터리 설치: Open the battery compartment of each bodypack transmitter. Insert two 1.5V AA batteries, ensuring correct polarity. Close the compartment securely.
- 마이크 연결: Plug the lavalier or headset microphone into the input jack on the bodypack transmitter.
- 전원 켜기: Turn on the power switch on the bodypack transmitter. The LCD display will illuminate, showing the channel and battery status.
6. 사용 설명서
- 시스템 전원 켜기: First, power on the receiver. Then, power on each bodypack transmitter.
- 볼륨 조절: Use the individual volume control knobs on the receiver for each channel (CH 01, CH 02, CH 03, CH 04) to adjust the microphone levels. Start with the volume low and gradually increase it to avoid feedback.
- 신호 표시기: The receiver's LCD display will show the active channel frequencies. The RF (Radio Frequency) and AF (Audio Frequency) indicators will light up when a signal is being received and audio is present, respectively.
- 용법: Position the lavalier microphone approximately 6-8 inches from your mouth, or wear the headset microphone comfortably. Speak clearly into the microphone.
- 전원 끄기: When finished, first turn off the bodypack transmitters, then power off the receiver. This helps prevent pops or thumps through your sound system.
7. 유지관리
- 청소: Use a soft, dry cloth to clean the receiver and transmitters. Do not use liquid cleaners or solvents.
- 배터리 교체: Replace batteries in the bodypack transmitters when the low battery indicator appears on the LCD display. Always use fresh, high-quality 1.5V AA batteries.
- 저장: Store the system in a cool, dry place when not in use. Remove batteries from transmitters if storing for extended periods to prevent leakage.
- 안테나 관리: Handle antennas carefully. Avoid bending them excessively.
8. 문제 해결
| 문제 | 가능한 원인 | 해결책 |
|---|---|---|
| 마이크에서 소리가 나지 않음 | Transmitter or receiver not powered on; low batteries; microphone not connected; receiver output not connected to sound system; volume too low. | Ensure all units are powered on. Replace batteries. Check microphone connection to transmitter. Verify receiver output is connected and sound system is on. Increase receiver and sound system volume. |
| 음질 불량/간섭 | Interference from other wireless devices; transmitter too far from receiver; antennas not positioned correctly; low batteries. | Move away from other wireless devices. Ensure line of sight between transmitter and receiver. Position antennas vertically. Replace batteries. |
| 짧은 작동 범위 | Obstructions between transmitter and receiver; antennas not positioned correctly; environmental interference. | Ensure clear line of sight. Position antennas vertically. Avoid using in areas with high RF interference. |
| Receiver LCD not displaying | Receiver not powered on; power adapter faulty. | Check power connection and ensure receiver is switched on. Try a different power outlet. |
9. 사양
9.1 General System
- 채널 수: 4채널
- 안정: ± 0.006%
- Normal Deviation: ± 22kHz
- S/N 비율: <120dB (XNUMXdB)
- THD : <0.6% (XNUMX%)
- 주파수 응답: 50Hz - 15kHz
- 범위: 65 미터
9.2 수신기
- 감광도: > 80dB
- 오디오 출력: Balanced and Unbalanced (6.3cm mixed output, four 6.3cm individual outputs)
- 전력 요구 사항: AC 16 V, 400 mA
- 치수: 440 x 210 x 40mm
- 무게: 약 1.3kg
- 재료: 금속
9.3 Wireless Microphone (Transmitter)
- 카트리지 유형 : 동적
- RF 출력: <10mW (XNUMX밀리와트)
- Normal Deviation: ± 22kHz
- 최대 편차: ± 80kHz
- 배터리: 2 x 1.5V AA 배터리
- 배터리 수명: 8시간
10. 보증 및 지원
XTUGA products are designed for reliability and performance. For warranty information and technical support, please refer to the contact details provided with your purchase or visit the official XTUGA web사이트. 보증 청구에 대비해 구매 증빙 자료로 구매 영수증을 보관하세요.