
스마트 425
Smart Kingfisher Rechargeable Lithium Battery and USB Charger User Manual
소개
This manual provides essential instructions for the safe and efficient use of your Smart Kingfisher Rechargeable Lithium Battery and USB Charger. Please read this manual thoroughly before use and retain it for future reference.
안전 정보
- 경고: 충전이 불가능한 배터리를 충전하려고 하지 마세요.
- 경고: Do not charge batteries from other suppliers unless explicitly stated as compatible.
- Keep the charger and batteries away from water and moisture.
- Do not disassemble, crush, or puncture the batteries or charger.
- 배터리를 극한 온도나 직사광선에 노출시키지 마십시오.
- 현지 규정에 따라 배터리를 책임감 있게 폐기하세요.
패키지 내용
패키지에 모든 품목이 들어 있는지 확인하세요.
- 2 x 425 Rechargeable Lithium Batteries
- 1 x Dual-Port USB Charger
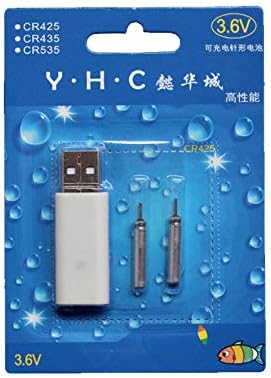
Image: Retail packaging showing the USB charger and two 425 rechargeable batteries.

Image: A pair of Smart Kingfisher 425 rechargeable lithium batteries.
설정
The Smart Kingfisher USB charger is designed for ease of use. No complex setup is required.
- Identify the USB charger and the 425 rechargeable batteries.
- Connect the USB charger to a compatible power source (see "Operating Instructions" for options).

Image: The USB charger unit with its two charging pins visible.
작동 지침
배터리 충전
The charger features two ports, allowing for simultaneous charging of two batteries.
- Insert the 425 rechargeable batteries into the charging ports of the USB charger. Ensure a secure connection.
- Connect the USB charger to a power source. Compatible power sources include:
- USB power adapter (wall charger)
- 파워뱅크
- 차량 충전기
- Laptop or PC USB port
- Observe the LED indicator on the charger:
- A 녹색 LED indicates that the batteries are currently charging.
- A 빨간색 LED indicates that the batteries are fully charged.
- 완전 충전에는 일반적으로 약 3시간이 소요됩니다.
- Once fully charged, disconnect the charger from the power source and remove the batteries.
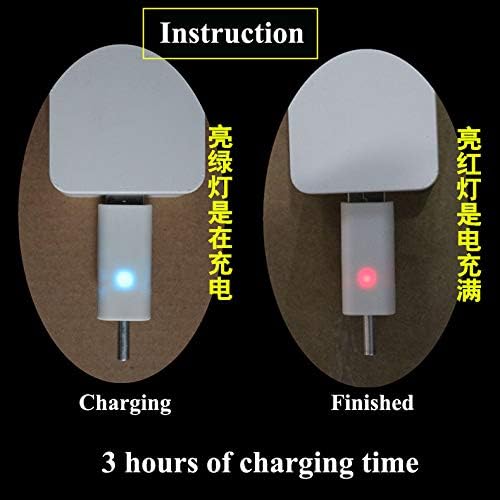
Image: Visual guide for charging status: green light for charging, red light for fully charged. Indicates a 3-hour charging time.

Image: Diagram illustrating multiple methods for charging the device, including car chargers, wall adapters, power banks, and laptops.
유지
- Clean the charger and batteries with a dry, soft cloth. Do not use liquids or abrasive cleaners.
- Store the batteries and charger in a cool, dry place when not in use.
- Avoid storing fully discharged batteries for extended periods to prolong their lifespan.
문제 해결
| 문제 | 가능한 원인 | 해결책 |
|---|---|---|
| Batteries not charging (no LED indication) |
|
|
| Charging takes longer than 3 hours |
|
|
| Red LED does not turn on after extended charging |
|
|
명세서
- 재료: 플라스틱
- 제품 무게: 20 g (total for charger and batteries)
- 배터리 유형: 425 Rechargeable Lithium Battery (compatible with CR425, CR435, CR535)
- 충전기 유형: 듀얼 포트 USB 충전기
- 입력: USB (compatible with various USB power sources)
- 충전 표시기: Green LED (charging), Red LED (fully charged)
- 대략적인 충전 시간: 3시간
보증 및 지원
For warranty information or technical support, please refer to the retailer's return policy or contact the manufacturer directly. Keep your purchase receipt as proof of purchase.
추가 지원이 필요하면 다음을 방문하세요. product page on Amazon.com.mx.
Ask a question about this manual
Ask about setup, troubleshooting, compatibility, parts, safety, or missing instructions. Manuals+ will review the question and use this page’s manual context to help answer it.