ASUS PRIME H310M-A R2.0/CSM
ASUS PRIME H310M-A R2.0/CSM Motherboard User Manual
Model: PRIME H310M-A R2.0/CSM
1. 서론
The ASUS PRIME H310M-A R2.0/CSM is a Micro-ATX motherboard designed to support 8th and 9th generation Intel Core processors. It offers a robust platform for building a reliable and efficient desktop system, featuring ASUS 5X Protection III for hardware safeguards and FanXpert for advanced cooling control. This manual provides essential information for the proper installation, operation, and maintenance of your motherboard.

Figure 1.1: The ASUS PRIME H310M-A R2.0/CSM Motherboard alongside its retail packaging.
주요 특징:
- Designed for 8th and 9th generation Intel Core processors (LGA 1151 socket).
- ASUS 5X Protection III for hardware-level safeguards and component longevity.
- FanXpert for dynamic system cooling control.
- Integrated M.2 slot with Intel Optane Memory compatibility for fast storage.
- ASUS Optic-MEM technology for improved memory stability and performance.
- On-board 8-channel HD audio for immersive sound.
- SafeSlot Core fortified PCIe slot for enhanced durability.
2. 패키지 내용
Before proceeding with the installation, please verify that all items listed below are present in your motherboard package. If any item is missing or damaged, contact your retailer.
- ASUS PRIME H310M-A R2.0/CSM motherboard
- Serial ATA 6.0Gb/s 케이블(2)
- I / O 실드
- 지원 DVD
- M.2 Anchor
- 사용자 설명서(본 문서)

Figure 2.1: All components included in the ASUS PRIME H310M-A R2.0/CSM motherboard package.
3. 마더보드 레이아웃 및 구성 요소
설치하기 전에 마더보드의 다양한 구성 요소와 커넥터를 숙지하십시오.

그림 3.1: 상향식 view of the motherboard, highlighting key component locations such as the CPU socket, DIMM slots, and PCIe slots.

그림 3.2: 각도 view 쇼씨asing the CPU socket, RAM slots, and various headers.
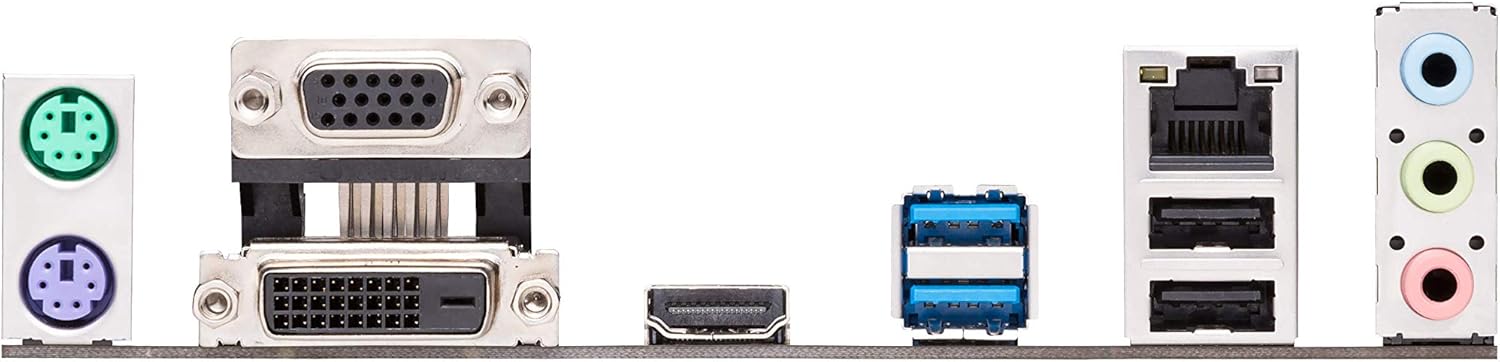
Figure 3.3: The rear input/output (I/O) panel, showing ports for USB, audio, video (VGA, DVI-D, HDMI), Ethernet, and PS/2.
주요 연결 요소:
- LGA 1151 CPU 소켓: For Intel 8th/9th Gen Core, Pentium Gold, and Celeron processors.
- DDR4 DIMM 슬롯: Two slots supporting up to 32GB of DDR4 memory (2666/2400/2133 MHz).
- PCIe 3.0 x16 슬롯: 그래픽 카드용입니다.
- PCIe 2.0 x1 Slots: Two slots for expansion cards.
- M.2 소켓 3: Supports M.2 SSDs (SATA & PCIe x2 mode).
- SATA 6Gb/s 포트: Four ports for SATA devices.
- USB 3.1 Gen 1 포트: Rear panel and internal header.
- USB 2.0 포트: 후면 패널 및 내부 헤더.
- 전면 패널 헤더: For power button, reset button, HDD LED, and front panel audio.
- ATX 전원 커넥터: 24-pin EATX Power and 8-pin EATX 12V Power.
4. 설정 및 설치
마더보드와 구성 요소를 설치하려면 다음 단계를 주의 깊게 따르세요.
4.1. 시스템 준비
- 정전기 예방 조치: Always wear an anti-static wrist strap or frequently touch a grounded metal object (like your computer case) to discharge static electricity before handling components.
- 작업 공간: Ensure you have a clean, well-lit, and spacious workspace.
- 전원 끄기 : 구성품을 설치하거나 제거하기 전에 전원 코드를 벽면 콘센트에서 분리하십시오.
4.2. CPU 설치
- 마더보드에서 LGA 1151 CPU 소켓을 찾으세요.
- Push the load lever down and away from the socket to open the load plate.
- Carefully align the triangular mark on the CPU with the mark on the socket. Gently place the CPU into the socket. Do not force it.
- 적재판을 닫고 적재 레버를 딸깍 소리가 날 때까지 제자리로 밀어 넣으십시오.
- 제조업체의 지침에 따라 CPU 쿨러를 설치하세요.
4.3. 메모리(RAM) 설치
- DIMM 슬롯 양쪽 끝에 있는 클립을 엽니다.
- DDR4 메모리 모듈의 노치를 DIMM 슬롯의 키에 맞춥니다.
- 메모리 모듈을 클립이 제자리에 고정될 때까지 슬롯에 단단히 삽입하십시오. 두 클립이 모두 닫혔는지 확인하십시오.
4.4. M.2 SSD 설치
- 마더보드에서 M.2 슬롯을 찾으세요.
- Remove the M.2 anchor screw from the standoff.
- M.2 SSD를 30도 각도로 슬롯에 삽입합니다.
- Gently push the SSD down and secure it with the M.2 anchor screw.
4.5. 마더보드를 케이스에 설치
- Install the I/O shield into the chassis's rear I/O opening.
- Align the motherboard with the standoffs in your chassis.
- 나사로 마더보드를 고정하세요. 너무 세게 조이지 마세요.
4.6. 전원 공급 장치 연결
- Connect the 24-pin ATX power cable from your power supply to the 24-pin EATX Power connector on the motherboard.
- Connect the 8-pin ATX 12V power cable to the 8-pin EATX 12V Power connector.
4.7. 주변기기 및 전면 패널 연결
- 저장 장치의 SATA 데이터 케이블을 마더보드의 SATA 6Gb/s 포트에 연결하십시오.
- Connect your graphics card to the PCIe 3.0 x16 slot (if applicable) and secure it.
- Connect front panel cables (Power SW, Reset SW, HDD LED, Power LED) to the corresponding headers on the motherboard. Refer to the motherboard diagram for exact pinouts.
- Connect USB and audio cables from your chassis front panel to the respective headers.
5. 시스템 운영
5.1. 초기 부팅
After all components are installed and connected, connect your monitor, keyboard, and mouse. Plug in the power cord and press the power button on your chassis.
5.2. BIOS/UEFI 접근
BIOS/UEFI 설정 유틸리티를 시작하려면 다음을 누르세요. 델 키 또는 F2 POST(Power-On Self-Test) 과정 중 키를 누릅니다. BIOS를 통해 시스템 설정, 부팅 순서를 구성하고 하드웨어 상태를 모니터링할 수 있습니다.
5.3. 드라이버 설치
After installing your operating system, install the necessary drivers for your motherboard's components. You can find these drivers on the included Support DVD or download the latest versions from the official ASUS support website. Installing the correct drivers ensures optimal performance and stability.
5.4. 운영체제 설치
Insert your operating system installation media (USB drive or DVD) and configure the boot order in the BIOS/UEFI to boot from it. Follow the on-screen instructions to install your preferred operating system.
6. 유지관리
6.1. 청소
컴퓨터 내부를 정기적으로 청소하여 먼지 축적을 방지하세요. 먼지가 쌓이면 과열 및 부품 고장의 원인이 될 수 있습니다. 압축 공기를 사용하여 팬, 방열판 및 기타 부품의 먼지를 제거하십시오. 청소하기 전에 시스템 전원을 끄고 전원 케이블을 뽑으십시오.
6.2. BIOS 업데이트
ASUS periodically releases BIOS updates to improve system stability, add support for new hardware, or fix bugs. You can download the latest BIOS from the ASUS support website. Refer to the motherboard's product page or the BIOS utility for instructions on how to update the BIOS safely. It is recommended to update the BIOS before installing Windows, especially if using a 9th generation Intel CPU.
6.3. 드라이버 업데이트
Keep your drivers updated to ensure optimal performance and compatibility. You can check the ASUS support website for the latest chipset, audio, LAN, and other drivers for your motherboard.
7. 문제 해결
이 섹션에서는 일반적으로 발생할 수 있는 문제에 대한 해결책을 제공합니다.
- 전원 없음/부팅 불가:
- Ensure all power cables (24-pin ATX, 8-pin 12V CPU) are securely connected to the motherboard and power supply.
- 전원 공급 장치가 켜져 있고 작동하는 콘센트에 연결되어 있는지 확인하세요.
- 전면 패널 전원 스위치와 마더보드의 연결 상태를 확인하십시오.
- 디스플레이 없음:
- Ensure your monitor is connected to the correct video output (either motherboard's integrated graphics ports or discrete graphics card).
- 그래픽 카드와 메모리 모듈을 다시 장착하세요.
- If using a discrete graphics card, ensure it has adequate power from the PSU.
- 시스템 불안정/충돌:
- CPU 및 GPU 온도를 확인하십시오. 냉각 솔루션이 제대로 설치되었는지 확인하십시오.
- 메모리 진단 도구를 실행하여 RAM에 오류가 있는지 확인하십시오.
- 모든 운전자가 최신 정보를 갖추고 있는지 확인하세요.
- 전원 공급 장치를 확인하십시오.tage는 모든 구성 요소에 충분합니다.
- 주변 장치가 감지되지 않음:
- 주변 장치를 다른 포트에 연결해보세요.
- 관련 드라이버를 설치하거나 업데이트하십시오.
- BIOS 설정을 확인하여 포트가 활성화되어 있는지 확인하세요.
For more detailed troubleshooting or issues not covered here, please refer to the ASUS support web사이트 또는 기술 지원팀에 문의하세요.
8. 사양
Below are the technical specifications for the ASUS PRIME H310M-A R2.0/CSM Motherboard.
| 특징 | 사양 |
|---|---|
| 상표 | 아수스 |
| 모델명 | PRIME H310M-A R2.0/CSM |
| CPU 소켓 | LGA 1151 |
| 호환 프로세서 | 8th and 9th Generation Intel Core, Pentium Gold, Celeron |
| 칩셋 유형 | 인텔 H310 |
| RAM 메모리 기술 | DDR4 |
| 메모리 슬롯 | 2 x DIMM, Max. 32GB, DDR4 2666/2400/2133 MHz Non-ECC, Un-buffered Memory |
| 메모리 클럭 속도 | 2666MHz |
| 그래픽 출력 | VGA, DVI-D, HDMI |
| 확장 슬롯 | PCIe 3.0/2.0 x16 1개, PCIe 2.0 x1 2개 |
| 저장 | 1 x M.2 Socket 3, 4 x SATA 6Gb/s port(s) |
| USB 포트 | USB 3.1 Gen 1 (Type-A), USB 2.0/1.1 |
| 오디오 | Realtek ALC887 8채널 고화질 오디오 코덱 |
| 랜 | Realtek RTL8111H 기가비트 LAN 컨트롤러 |
| 폼 팩터 | mATX (8.9인치 x 7.3인치) |
| 제품 치수 | 8.9 x 1 x 7.3 인치 |
| 품목 무게 | 1.2파운드 |
| 첫 번째 이용 가능 날짜 | 12년 2018월 XNUMX일 |
9. 보증 및 지원
9.1. 제품 보증
This ASUS motherboard comes with a limited warranty. The duration and terms of the warranty may vary by region and retailer. Please retain your proof of purchase for warranty claims. For detailed warranty information, refer to the warranty card included in your package or visit the official ASUS web대지.
9.2. 기술 지원
For technical assistance, driver downloads, BIOS updates, or further information regarding your ASUS PRIME H310M-A R2.0/CSM motherboard, please visit the official ASUS support web대지:
You may also find helpful resources, FAQs, and contact information for regional support centers on the web대지.
Ask a question about this manual
Ask about setup, troubleshooting, compatibility, parts, safety, or missing instructions. Manuals+ will review the question and use this page’s manual context to help answer it.