
1. 서론
Thank you for choosing the lightmaXX Vega 3-Way PRO Beam/WASH/FX Moving Head Scanner. This versatile lighting fixture is designed for professional stage, event, and club applications, offering dynamic beam, wash, and special effect capabilities. This manual provides essential information for safe operation, setup, maintenance, and troubleshooting to ensure optimal performance and longevity of your device.
2. 안전 지침
Please read and understand all safety instructions before installing or operating this device. Failure to comply with these instructions may result in electric shock, fire, or personal injury.
- 이 장치는 전문가용으로만 사용됩니다.
- 전원 공급 장치 볼륨을 확인하십시오.tage는 vol과 일치합니다tage 장치에 지정되어 있습니다.
- 항상 접지된 전원 콘센트에 장치를 연결하십시오.
- Disconnect from mains power before any service, cleaning, or maintenance.
- 전원 코드가 손상된 경우 기기를 작동하지 마세요.
- 광원에 눈이 직접 노출되지 않도록 하십시오.
- Ensure adequate ventilation around the unit to prevent overheating. Maintain a minimum distance of 0.5 meters from flammable materials.
- Mount the device securely using appropriate clamp및 안전 케이블.
- 케이스를 열지 마십시오. 내부에는 사용자가 수리할 수 있는 부품이 없습니다. 모든 수리는 자격을 갖춘 기술자에게 맡기십시오.
- 기기를 비, 습기 및 극한 온도로부터 멀리하십시오.
3. 제품 오버view
The lightmaXX Vega 3-Way PRO is a hybrid moving head fixture designed to deliver powerful and versatile lighting effects. It combines beam, wash, and special effect functionalities in one compact unit.
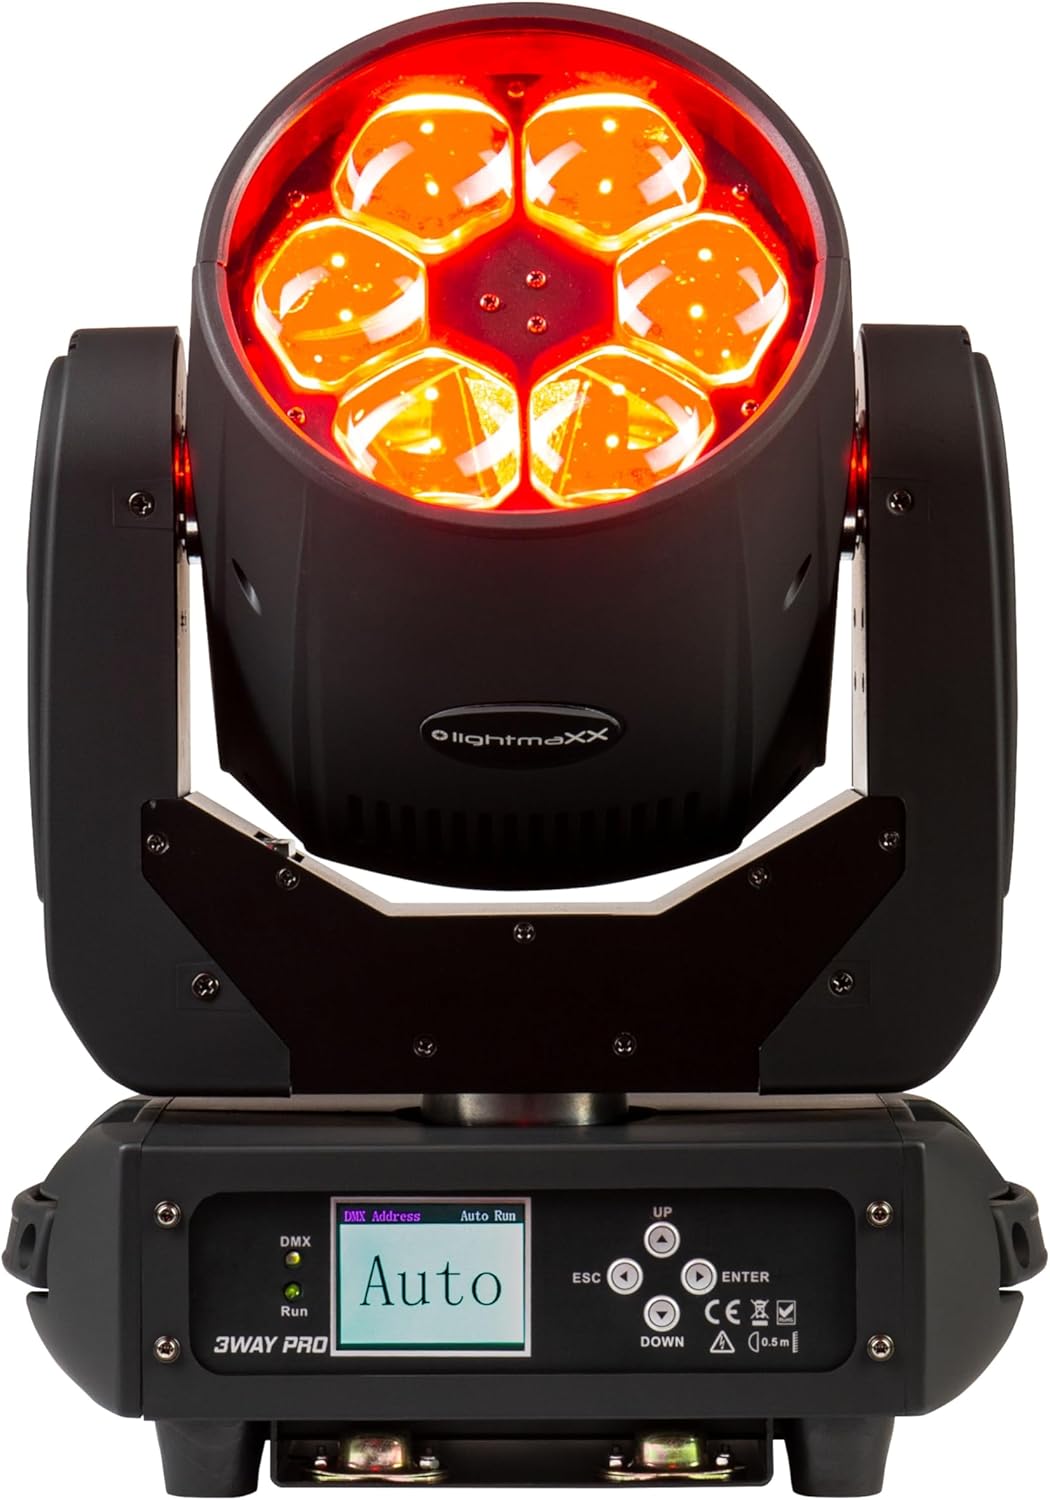
그림 3.1: 전면 view of the lightmaXX Vega 3-Way PRO, displaying red light output.

그림 3.2: 전면 view of the lightmaXX Vega 3-Way PRO with lights off, showing the lens array.
3.1 제어판 및 연결
The rear of the unit features the control panel and various input/output connections for power and DMX control.

Figure 3.3: Close-up of the control panel and connection ports.

그림 3.4: 후면 view of the lightmaXX Vega 3-Way PRO, showing DMX In/Out, Power In/Out, and fuse.
- DMX 입력/출력: DMX 신호 입력 및 출력을 위한 3핀 XLR 커넥터.
- 전원 입력/출력: PowerCon compatible connectors for mains power input and daisy-chaining power to other units.
- 퓨즈: 회로 보호용 퓨즈 홀더.
- 온 / 오프 스위치: 장치의 주 전원 스위치입니다.
- 표시하다: LCD screen for menu navigation and settings.
- 제어 버튼: UP, DOWN, ESC, ENTER for navigating the menu and adjusting settings.
- DMX/Run Indicators: LEDs indicating DMX signal presence and auto-run mode.
4. 설정
4.1 장착
The lightmaXX Vega 3-Way PRO can be mounted in various orientations (floor, truss, wall) using appropriate mounting hardware (not included). Always ensure the mounting surface or truss is capable of supporting the weight of the fixture and any additional equipment.
- Use a safety cable (not included) attached to the designated safety point on the fixture to prevent accidental drops.
- Ensure the fixture is securely fastened and balanced.
- Allow sufficient space around the fixture for ventilation and movement.
4.2 전원 연결
Connect the provided power cable to the POWER IN connector on the fixture and then to a suitable grounded power outlet. The unit supports daisy-chaining power to other fixtures using the POWER OUT connector, but ensure the total current draw does not exceed the circuit breaker's rating.
4.3 DMX 연결
To control the fixture via DMX, connect a DMX controller to the DMX IN port using a 3-pin XLR cable. If connecting multiple DMX fixtures, daisy-chain them by connecting the DMX OUT of the first fixture to the DMX IN of the next. The last fixture in the chain should have a DMX terminator connected to its DMX OUT port to prevent signal reflection.
5. 운영
5.1 제어판 탐색
Use the control buttons to navigate the menu and adjust settings:
- 위아래: Scroll through menu options or increase/decrease values.
- 시작하다: 옵션을 선택하거나 설정을 확인하세요.
- 키보드: Go back to the previous menu or cancel an action.
5.2 DMX 주소 설정
To control the fixture with a DMX controller, you must set a unique DMX start address for each unit. Refer to the DMX channel chart in your DMX controller's manual for channel assignments.
- 누르다 입력하다 주 메뉴에 액세스합니다.
- Navigate to the 'DMX Address' or 'Address Set' option using 위/아래.
- 누르다 입력하다 선택하다.
- 사용 위/아래 to set the desired DMX start address.
- 누르다 입력하다 to confirm and save the address.
5.3 작동 모드
The lightmaXX Vega 3-Way PRO typically offers several operating modes:
- DMX 모드: Full control over all functions via a DMX controller.
- 자동 실행 모드: Pre-programmed internal light shows that run automatically. Select 'Auto Run' from the menu and choose a program.
- 사운드 활성 모드: The fixture reacts to sound via its built-in microphone. Select 'Sound Active' from the menu.
- 마스터/슬레이브 모드: Link multiple units together. Set one unit as 'Master' and others as 'Slave'. The slave units will mirror the master's actions.
6. 유지관리
Regular maintenance ensures the longevity and optimal performance of your lightmaXX Vega 3-Way PRO.
- 청소: Periodically clean the lenses and exterior housing with a soft, lint-free cloth. Do not use abrasive cleaners or solvents. Ensure the unit is powered off and cool before cleaning.
- 통풍: Keep ventilation openings clear of dust and debris. Use compressed air to gently clear vents if necessary.
- 퓨즈 교체: If the unit does not power on, check the fuse. Disconnect power, unscrew the fuse holder, and replace with a fuse of the exact same type and rating (refer to specifications).
- 점검: 전원 케이블, DMX 케이블 및 장착 하드웨어에 마모 또는 손상 흔적이 있는지 정기적으로 점검하십시오. 손상된 부품은 즉시 교체하십시오.
7. 문제 해결
If you encounter issues with your lightmaXX Vega 3-Way PRO, refer to the following common problems and solutions:
| 문제 | 가능한 원인 | 해결책 |
|---|---|---|
| 전원이 없습니다 | No mains power; Blown fuse; Damaged power cable | Check power outlet; Replace fuse; Replace power cable |
| DMX 제어 없음 | 잘못된 DMX 주소; 불량 DMX 케이블; DMX 신호 없음; 종단 저항 누락 | Verify DMX address; Check/replace DMX cables; Ensure DMX controller is active; Add DMX terminator to last fixture |
| Fixture not moving/responding | DMX issue; Internal error; Motor blockage | Check DMX connection/address; Power cycle the unit; Ensure no physical obstructions |
| 과열 | Blocked ventilation; Insufficient airflow | Clear vents; Ensure proper spacing for airflow |
If the problem persists after attempting these solutions, please contact lightmaXX customer support or your authorized dealer.
8. 사양
| 특징 | 사양 |
|---|---|
| 모델 | Vega 3-Way PRO Beam/WASH/FX |
| 제조업체 참조 | LIG0014819-000 |
| 전력 소비 | 240 와트 |
| 치수(길이 x 너비 x 높이) | 43.5 x 36.5 x 33cm |
| 무게 | 11.1 킬로그램 |
| 연결성 | DMX (3-pin XLR), PowerCon compatible (In/Out), USB (for service/firmware) |
| 광센서 기술 | CMOS |
| 해결 | 600 (units not specified, likely for internal sensor) |
9. 보증 및 지원
For warranty information, please refer to the terms and conditions provided at the time of purchase or contact your authorized lightmaXX dealer. If you require technical assistance or have questions not covered in this manual, please contact lightmaXX customer support or your retailer for further guidance.