
1. 이상view
The Amazon Basics Electronic Keypad Deadbolt Door Lock offers convenient keyless entry with a touch-control keypad, providing enhanced security for your home. It features customizable security codes, an automatic locking function, and dual operation options including a traditional keyed entry. This deadbolt is designed for standard door preparations.

이미지: 앞면 view of the Amazon Basics Electronic Keypad Deadbolt, highlighting features such as programmable user codes, automatic locking, compatibility with left and right-handed doors, and dual electronic/keyed entry options.
2. 패키지 내용
설치를 시작하기 전에 모든 구성 요소가 있는지 확인하세요.
- 데드볼트 키패드 어셈블리
- 수신기 어셈블리
- 데드 볼트 래치
- 장착 플레이트
- 실린더
- 스트라이크 플레이트
- Square Corner Latch
- 드라이브인 슬리브
- 2개의 키
- Screw Pack (Deadbolt Chassis Screws x2, Machine Screws x3, Wood Screws x5)

Image: All parts included in the Amazon Basics Electronic Keypad Deadbolt package, including the keypad, interior assembly, latch, strike plate, keys, and various screws.
3. 설치
Follow these steps carefully for proper installation. An official installation video is provided below for visual guidance.
Video: Official Amazon Basics installation guide for the Traditional Electronic Keypad Deadbolt. This video demonstrates the complete installation process from start to finish.
3.1 Door Compatibility and Measurements
This lock is designed to fit standard door preparations. Verify your door's dimensions before installation.
- 문 구멍: Only suitable for 2-1/8 inches (54.1 mm) center hole.
- 문 두께: 1-3/8 inches to 1-3/4 inches (35.1 mm to 50.8 mm).
- 역수: 2-3/8 inches or 2-3/4 inches (60.5 mm or 69.9 mm).
- 보어 직경: 1 inch (25.4 mm).

Image: Diagram illustrating door compatibility, showing required dimensions for door holes, thickness, and backset for the deadbolt installation.
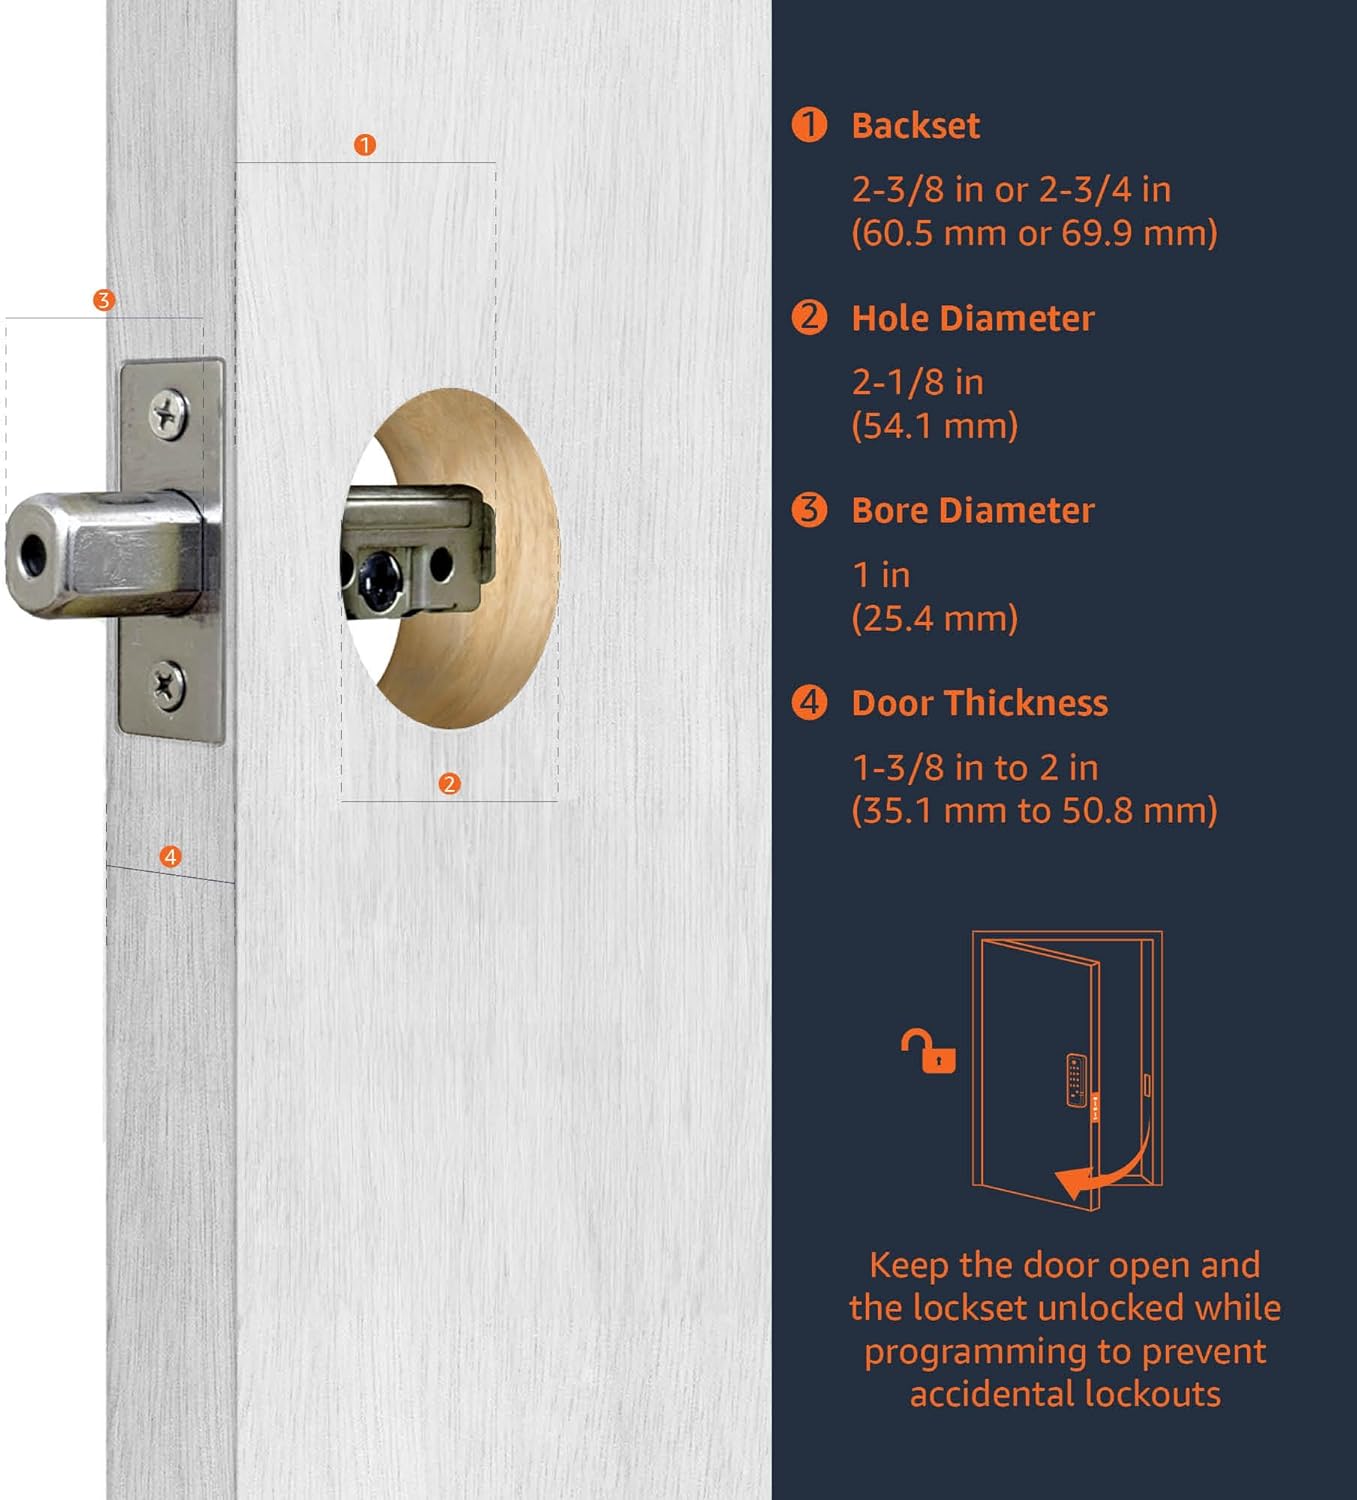
Image: Close-up diagram detailing the backset, hole diameter, bore diameter, and door thickness requirements for installing the deadbolt.
3.2 Latch Installation
Insert the deadbolt latch into the door edge. Ensure it is parallel to the door face. Secure it with the provided wood screws. (Refer to video 0:20-1:00)
3.3 Keypad Assembly Installation
Install the exterior keypad assembly, ensuring the tailpiece passes through the latch. (Refer to video 1:00-1:30)
3.4 Interior Assembly Installation
Attach the interior mounting plate, then connect the inner and outer harness connectors. Secure the interior assembly to the door with screws. (Refer to video 1:30-2:00)
3.5 배터리 설치
Insert 4 (AA) 1.5V alkaline batteries into the interior assembly. Alkaline batteries are recommended for stable power supply. Cover the battery lid. (Refer to video 2:00-2:15)
4. 설정 및 프로그래밍
After installation, program your lock for optimal functionality. The default Programming Code (PC) is 0000.
4.1 Door Handing Identification Process
The lock needs to learn if it's installed on a right-handed or left-handed door. This is crucial for correct operation. (Refer to video 2:15-2:45)
- Enter PC (0000) then press the Lock/Unlock button.
- Press '0' then press the Lock/Unlock button.
- The lock will perform a self-check to identify door handing.
4.2 Change Programming Code (PC)
Change the default PC for security. Programming Codes should be 4-10 digits in length. (Refer to video 2:45-3:15)
- Enter current PC then press the Lock/Unlock button.
- Press '4' then press the Lock/Unlock button.
- Enter new PC then press the Lock/Unlock button.
4.3 Create New User Code (UC)
Up to 6 sets of user codes can be saved. User codes should be 4-10 digits in length. (Refer to video 3:15-3:45)
- Enter PC then press the Lock/Unlock button.
- Press '1' then press the Lock/Unlock button.
- Enter new UC then press the Lock/Unlock button.
4.4 Delete an Existing User Code (UC)
(Refer to video 3:45-4:00)
- Enter PC then press the Lock/Unlock button.
- Press '2' then press the Lock/Unlock button.
- Enter the UC you want to delete then press the Lock/Unlock button.
4.5 Delete All User Codes (UC) at once
Auto-locking and Keypad locking functions will be invalid when User Codes are deleted. The lock can only be operated by key during that time. (Refer to video 4:00-4:15)
- Enter PC then press the Lock/Unlock button.
- Press '3' then press the Lock/Unlock button.
4.6 Toggle Auto-Lock On/Off
The preset delay-time is 30 seconds. (Refer to video 4:15-4:30)
- Enter PC then press the Lock/Unlock button.
- Press '5' then press the Lock/Unlock button.
4.7 Set Auto-Lock Time Delay
10-99 seconds delay-time available. (Refer to video 4:30-4:45)
- Enter PC then press the Lock/Unlock button.
- Press '6' then press the Lock/Unlock button.
- Enter seconds (10-99) then press the Lock/Unlock button.
4.8 Enable / Disable All User Codes
Auto-locking and keypad locking functions will be invalid when user codes are disabled. The lock can only be operated by key during the time. (Refer to video 4:45-5:00)
- Enter PC then press the Lock/Unlock button.
- Press '8' then press the Lock/Unlock button.
4.9 Create a One-Time User Code
User Codes should be 4-10 digits in length. The one-time user code will automatically cancel after it is used one time. (Refer to video 5:00-5:15)
- Enter PC then press the Lock/Unlock button.
- Press '9' then press the Lock/Unlock button.
- Enter One Time Code then press the Lock/Unlock button.
4.10 기본 설정 복원
The programming is reset back to the original factory codes once you hear 3 long beeps. New installation or restoring default setting: you must run the door handing identification process first. (Refer to video 5:15-5:30)
- Press the 'R' button for more than 5 seconds.
5. 사용 설명서
Once installed and programmed, operating your deadbolt is straightforward:
- 잠금 해제하려면: Enter your programmed User Code (UC) on the keypad, then press the Lock/Unlock button. The deadbolt will retract.
- 잠그려면: Press and hold any button on the keypad for a few seconds, or press the Lock/Unlock button. The deadbolt will extend. If auto-lock is enabled, the deadbolt will automatically extend after the set delay time.
- 키 입력 방식: Use the traditional key provided as an alternative entry method.
6. 유지관리
Regular maintenance ensures the longevity and optimal performance of your deadbolt:
- 배터리 교체: Replace all four AA alkaline batteries when the low battery indicator appears or when the lock's operation becomes sluggish. To access the battery compartment, slide off the cover on the interior assembly.
- 청소: 키패드와 외부 표면을 부드러운 천으로 청소하십시오.amp 천으로 닦으세요. 마감재나 전자 부품을 손상시킬 수 있는 연마성 세척제나 용제는 사용하지 마세요.
- 매끄럽게 하기: Periodically lubricate the deadbolt latch mechanism with a silicone-based lubricant to ensure smooth operation.
7. 문제 해결
현관문 잠금장치에 문제가 발생하면 다음과 같은 일반적인 해결 방법을 고려해 보세요.
- 잠금이 응답하지 않음: Check the batteries. Ensure they are correctly inserted and have sufficient charge. Replace with new alkaline batteries if necessary.
- 잘못된 코드 입력: If the lock flashes red or beeps incorrectly, re-enter your user code carefully. Ensure the correct programming code is used for programming functions.
- 잠금장치가 열리거나 닫히지 않음: Verify that the door is properly aligned and not binding. Ensure the door handing identification process was completed correctly after installation or factory reset.
- Forgotten Codes: If you forget your user codes, you can delete all user codes (Step 4.5) or perform a factory reset (Step 4.10) and reprogram.
8. 사양
| 특징 | 세부 사항 |
|---|---|
| 상표 | 아마존 기본 정보 |
| 모델명 | PL14910 |
| 특징 | 키리스 |
| 잠금 유형 | 키패드 |
| 품목 치수(L x W x H) | 9.05 x 6.13 x 2.99 인치 |
| 스타일 | 전통적인 |
| 색상 | 매트블랙 |
| 조각 수 | 1 |
| 마무리 유형 | 공단 |
| 포함된 구성 요소 | Screw pack, latch, strike and keys |
| 컨트롤러 유형 | 핸드 컨트롤 |
| 품목 무게 | 2.07파운드(0.94킬로그램) |
| 제어 방법 | 만지다 |
| 한국어: | 193598101164 |
| 배터리가 필요하세요? | 예 (AA 건전지 4개, 미포함) |
9. 보증 및 지원
For warranty information and customer support, please refer to the documentation included with your product or visit the official Amazon Basics support page. Keep your purchase receipt for warranty claims.