
소개
The Verve Electronic Timer is designed to automate your watering schedule, providing convenience and efficient water management for your garden or lawn. This manual provides detailed instructions for the setup, operation, maintenance, and troubleshooting of your electronic timer.
설정
1. 배터리 설치
- 타이머 뒷면에서 배터리 구획을 찾으세요.
- 구획 덮개를 엽니다.
- AA 알칼리 건전지 2개를 삽입할 때, 극성(+/-)을 정확히 맞춰주세요.
- 배터리 덮개를 단단히 닫으세요.
2. 타이머 연결
- Screw the timer's inlet (top connector) onto a standard outdoor faucet. Hand-tighten only to prevent damage.
- Connect your garden hose to the timer's outlet (bottom connector). Ensure a tight connection to prevent leaks.
3. 현재 시간 설정
- 를 누르세요 시간 button or navigate to the 'TIME' option using the arrow keys.
- 사용하세요 위/아래 arrow keys to adjust the hour and minute.
- 를 누르세요 OK 각 설정을 확인하고 다음 단계로 이동하려면 버튼을 누르십시오.

이미지: 앞면 view of the Verve Electronic Timer, showing the display and control buttons with menu labels such as TIME, START WATER, HOW LONG, WATER EVERY, PROGRAM, and MANUAL.
작동 지침
1. 디스플레이 이해하기
The LCD screen displays the current time, watering schedule settings, and battery status. Use the arrow keys to navigate through the menu options and the OK 선택 또는 확인 버튼입니다.
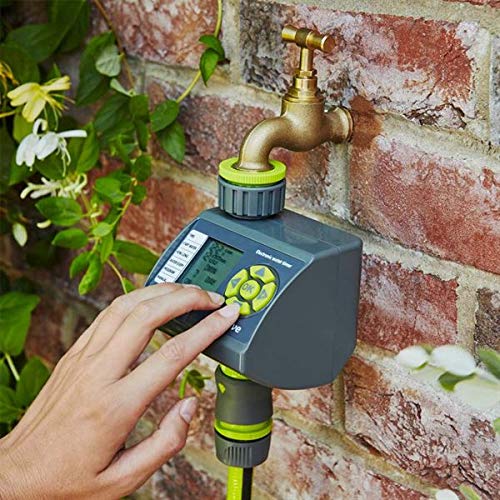
Image: Close-up of the Verve Electronic Timer's display, showing '12:03 AM' for current time, '0 MIN' for watering duration, '4 HRS' for frequency, and 'ON/OFF' status, along with a battery indicator.
2. Programming a Watering Schedule (6 Settings)
The timer allows for up to 6 different watering programs. Follow these steps to set a program:
- 로 이동합니다 프로그램 option using the arrow keys and press OK.
- Select a program number (e.g., P1, P2) using the arrow keys and press OK.
- 세트 시작 물: Use arrow keys to set the desired start time for watering. Press OK.
- 세트 얼마나 걸려요: Use arrow keys to set the duration of watering (e.g., 5 minutes, 1 hour). Press OK.
- 세트 WATER EVERY: Use arrow keys to set the frequency (e.g., every 12 hours, every 24 hours, every 2 days). Press OK.
- Ensure the program is set to ON.
3. 수동 조작
설정된 급수 일정 외에 수동으로 물을 주는 경우:
- 로 이동합니다 수동 옵션.
- 누르다 OK.
- Use the arrow keys to set the desired manual watering duration.
- 누르다 OK 수동으로 물을 주기 시작하세요. 설정된 시간이 지나면 타이머가 자동으로 꺼집니다.
- To stop manual watering prematurely, navigate to 수동 again and select 끄다 또는 누르세요 OK to cycle through options until it stops.
4. 배터리 표시기
A battery icon on the display indicates the current battery level. When the icon shows low battery, replace the batteries promptly to ensure continuous operation.
유지
1. 청소
- 부드러운 천으로 타이머 외부를 닦으십시오. damp 옷감.
- 연마성 세척제나 용제를 사용하지 마십시오. 디스플레이나 케이스가 손상될 수 있습니다.asing.
2. 배터리 교체
Replace batteries when the low battery indicator appears on the display. Refer to the 'Battery Installation' section under Setup for detailed steps.
3. 겨울 보관
Before the first frost, disconnect the timer from the faucet and hose. Remove the batteries and store the timer indoors in a dry, frost-free location. This prevents damage from freezing water.
문제 해결
- 타이머가 켜지지 않거나 화면이 비어 있습니다.
Check battery installation. Ensure batteries are inserted with correct polarity. Replace with fresh AA alkaline batteries. - Water not flowing or timer not activating:
Ensure the faucet is fully open. Check that the hose is securely connected to the timer. Verify that the program is set to 'ON' and the start time has passed. Check battery level. - Timer leaks from connections:
Ensure all connections (faucet to timer, timer to hose) are hand-tightened. Check for damaged washers and replace if necessary. - Incorrect watering schedule:
Review your programmed settings for START WATER, HOW LONG, and WATER EVERY. Ensure the current time is set correctly.
명세서
| 상표 | 기백 |
| 모델 번호 | B07HMQZ9D7 |
| 설정 수 | 6 |
| 패키지 크기 | 12.8 x 10.6 x 10cm |
| 품목 무게 | 320그램 |
| 제조업체 | Koçtaş |
| 첫 번째 가능한 날짜 | 24년 2018월 XNUMX일 |
보증 및 지원
보증 정보 또는 기술 지원에 대한 문의는 구매 시 제공된 설명서를 참조하시거나 판매점에 문의해 주세요. 보증 청구를 위해 구매 증빙 자료를 보관해 주세요.