
1. 서론
Thank you for choosing the Adastra DM40 Digital 100V Mixer Amplifier System. This system provides a comprehensive audio solution for various small to medium-sized installations, combining a powerful amplifier with versatile input options including USB, FM radio, and Bluetooth connectivity. The included Adastra BC3V-B background speakers are designed for clear audio reproduction and flexible installation.
This manual provides essential information for the safe and efficient operation of your Adastra DM40 system. Please read it thoroughly before installation and use, and retain it for future reference.
2. 안전 지침
To prevent the risk of fire or electric shock, do not expose this appliance to rain or moisture. Do not open the casing. 모든 서비스는 자격을 갖춘 담당자에게 의뢰하세요.
- 전원 공급 장치: 메인 볼륨 확인tage is correct for the amplifier (230Vac, 50Hz). Use the supplied IEC power lead.
- 통풍: Do not obstruct any ventilation openings. Ensure adequate airflow around the unit.
- 물 및 수분: 이 제품을 물 근처나 물속에서 사용하지 마십시오.amp environments. Do not place objects filled with liquids on the unit.
- 열원: 장치를 라디에이터, 난방 조절기, 스토브 또는 열을 발생시키는 기타 장치와 같은 열원으로부터 멀리 두십시오.
- 청소: 마른 천으로만 닦으십시오. 액체 세제나 스프레이형 세척제를 사용하지 마십시오.
- 과부하 : Do not overload power outlets or extension cords, as this can result in a risk of fire or electric shock.
- 서비스: 이 제품을 직접 수리하려고 하지 마십시오. 덮개를 열거나 제거하면 위험한 vol에 노출될 수 있습니다.tages 또는 기타 위험 요소.
3. 패키지 내용
Carefully unpack the system and check the contents to ensure all items are present and in good condition. If any items are missing or damaged, please contact your supplier immediately.

Figure 3.1: Complete Adastra DM40 System Package Contents
This image displays the full Adastra DM40 system package, including the DM40 digital mixer amplifier, four Adastra BC3V-B background speakers, and a roll of 100m speaker cable. This visual representation helps confirm all components are present upon unboxing.
- 1 x Adastra DM40 Digital 100V Mixer Amp리퍼
- 4 x Adastra BC3V-B Background Speakers
- 1 x 100m Speaker Cable
- 1 x IEC Mains Power Lead
- 1 x 사용자 매뉴얼(이 문서)
4. 제품 오버view
4.1. DM40 Amplifier 전면 패널 컨트롤
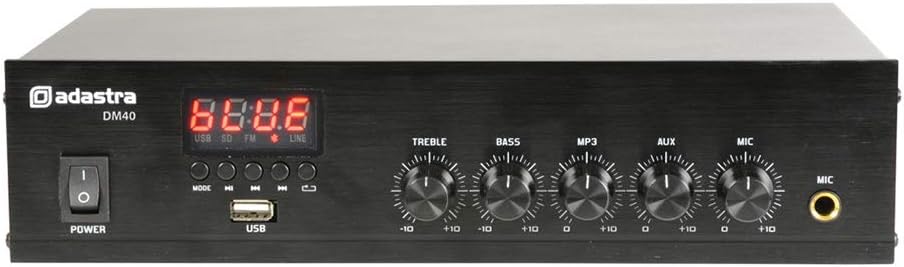
Figure 4.1: Adastra DM40 Ampliifier 전면 패널
This image shows the front panel of the Adastra DM40 amplifier. Key features visible include the power switch, digital display, control buttons for media playback (Mode, Play/Pause, Previous, Next, Repeat), a USB port, and rotary controls for Treble, Bass, MP3/USB/FM volume, Aux volume, and Microphone volume, along with a 6.3mm microphone input jack.
- 전원 스위치: 토글 amp리퍼 온/오프.
- 디지털 디스플레이: Shows current mode (USB, SD, FM, LINE) and track/station information.
- MODE 버튼: Switches between USB, FM, Bluetooth, and Line input modes.
- 재생/일시정지 버튼: Starts or pauses playback for USB/Bluetooth, or auto-scans for FM.
- 이전 버튼: 이전 트랙/방송국으로 이동합니다.
- 다음 버튼: 다음 트랙/스테이션으로 건너뜁니다.
- 반복 버튼: Repeats current track or all tracks (USB mode).
- USB 포트: For connecting USB flash drives with audio files.
- 트레블 컨트롤: 고주파 출력을 조절합니다.
- 베이스 컨트롤: 저주파 출력을 조절합니다.
- MP3/USB/FM Volume: Controls the volume level for the integrated media player.
- AUX 볼륨: Controls the volume level for the auxiliary input.
- 마이크 볼륨: Controls the volume level for the microphone input.
- 마이크 입력: 6.3mm jack for connecting an unbalanced microphone.
4.2. DM40 Amp앰프 후면 패널 연결 단자

Figure 4.2: Adastra DM40 Ampliifier 후면 패널
This image displays the rear panel of the Adastra DM40 amplifier, highlighting its various input and output connections. These include RCA line inputs (AUX IN), RCA line outputs (OUT), spring terminals for speaker connections (COM, 4-16 Ohms, 100V), an FM antenna terminal, and the IEC mains power inlet.
- AUX IN(RCA): Stereo RCA input for external audio sources (summed to mono).
- 아웃(RCA): Stereo RCA line output for connecting to another ampliifier 또는 녹음 장치.
- Speaker Outputs (Spring Terminals):
- 통신: Common negative terminal for all speaker connections.
- 4-16 Ohms: Output for low impedance speakers (e.g., 8 Ohm speakers).
- 100V : Output for 100V line speakers.
- FM 안테나 터미널: Spring terminal for connecting the FM antenna wire.
- IEC 전원 입력 단자: For connecting the supplied power cable.
4.3. Adastra BC3V-B Background Speakers

Figure 4.3: Adastra BC3V-B Speaker Front View
이 이미지는 앞면을 보여줍니다 view of a single Adastra BC3V-B background speaker, highlighting its sturdy metal grille and compact ABS housing. This speaker is designed for clear audio output in various indoor settings.

Figure 4.4: Adastra BC3V-B Speaker Rear View
This image displays the rear panel of the Adastra BC3V-B speaker, featuring the rotary selector switch for 100V line taps (6W, 3W, 1.5W) or 8 Ohm operation, and spring terminals for speaker wire connection. The adjustable mounting bracket is also visible.
The BC3V-B speakers are 2-way systems with a 75mm (3'') reinforced paper cone woofer and a 13mm (0.5'') polymer HF driver. They feature a rotary selector switch on the rear for choosing between 100V line taps (6W, 3W, 1.5W) or 8 Ohm operation. They come with an adjustable mounting bracket for wall or freestanding installation.
5. 설정
5.1. 스피커 연결
The DM40 amplifier supports both 100V line and 4-16 Ohm speaker connections. The BC3V-B speakers can be configured for either mode using their rear selector switch.
- 100V Line Connection: This is recommended for multiple speakers over long distances.
- Set the rotary switch on each BC3V-B speaker to the desired 100V tap (6W, 3W, or 1.5W).
- Connect the positive (+) terminal of each speaker to the '100V' terminal on the DM40 amp리퍼.
- Connect the negative (-) terminal of each speaker to the 'COM' terminal on the DM40 amp리퍼.
- 총 와트를 보장tage of all connected 100V speakers does not exceed the amp앰프의 출력(40W).
- 4-16 Ohm Connection: Use this for direct impedance matching, typically for fewer speakers over shorter distances.
- Set the rotary switch on each BC3V-B speaker to '8 Ohms'.
- Connect the positive (+) terminal of each speaker to the '4-16 Ohms' terminal on the DM40 amp리퍼.
- Connect the negative (-) terminal of each speaker to the 'COM' terminal on the DM40 amp리퍼.
- Ensure the total impedance of connected speakers is within the 4-16 Ohm range. For multiple 8 Ohm speakers, connect them in series-parallel to achieve a suitable total impedance.
Use the supplied 100m speaker cable for connections. Ensure correct polarity (+ to + and - to -) for optimal sound quality.
5.2. 오디오 소스 연결
- 보조 입력: Connect external audio devices (e.g., CD player, mixer) to the 'AUX IN' RCA jacks on the rear panel.
- 마이크 입력: Connect an unbalanced microphone to the 6.3mm 'MIC' jack on the front panel.
- USB 미디어: MP3 오디오가 포함된 USB 플래시 드라이브를 삽입하세요 files into the 'USB' port on the front panel.
- FM 안테나: Connect the supplied FM antenna wire to the 'FM' spring terminal on the rear panel for radio reception.
5.3. 전원 연결
Connect the supplied IEC mains power lead to the 'IEC Mains Inlet' on the rear panel of the DM40 amplifier and then to a suitable 230Vac, 50Hz power outlet.
6. 사용 설명서
6.1. 전원 켜기 / 끄기
전면 패널의 'POWER' 스위치를 눌러 전원을 켜세요. amp앰프 켜짐/꺼짐 여부. 전원이 켜지면 디지털 디스플레이에 불이 들어옵니다.
6.2. 소스 선택
Press the 'MODE' button on the front panel to cycle through the available input sources: USB, FM, Bluetooth, and Line (AUX).
6.3. USB Player Operation
- Insert a USB flash drive into the USB port. The unit will automatically switch to USB mode and begin playback.
- Use the 'PREVIOUS' and 'NEXT' buttons to skip tracks.
- '재생/일시정지' 버튼을 눌러 재생을 일시정지하거나 다시 시작하세요.
- Press 'REPEAT' to cycle through repeat modes (e.g., repeat one, repeat all).
- Adjust the 'MP3' volume control to set the output level.
6.4. FM 튜너 작동
- Switch to FM mode using the 'MODE' button.
- Press and hold the 'PLAY/PAUSE' button to initiate an automatic station scan. The tuner will scan and save available FM stations.
- Use the 'PREVIOUS' and 'NEXT' buttons to navigate through saved stations.
- Adjust the 'MP3' volume control to set the output level.
6.5. 블루투스 페어링
- Switch to Bluetooth mode using the 'MODE' button. The display will show 'BT'.
- 스마트폰이나 태블릿에서 블루투스를 활성화하고 사용 가능한 장치를 검색하세요.
- Select 'Adastra DM40' (or similar name) from the list of devices to pair.
- Once paired, you can play audio from your device wirelessly through the amp리퍼.
- Adjust the 'MP3' volume control to set the output level.
6.6. 보조 입력 작동
- Switch to Line mode using the 'MODE' button. The display will show 'LINE'.
- Play audio from your connected external device.
- Adjust the 'AUX' volume control to set the output level.
6.7. 마이크 작동
- Connect a microphone to the 'MIC' input jack.
- Adjust the 'MIC' volume control to set the microphone's output level.
- The microphone input is active regardless of the selected audio source, allowing for announcements or voice-overs.
6.8. 톤 컨트롤
- Use the 'TREBLE' control to adjust the high-frequency response of the overall output.
- Use the 'BASS' control to adjust the low-frequency response of the overall output.
7. 유지관리
The Adastra DM40 system requires minimal maintenance. Follow these guidelines to ensure longevity and optimal performance:
- 청소: 닦아내다 amplifier and speakers with a soft, dry cloth. Do not use abrasive cleaners, waxes, or solvents.
- 통풍: Periodically check that the ventilation openings on the amplifier are clear of dust and debris.
- 사이: Ensure all cable connections remain secure. Loose connections can lead to poor sound quality or intermittent operation.
- 저장: 장기간 보관할 경우 전원을 차단하고 직사광선과 극한 온도 변화를 피해 서늘하고 건조한 곳에 보관하십시오.
8. 문제 해결
| 문제 | 가능한 원인 | 해결책 |
|---|---|---|
| 전원이 없습니다 | Power cable not connected; Power outlet faulty; Power switch off | 전원 케이블 연결 상태를 확인하십시오. 다른 콘센트에 연결해 보십시오. 전원 스위치가 켜져 있는지 확인하십시오. |
| 사운드 출력이 없습니다 | Incorrect source selected; Volume too low; Speaker cables disconnected/incorrectly wired; Speaker selector switch incorrect | Select correct source; Increase volume; Check speaker wiring and polarity; Ensure speaker selector switch is set correctly (100V or 8 Ohm) |
| 왜곡된 소리 | Volume too high; Incorrect impedance matching (for 4-16 Ohm); Damaged speaker/cable | Reduce volume; Verify speaker impedance matches amplifier output; Inspect speakers and cables for damage |
| 블루투스가 연결되지 않습니다 | Amplifier not in Bluetooth mode; Device not in pairing mode; Device too far | 보장하다 amplifier is in BT mode; Put device in pairing mode; Move device closer to amp리퍼 |
| USB 재생 문제 | 지원되지 않음 file format; USB drive faulty; USB drive not properly inserted | 보장하다 files are MP3; Try a different USB drive; Re-insert USB drive firmly |
| FM 수신 불량 | 안테나가 연결되지 않았습니다. 신호가 약합니다. | Connect FM antenna; Reposition antenna for better reception |
9. 사양
9.1. Adastra DM40 Amp리퍼
| 특징 | 사양 |
|---|---|
| 전원 공급 장치 | 230VAC, 50Hz(IEC) |
| 최대 출력 전력 | 40와트 |
| 오디오 소스 | USB player, FM tuner, Bluetooth receiver, AUX (RCA), Microphone (6.3mm jack) |
| 블루투스 버전 | 2.1 |
| 스피커 출력 | COM, 100V, 4-16 Ohms (spring terminals) |
| 통제 수단 | Treble, Bass, MP3/USB/FM Volume, Aux Volume, Microphone Volume |
| 치수(폭 x 깊이 x 높이) | 280 x 205 x 67mm |
| 무게 | 1.74kg |
9.2. Adastra BC3V-B Background Speakers (per unit)
| 특징 | 사양 |
|---|---|
| 모델 | BC3V-B |
| 색상 | 검은색 |
| 우퍼 | 75mmØ (3'') reinforced paper cone |
| 트위터 | 13mm (0.5'') polymer HF driver |
| 주파수 응답 | 110Hz - 20kHz |
| Power Max. (8 Ohms) | 60와트 |
| 실효 전력(8옴) | 30와트 |
| SPL @ 1W/1m | 87데시벨 |
| 100V Tappings | 6W, 3W, 1.5W |
| 임피던스(100V) | 1.6k, 3.3k, 6.6k Ohms |
| 치수(폭 x 높이 x 깊이) | 106 x 153 x 98mm |
| 무게 | 0.900kg |
10. 보증 및 지원
Specific warranty information for the Adastra DM40 Digital 100V Mixer Amplifier System is not provided within this manual. Please refer to your purchase documentation or contact your retailer or the manufacturer, Adastra, for details regarding warranty coverage and support services.
For technical assistance or inquiries, please visit the official Adastra web사이트를 방문하거나 고객 지원 채널에 문의하세요.


