1. 서론
This manual provides detailed instructions for the safe and effective use of your CAMWAY Digital Multimeter. This device is a 6000-count, True RMS auto-ranging multimeter designed for various electrical measurements, including AC/DC voltage, current, resistance, capacitance, frequency, duty cycle, temperature, diode, continuity, and Non-Contact Voltage (NCV) detection. It is suitable for home, laboratory, factory, and educational use.
2. 안전 정보
전기 시험 장비를 사용할 때는 항상 안전 수칙을 준수하십시오. 그렇지 않을 경우 감전, 부상 또는 측정기나 시험 대상 장비의 손상이 발생할 수 있습니다.
- 각 기능에 대해 지정된 최대 입력 값을 초과하지 마십시오.
- 측정하기 전에 테스트 리드가 제대로 연결되어 있고 기능 스위치가 올바른 범위로 설정되어 있는지 확인하십시오.
- vol으로 작업할 때 극도의 주의를 기울이십시오.tag30V AC RMS, 42V 피크 또는 60V DC 이상입니다. 이러한 볼륨tag이것은 충격 위험을 초래합니다.
- 회로의 전원을 항상 차단하고 고전압을 방전시키십시오.tag저항, 연속성, 다이오드 또는 정전용량을 측정하기 전에 커패시터를 먼저 검사합니다.
- 미터기가 손상된 것처럼 보이거나 테스트 리드가 손상된 경우 사용하지 마십시오.
- 정확한 측정값을 얻으려면 배터리 부족 표시가 나타나면 배터리를 교체하세요.
- The meter features a precision circuit board with intelligent anti-burn protection and dual fuses (600V CAT IV, 1000V CAT III) for enhanced safety.
3. 패키지 내용
패키지에 모든 품목이 들어 있는지 확인하세요.
- CAMWAY Digital Multimeter
- 테스트 리드(빨간색 및 검은색)
- K형 열전대(온도 프로브)
- Alligator Clips (Pair)
- 9V 배터리 (사전 설치됨 또는 별도 구매)
- 사용자 설명서

그림 3.1: 패키지 내용물
4. 제품 오버view
Familiarize yourself with the components of your digital multimeter.
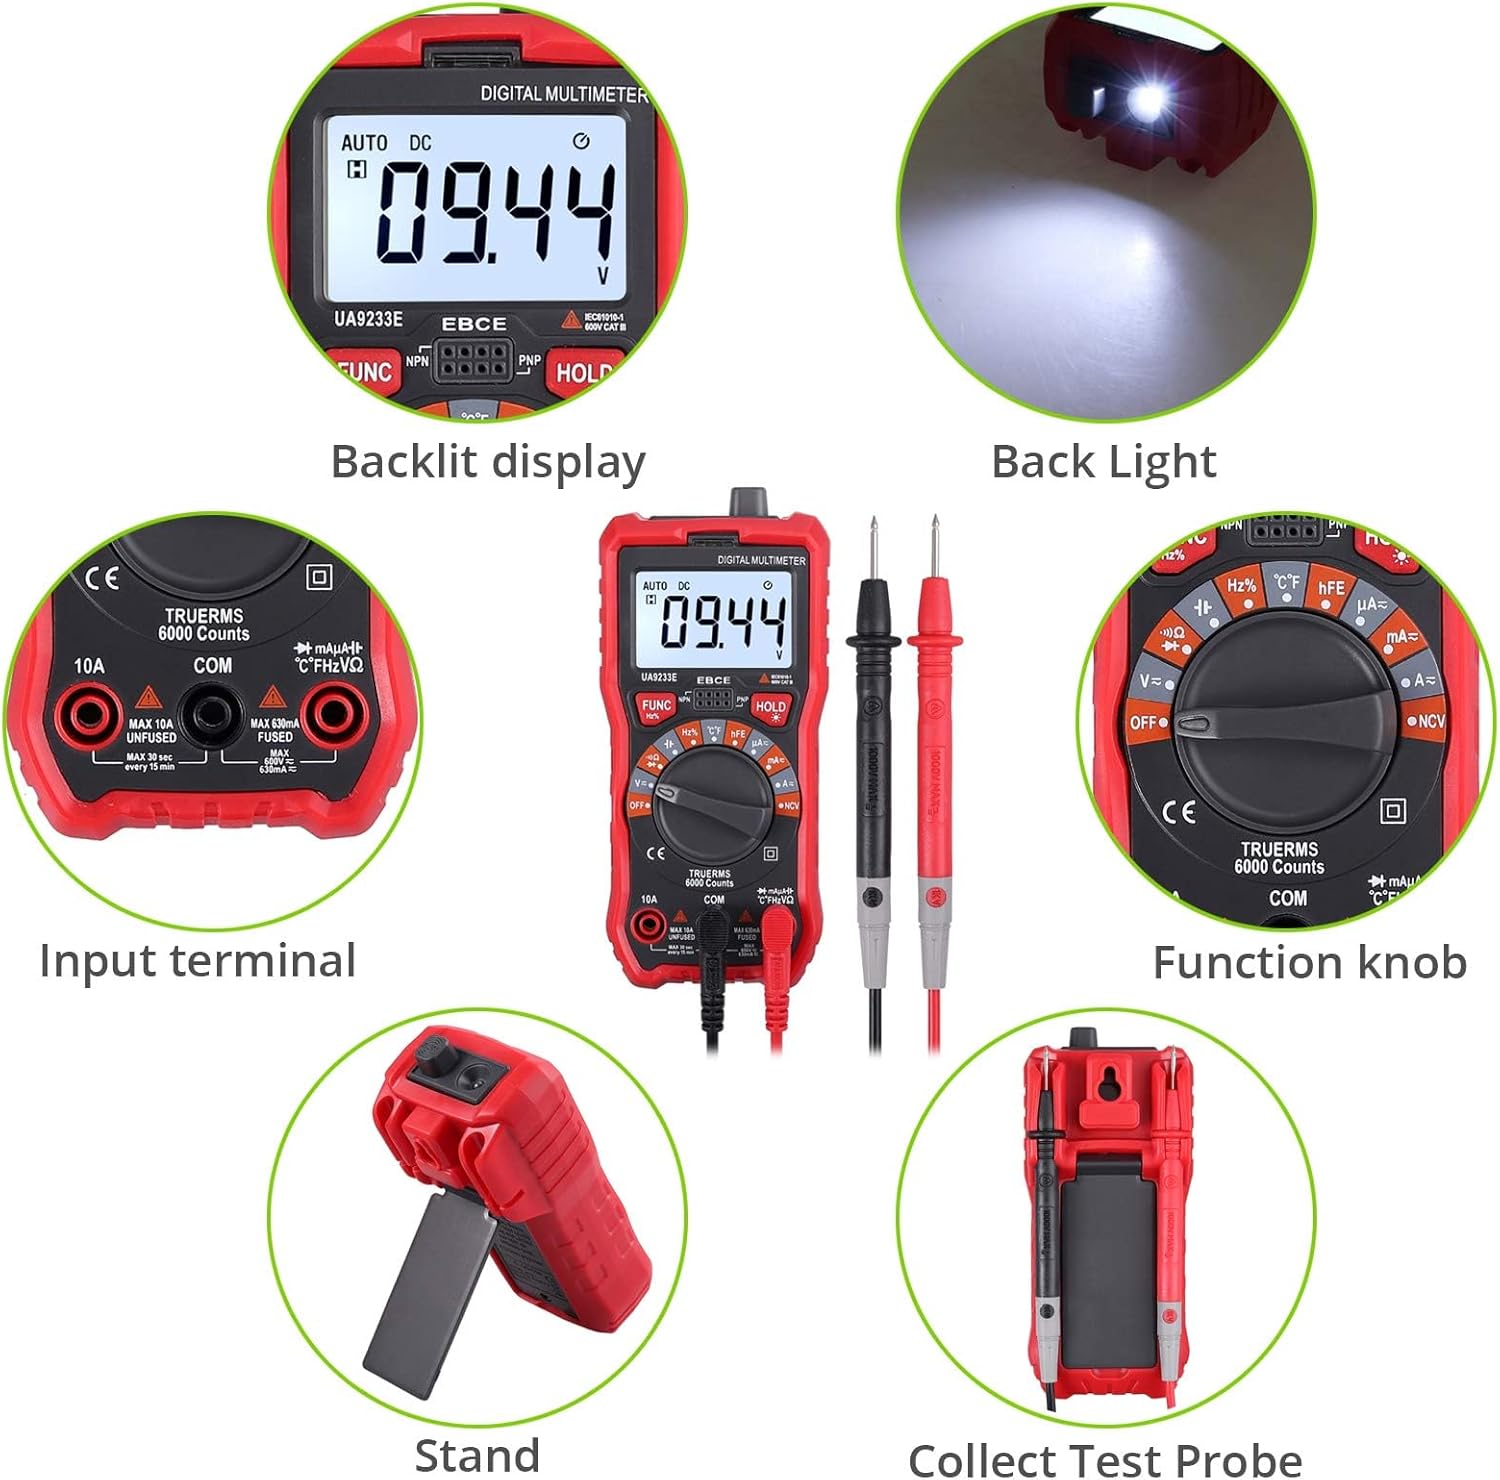
Figure 4.1: Front Panel and Components
주요 구성 요소:
- 백라이트 LCD 디스플레이: 측정값, 단위, 기능 표시기를 보여줍니다.
- 기능 손잡이: Used to select the desired measurement function (e.g., Voltage, Current, Resistance, Temperature, NCV).
- 입력 단자: Sockets for connecting test leads.
- FUNC 버튼: Toggles between different measurement modes within a single function setting (e.g., AC/DC voltage, 다이오드/연속성).
- 홀드 버튼: 디스플레이에 현재 판독값을 고정합니다.
- 백라이트/손전등 버튼: Activates the display backlight and the integrated flashlight.

Figure 4.2: Rear Panel with Support Stand
The multimeter includes a durable protective rubber shell and an integrated support stand for convenient hands-free operation. A hanging hole is also provided for storage.

그림 4.3: 멀티미터 크기
5. 설정
5.1 배터리 설치
The multimeter requires one 9V battery (included). To install or replace the battery:
- 멀티미터가 꺼져 있는지 확인하세요.
- 측정기 뒷면에서 배터리 덮개를 찾으세요.
- Remove the screw securing the cover and open it.
- 9V 배터리를 배터리 클립에 연결할 때 극성을 올바르게 확인하십시오.
- 배터리를 수납공간에 넣고 덮개를 덮은 후 나사로 고정합니다.
5.2 테스트 리드 연결
Always connect the black test lead to the 'COM' (Common) terminal. Connect the red test lead to the appropriate input terminal based on the desired measurement:
- VΩHz%°C: 권용tag예를 들어 저항, 주파수, 용량, 다이오드, 연속성 및 온도 측정 등이 있습니다.
- mAμA: 최대 600mA의 전류 측정에 사용 가능합니다.
- 오전 10시 XNUMX분: 최대 10A의 전류 측정이 가능합니다.
The included alligator clips can be attached to the test leads for hands-free connections.
6. 사용 설명서
This section details how to perform various measurements with your multimeter.
Video 6.1: CAMWAY Digital Multimeter Overview and Basic Operation. This video demonstrates the unboxing, connecting test leads, using the kickstand, selecting functions, measuring DC voltage, and utilizing the NCV feature.
6.1권tage 측정(AC/DC)
- Set the function knob to the 'V=' (DC Voltage) or 'V~' (AC Voltage) 위치. 측정기는 자동으로 범위를 조정합니다.
- Connect the black test lead to the 'COM' terminal and the red test lead to the 'VΩHz%°C' terminal.
- 측정하려는 회로 또는 부품에 테스트 프로브를 병렬로 연결하십시오.
- vol을 읽어보세요tagLCD 디스플레이의 e 값.
6.2 전류 측정(AC/DC)
주의: 전압계를 볼륨계와 병렬로 연결하지 마십시오.tag전류를 측정할 때는 전원을 끄세요. 퓨즈가 끊어지거나 계측기가 손상될 수 있습니다.
- Set the function knob to the 'A=' (DC Current) or 'A~' (AC Current) position.
- For currents up to 600mA, connect the black test lead to 'COM' and the red test lead to 'mAμA'. For currents up to 10A, connect the red test lead to '10A'.
- Open the circuit where current is to be measured and connect the test probes in series with the circuit.
- LCD 디스플레이의 현재 값을 읽습니다.

Figure 6.1: Current Measurement Setup
6.3 저항 측정
- Set the function knob to the 'Ω' (Resistance) position.
- Connect the black test lead to 'COM' and the red test lead to 'VΩHz%°C'.
- 회로의 전원이 차단되었는지 확인하십시오. 테스트 프로브를 부품 양단에 연결하여 저항을 측정하십시오.
- LCD 디스플레이에서 저항값을 읽으세요.
6.4 커패시턴스 측정
- Set the function knob to the 'F' (Capacitance) position.
- Connect the black test lead to 'COM' and the red test lead to 'VΩHz%°C'.
- Ensure the capacitor is fully discharged before measurement. Connect the test probes across the capacitor.
- LCD 디스플레이의 커패시턴스 값을 읽습니다.
6.5 주파수 및 듀티 사이클 측정
- Set the function knob to the 'Hz%' (Frequency/Duty Cycle) position.
- Connect the black test lead to 'COM' and the red test lead to 'VΩHz%°C'.
- 테스트 프로브를 신호 소스에 연결합니다.
- Press the 'FUNC' button to toggle between frequency (Hz) and duty cycle (%).
6.6 다이오드 테스트
- Set the function knob to the 'Diode' symbol position.
- Connect the black test lead to 'COM' and the red test lead to 'VΩHz%°C'.
- 빨간색 프로브를 다이오드의 애노드에, 검은색 프로브를 캐소드에 연결하십시오. 디스플레이에 순방향 전압이 표시됩니다.tag프로브를 반대로 연결하십시오. 정상적인 다이오드의 경우 디스플레이에 'OL'(개방 루프)이 표시되어야 합니다.
6.7 연속성 테스트
- Set the function knob to the 'Continuity' symbol position (often shared with Diode or Resistance).
- Connect the black test lead to 'COM' and the red test lead to 'VΩHz%°C'.
- Connect the test probes across the circuit or component. If the resistance is below approximately 50Ω, the buzzer will sound, indicating continuity.
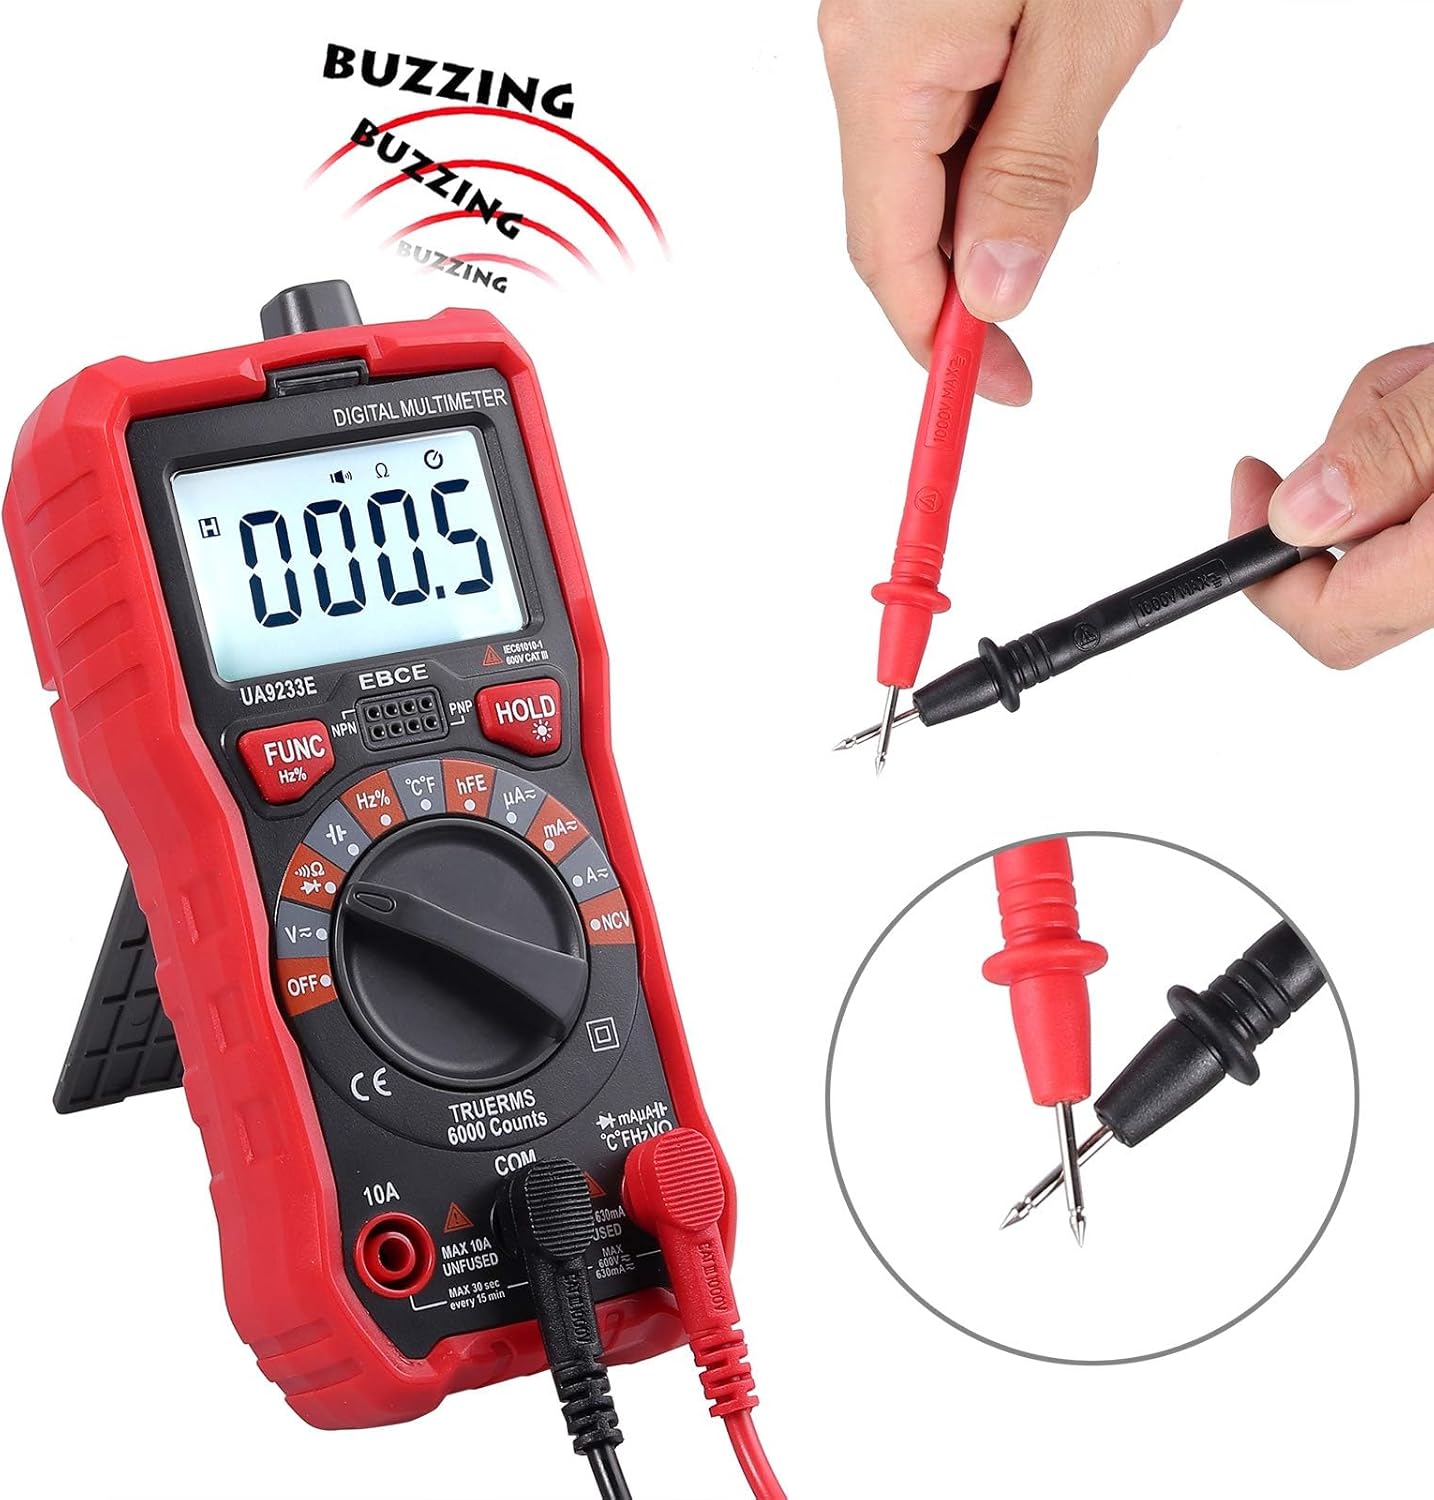
그림 6.2: 연속성 테스트
6.8 온도 테스트
- Set the function knob to the '°C/°F' (Temperature) position.
- Connect the K-type thermocouple to the 'VΩHz%°C' and 'COM' terminals, observing polarity.
- 온도를 측정하려는 물체 위 또는 근처에 열전대 끝을 놓으십시오.
- Read the temperature value on the LCD display. Press 'FUNC' to switch between Celsius and Fahrenheit.

그림 6.3: 온도 측정
6.9 비접촉 Voltage(NCV) 검출
- Set the function knob to the 'NCV' position.
- Move the top end of the multimeter close to the conductor or outlet.
- AC voltage is detected, the meter will emit an audible alarm and the NCV indicator light will flash. The intensity of the alarm and flashing indicates the strength of the electric field.
6.10 HFE Test (Transistor Gain)
- Set the function knob to the 'hFE' position.
- Insert the NPN or PNP transistor leads into the corresponding sockets on the meter.
- 디스플레이에서 hFE 값(DC 전류 이득)을 읽으십시오.
6.11 데이터 홀드
'HOLD' 버튼을 누르면 현재 측정값이 디스플레이에 고정됩니다. 다시 누르면 고정 기능이 해제됩니다.
6.12 백라이트 및 손전등
Press the backlight button (often integrated with the HOLD button or a separate button) to turn on the display backlight and the integrated flashlight. Press again to turn them off. This feature is useful in dimly lit environments.
6.13 자동 전원 끄기
The multimeter is equipped with an auto power-off feature to conserve battery life. If no operation is performed for approximately 15 minutes, the meter will automatically shut down. To reactivate, turn the function knob to OFF and then back to the desired function, or press any button.
7. 유지관리
7.1 일반 관리
- 계량기를 건조하게 유지하십시오. 젖었을 경우 즉시 닦아내십시오.
- 측정기는 상온 환경에서 사용하고 보관하십시오. 극한의 온도는 전자 기기의 수명을 단축시킬 수 있습니다.
- 미터를 조심스럽고 부드럽게 다루십시오. 떨어뜨리면 회로 기판이 손상될 수 있습니다.asing.
- 전자 부품의 부식을 유발할 수 있는 먼지와 이물질로부터 계량기를 멀리하십시오.
- 광고로 미터를 닦으세요amp 가끔 천으로 새 것처럼 보이도록 하세요. 독한 화학 물질, 세척 용제 또는 강한 세제를 사용하지 마십시오.
7.2 퓨즈 교체
The multimeter is protected by dual fuses. If the current measurement function fails, the fuse may need replacement. Refer to the specifications for fuse ratings. Fuse replacement should only be performed by qualified personnel.

Figure 7.1: Internal Circuit Board (for reference only, do not open unless qualified)
8. 문제 해결
계량기가 제대로 작동하지 않으면 다음 사항을 확인하십시오.
- 화면이 표시되지 않거나 화면이 어둡게 표시됩니다. 배터리를 점검하십시오. 필요하면 교체하십시오.
- 잘못된 판독: Ensure the test leads are correctly inserted into the appropriate terminals for the selected function. Verify the function knob is set to the correct measurement type.
- Current measurement failure: 퓨즈를 점검하십시오. 끊어졌다면 정격 용량의 퓨즈로 교체하십시오.
- 'OL' (과부하)이 표시됨: The measured value exceeds the meter's range for the selected function. Select a higher range if available, or ensure the input is within the meter's capabilities.
9. 사양
| 특징 | 사양 |
|---|---|
| 표시하다 | 6000 카운트, 백라이트 LCD |
| 측정 유형 | 진정한 RMS 멀티미터 |
| AC/DC 볼륨tage | 예 |
| AC / DC 전류 | 예 |
| 저항 | 예 |
| 정전 용량 | 예 |
| 주파수 / 듀티 사이클 | 예 |
| 다이오드 테스트 | 예 |
| 연속성 테스트 | Yes (Buzzer at ~50Ω) |
| 온도 테스트 | -20°C ~ 1000°C / -4°F ~ 1832°F |
| NCV(비접촉 Voltage) | Yes, with Visual and Audible Alarm |
| HFE 테스트 | 예 |
| 자동 범위 설정 | 예 |
| 데이터 보류 | 예 |
| 자동 전원 끄기 | 예 |
| 과부하 보호 | 예 |
| 퓨즈 | Dual Fuse (600V CAT IV, 1000V CAT III) |
| 전원 | 1 x 9V 배터리(포함) |
| 재료 | ABS |
| 치수(길이 x 너비 x 높이) | 5.91 x 2.68 x 1.97인치(150 x 68 x 50mm) |
| 품목 무게 | 7.9온스(225그램) |
10. 보증 및 지원
For warranty information or technical support, please refer to the contact details provided with your purchase or visit the official CAMWAY web사이트. 구매 증빙 자료로 구매 영수증을 보관하세요.