1. 서론
This instruction manual provides guidance for the assembly and finishing of the Trumpeter TRU01687 1:72 scale Tupolev Tu-128M Fiddler plastic model kit. The Tu-128M Fiddler was a long-range interceptor aircraft developed by the Soviet Union. This kit is designed for adult collectors and model enthusiasts aged 14 and above. Please read all instructions carefully before beginning assembly.
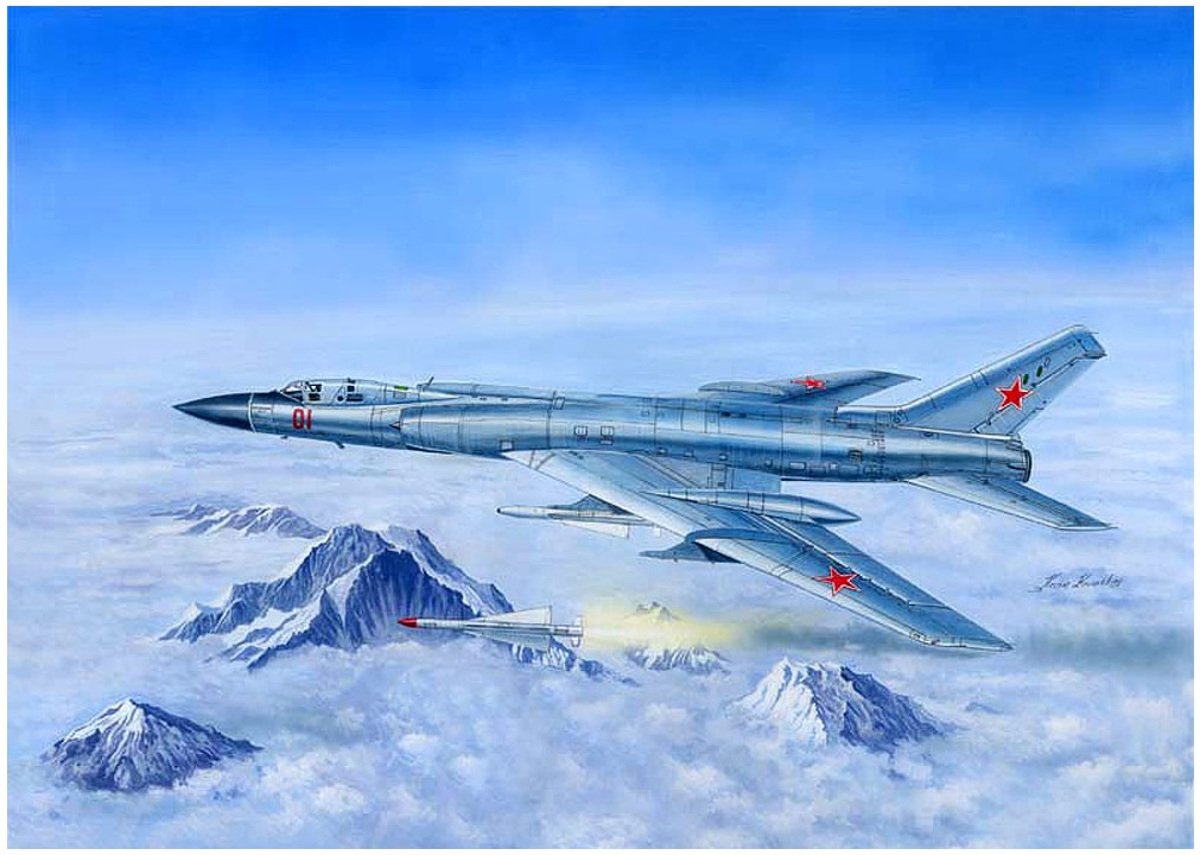
Figure 1: Illustration of the Trumpeter Tu-128M Fiddler model kit, depicting the aircraft in flight above a mountainous landscape, showcasing its sleek design and markings.
2. 안전수칙
Always prioritize safety during model assembly. This kit contains small parts and may require the use of sharp tools and adhesives. Adhere to the following guidelines:
- 성인 감독: This kit is not a toy. It is intended for individuals aged 14 and older. Younger builders should have adult supervision.
- 작은 부품: 질식 위험을 방지하기 위해 작은 부품을 어린이의 손이 닿지 않는 곳에 보관하세요.
- 날카로운 도구: Use hobby knives, clippers, and other sharp tools with extreme care. Always cut away from your body.
- 접착제 및 페인트: Use model-specific glues and paints in a well-ventilated area. Avoid inhaling fumes. Refer to the manufacturer's safety data sheets for specific product warnings.
- 눈 보호: Consider wearing eye protection when cutting or sanding parts to prevent debris from entering your eyes.
- 처분: Dispose of waste materials, including empty glue tubes and paint cans, according to local regulations.
3. 키트 내용물
Before starting assembly, carefully check all components against the parts list provided in the kit's original instruction booklet. The kit includes multiple plastic sprues, clear parts, photo-etched parts, and a decal sheet. Ensure all parts are present and undamaged.

Figure 2: Main sprue containing the fuselage halves and initial engine components, showing the detailed molding of the primary airframe sections.
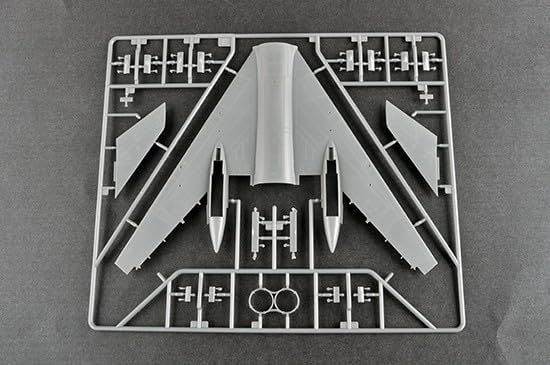
Figure 3: Sprue featuring the main wing sections and associated structural elements, ready for detachment and assembly.

Figure 4: Another sprue displaying additional wing components, including flaps, ailerons, and other control surfaces, along with internal structural details.

Figure 5: Sprue containing intricate parts such as landing gear struts, wheels, cockpit interior details, and various small external fittings.

Figure 6: Sprue dedicated to the air-to-air missiles, showing their individual components and attachment points.
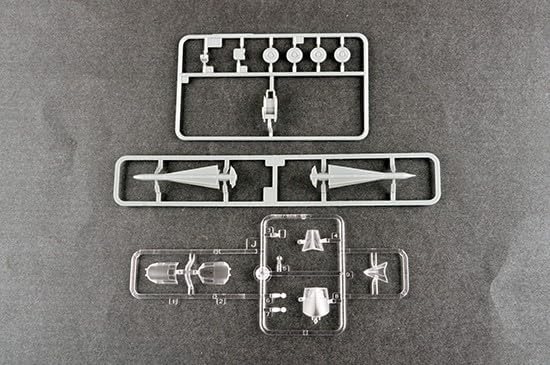
Figure 7: Sprue containing engine exhaust nozzles and other circular or cylindrical components, essential for completing the aircraft's propulsion system.

Figure 8: Clear plastic sprue featuring the cockpit canopy and other transparent elements, requiring careful handling to avoid scratches.
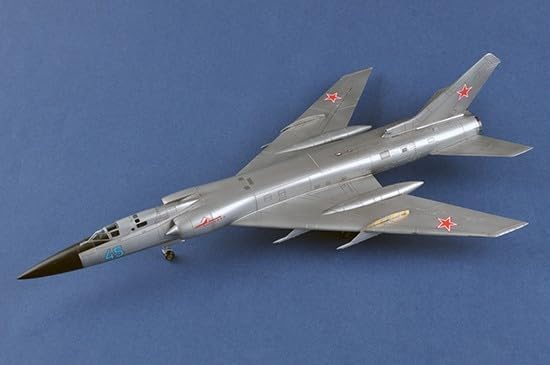
Figure 9: Photo-etched fret containing highly detailed, thin metal parts for enhancing realism, such as grilles, antennae, or cockpit elements.
4. 조립 설명서
Follow the step-by-step diagrams and instructions provided in the kit's original manual. The general assembly process involves:
- 준비: Carefully remove parts from the sprues using a hobby knife or clippers. Clean any flash or mold lines with a sanding stick or fine-grit sandpaper.
- Dry Fitting: Before applying glue, dry-fit parts to ensure proper alignment and fit. This helps identify and correct any potential issues beforehand.
- 접착 : Use plastic cement for plastic parts. Apply sparingly to avoid excess glue. For photo-etched parts, use super glue (CA glue). Allow sufficient drying time for each glued section.
- 하위 어셈블리: Build smaller sections (e.g., cockpit, landing gear, engines) separately before integrating them into the main airframe.
- Main Airframe: Assemble the fuselage halves, wings, and tail sections. Pay close attention to alignment to ensure a straight and accurate model.
- 상세 부품: Attach smaller details such as antennae, pitot tubes, and weapons after the main structure is solid.
Refer to the specific diagrams in your kit's manual for the exact sequence and placement of each part.
5. 도색 및 데칼
Once assembly is complete, the model can be painted and decaled to achieve a realistic finish.
5.1 페인팅
- 표면 준비: Ensure the model surface is clean, smooth, and free of dust or grease. A primer coat is recommended for better paint adhesion.
- 색상 구성표: Consult the kit's painting guide for recommended colors and camouflage patterns for the Tu-128M Fiddler.
- 애플리케이션: Apply paint in thin, even coats. Allow each coat to dry thoroughly before applying the next. Use appropriate ventilation.
- Weathering: Advanced modelers may wish to apply weathering effects (e.g., panel line washes, exhaust stains) to enhance realism.
데칼 5.2개
The kit includes a decal sheet for markings and stencils.
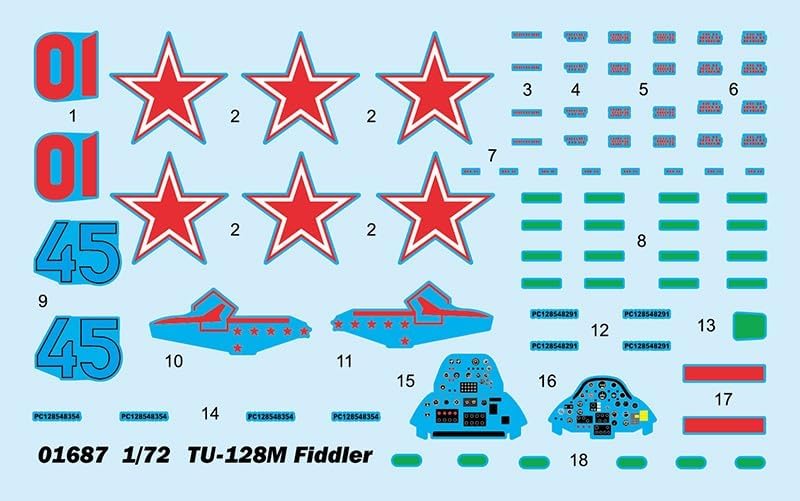
Figure 10: The decal sheet for the 1/72 scale Tu-128M Fiddler, featuring national insignia, aircraft numbers, and various warning and informational stencils.
- 광택 코팅: Apply a clear gloss coat over the painted surface before decaling. This provides a smooth surface for decals and helps prevent silvering.
- 애플리케이션: Cut out each decal carefully. Dip it in warm water for a few seconds until it slides freely from the backing paper. Position the decal on the model using a wet brush or tweezers.
- Setting Solutions: Use decal setting solutions to help decals conform to irregular surfaces and eliminate air bubbles.
- Matte Coat: Once decals are dry, apply a final clear matte or satin coat to seal them and unify the finish.
6. 유지관리
Proper care will preserve the appearance of your finished model:
- 가루 살포: Regularly dust the model with a soft, dry brush or a gentle air blower to prevent dust buildup.
- 청소: Avoid using harsh chemicals or abrasive cleaners. If necessary, gently wipe with a slightly damp 천으로 닦고 즉시 말리세요.
- 표시하다: Display the model in a stable location away from direct sunlight, extreme temperatures, and high humidity to prevent fading, warping, or damage to decals.
- 손질: Handle the model by its sturdy parts (e.g., fuselage, wings) and avoid touching delicate components.
7. 사양
| 특징 | 세부 사항 |
|---|---|
| 상표 | 퍼뜨리는 사람 |
| 모델 번호 | 트럭 스 넘스 |
| 규모 | 1:72 (Tupolev Tu-128M Fiddler) |
| 재료 | 플라스틱 |
| 품목 유형 | Plastic model kit |
| 조립이 필요합니다 | 예 |
| 추천연령 | 14세 이상 |
| 포함된 구성 요소 | Parts to build one plastic model. |
| 품목 무게 | 0.34 킬로그램 |
| 품목 치수(L x W x H) | 17.91 x 11.42 x 2.76인치(포장) |
8. 일반적인 문제 해결
Encountering issues during model assembly is common. Here are solutions to frequent problems:
- 부품이 제대로 맞지 않음: If parts do not fit together smoothly, gently sand the mating surfaces. Ensure all sprue gates and flash are completely removed. Dry-fit repeatedly.
- 부품 간 간격: Small gaps can be filled with plastic putty or stretched sprue. Sand smooth once dry.
- 데칼 실버링: This occurs when air is trapped under the decal. Apply decals over a gloss surface and use decal setting solutions to help them conform and eliminate air. A final clear coat will also help.
- 페인트 접착 문제: Ensure the model surface is clean and free of oils. Use a primer coat before applying main colors.
- 파손된 작은 부품: If a small part breaks, attempt to re-attach it with super glue. For very delicate parts, consider replacing them with stretched sprue or wire if possible.
9. 보증 및 지원
This Trumpeter model kit is manufactured to high standards. For specific warranty information regarding manufacturing defects or missing parts, please refer to the documentation included in your kit or contact Trumpeter directly through their official web웹사이트 또는 고객 서비스 채널을 이용하세요. 보증 청구를 위해 구매 증빙 자료를 보관하십시오.
For additional support, modeling communities and forums can provide valuable tips and assistance from experienced builders.