
소개
This manual provides detailed instructions for the installation, operation, and maintenance of your BONTEC MFS001 Gas Spring Single Monitor Mount. Designed for screens ranging from 13 to 36 inches and supporting weights up to 12 kg (26.5 lbs), this monitor arm offers ergonomic adjustments to enhance your viewing comfort and optimize desk space. Please read this manual thoroughly before installation and use to ensure proper setup and safe operation.
안전 정보
- 조립하기 전에 모든 구성품이 있는지, 손상되지 않았는지 확인하십시오. 부품이 누락되었거나 불량인 경우 사용하지 마십시오.
- Verify that your monitor's weight and VESA pattern are within the specified limits of this mount.
- Always follow the installation steps carefully. Improper installation can result in equipment damage or personal injury.
- 나사를 너무 세게 조이지 마세요. 손상될 수 있습니다.
- 조립 장소에 어린이가 접근하지 못하도록 하십시오. 작은 부품은 질식 위험이 있습니다.
- Adjust the gas spring tension only after the monitor is mounted to prevent the arm from springing up or down unexpectedly.
패키지 내용
Before proceeding with installation, please ensure all the following components are present:
- 모니터 암 어셈블리
- C-Clamp 베이스
- 그로밋 베이스 구성 요소
- VESA 플레이트
- 하드웨어 키트(나사, 와셔, 스페이서)
- Allen Keys (for adjustments)
- 사용 설명서
명세서
| 특징 | 사양 |
|---|---|
| 모델 번호 | MFS001 |
| 호환 가능한 화면 크기 | 13~36인치 |
| 중량 용량 | 최대 12kg(26.5파운드) |
| VESA 호환성 | 75x75mm, 100x100mm |
| 기울기 범위 | +85° ~ -50° |
| 스위블 범위 | ±90° |
| 회전 | 360° (세로에서 가로로) |
| 높이 조정 | 7.1인치~19.1인치(180mm~485mm) |
| 최대 확장 | 23.3인치(588mm) |
| 책상 두께(C-Cl)amp) | 10mm - 80mm (0.39" - 3.15") |
| 책상 두께(그로밋) | 10mm - 70mm (0.39" - 2.76") |
| 그로밋 구멍 직경 | 10mm - 60mm (0.39" - 2.36") |
| 재료 | High-grade Zinc Alloy, Metal |
설정 및 설치
The BONTEC MFS001 monitor arm offers two installation methods: C-Clamp 그리고 그로밋 베이스를 사용하세요. 책상에 가장 적합한 방법을 선택하십시오.
1. C-Clamp 설치
- C-cl을 부착하세요amp base to the edge of your desk. Ensure the desk thickness is between 10mm and 80mm.
- C-cl을 조입니다amp screw firmly until the base is stable and secure.
- Slide the main arm pole onto the C-clamp base and secure it with the provided screw.
2. 그로밋 장착
- Ensure your desk has a grommet hole with a diameter between 10mm and 60mm, and the desk thickness is between 10mm and 70mm.
- Insert the grommet bolt through the desk hole.
- Secure the grommet base plate and nut from underneath the desk, tightening until stable.
- Slide the main arm pole onto the grommet base and secure it with the provided screw.
3. 모니터 연결
- Attach the VESA plate to the back of your monitor using the appropriate screws and spacers from the hardware kit. Ensure the VESA pattern is 75x75mm or 100x100mm.
- Slide the VESA plate with the attached monitor onto the arm's mounting head. Ensure it clicks securely into place.
- Tighten any security screws on the VESA plate to prevent accidental detachment.

Image: Illustration of C-Clamp and Grommet mounting options, showing desk thickness and hole diameter requirements.

Image: A user working at a desk with a monitor mounted on the BONTEC arm, highlighting its compatibility with various screen sizes and VESA standards.
운영 및 조정
The BONTEC MFS001 monitor arm provides full motion adjustability for optimal ergonomic positioning.
1. 높이 조절
The gas spring arm allows for smooth vertical movement. Gently push or pull the monitor to the desired height. The arm supports a height range from 7.1 inches to 19.1 inches.
2. 기울기 조정
The monitor can be tilted +85° upwards and -50° downwards. Loosen the tilt screw slightly with the provided Allen key, adjust the monitor to your preferred angle, and then retighten the screw to secure it.
3. 회전 조절
The arm allows for a ±90° swivel movement. You can rotate the monitor horizontally to share your screen or adjust your view잉 각도.
4. 회전 조정
The VESA plate allows for a full 360° rotation, enabling you to switch your monitor between landscape and portrait orientations without removing it.
5. 가스 스프링 장력 조절
If the monitor arm does not hold its position or is difficult to move, you may need to adjust the gas spring tension. Use the provided Allen key to turn the adjustment screw located on the arm. Turn clockwise to increase tension for heavier monitors, and counter-clockwise to decrease tension for lighter monitors. Adjust only after the monitor is mounted.
6. 케이블 관리
Utilize the integrated cable management clips along the arm to route and conceal your power, HDMI, and other cables for a tidy workspace.
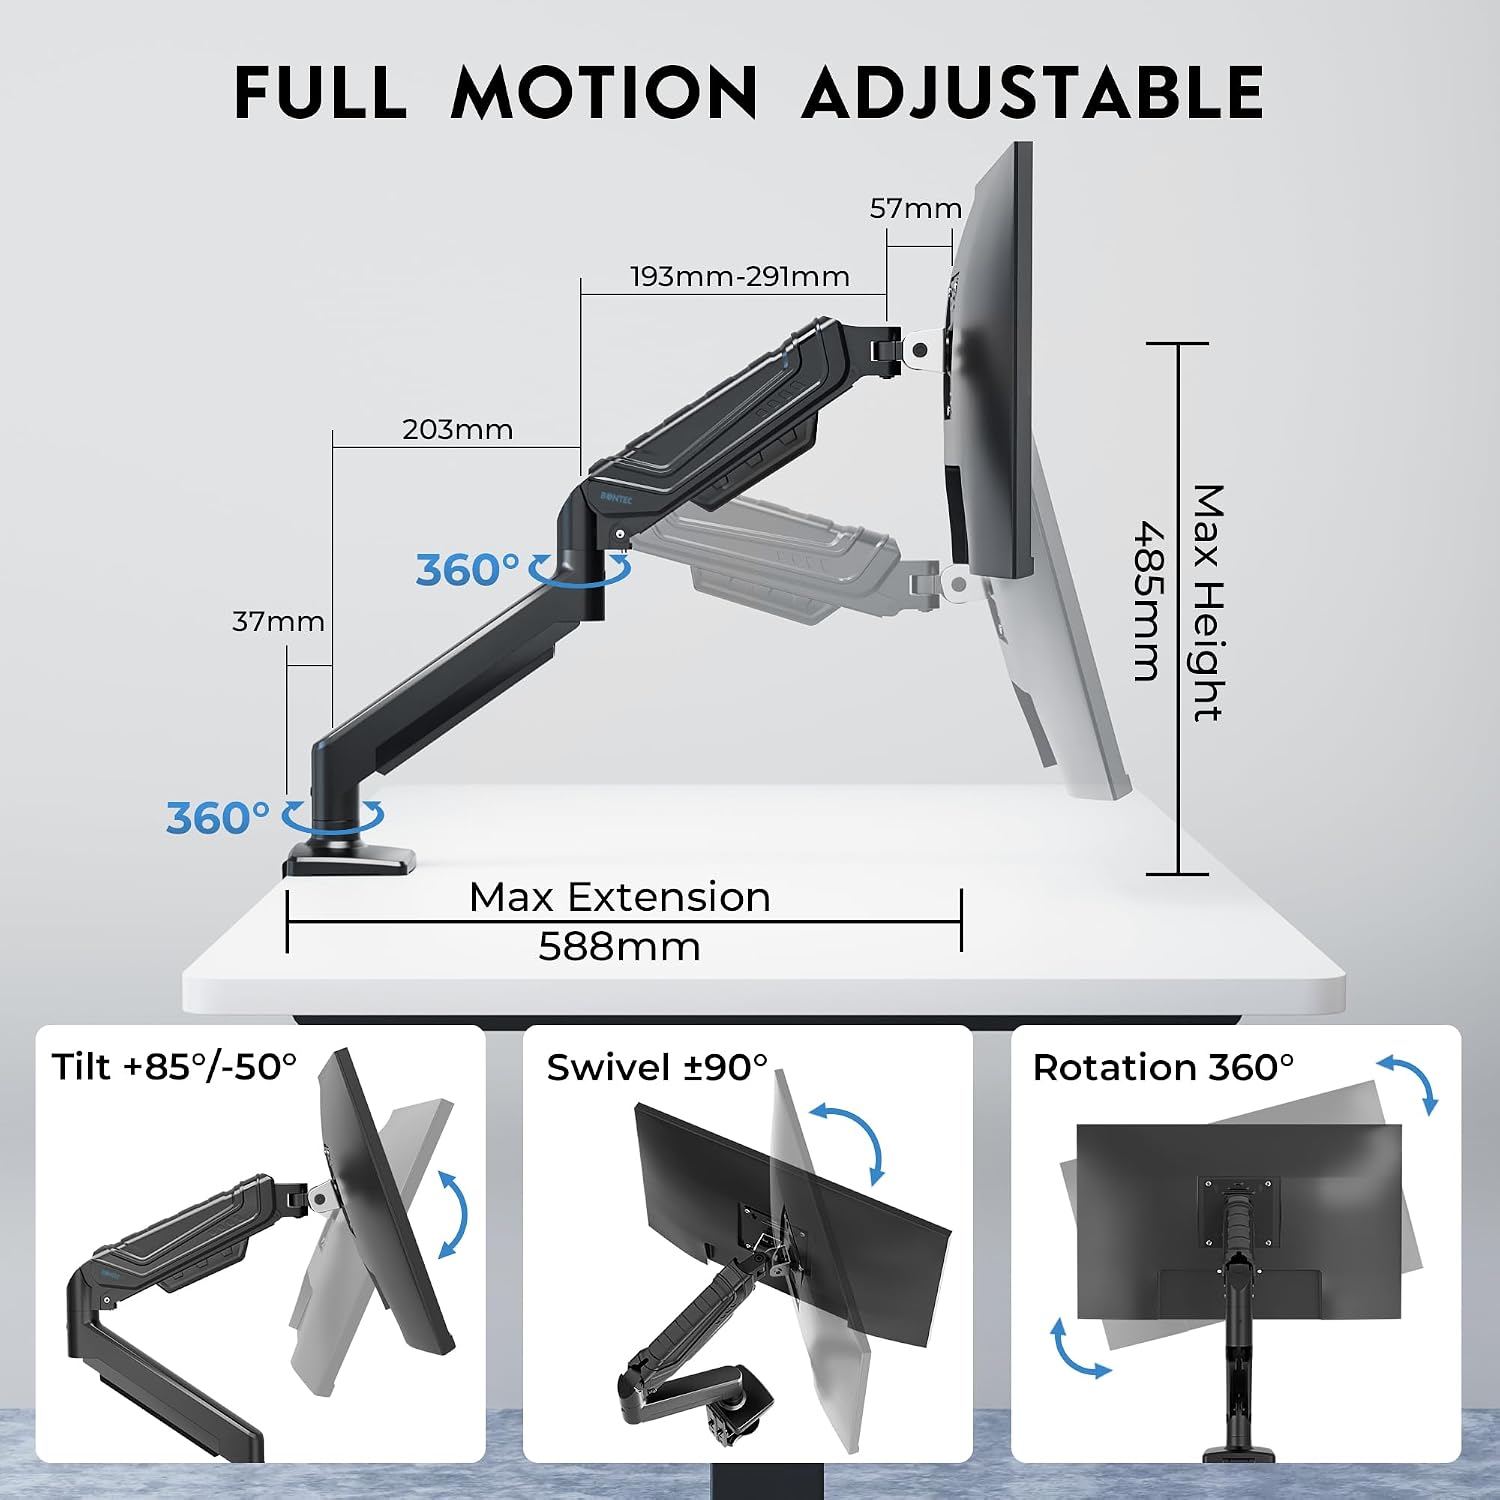
Image: Detailed illustration of the monitor arm's full motion capabilities, including tilt, swivel, rotation, and maximum extension and height.

Image: Visual representation of key features such as smooth rotation, adjustable swivel resistance, weight capacity, cable management, and the multi-position C-clamp.
유지
- 청소: 모니터 암을 부드러운 천으로 닦으세요.amp 천으로 닦아주세요. 마감재를 손상시킬 수 있는 연마성 세제나 용제는 사용하지 마세요.
- 정기 점검: 모든 나사와 연결부가 단단히 조여져 있는지 정기적으로 점검하십시오. 필요한 경우 다시 조이십시오.
- 가스 스프링: The gas spring is designed for long-lasting performance. No specific lubrication is required. If adjustments become difficult, refer to the 'Gas Spring Tension Adjustment' section.
문제 해결
- Problem: Monitor arm sags or does not stay at the desired height.
- 해결책: The gas spring tension may be too low for your monitor's weight. Increase the gas spring tension by turning the adjustment screw clockwise with the provided Allen key. Ensure the monitor is mounted before adjusting.
- Problem: Monitor arm is difficult to move or too stiff.
- 해결책: The gas spring tension may be too high. Decrease the gas spring tension by turning the adjustment screw counter-clockwise with the provided Allen key. Ensure the monitor is mounted before adjusting.
- Problem: Monitor wobbles or feels unstable.
- 해결책: Check all mounting screws for the C-clamp or grommet base, and the VESA plate attachment to the monitor. Ensure they are securely tightened. Also, verify that your desk surface is stable.
- Problem: Monitor does not fit the VESA plate.
- 해결책: Confirm your monitor's VESA pattern is either 75x75mm or 100x100mm. If it differs, your monitor is not compatible with this mount. Ensure you are using the correct screws and spacers from the hardware kit.
보증
The BONTEC MFS001 Monitor Arm comes with a 2년 보증 from the date of purchase. This warranty covers manufacturing defects and material flaws under normal use. It does not cover damage caused by improper installation, misuse, accidents, modifications, or unauthorized repairs. Please retain your proof of purchase for warranty claims.
고객 지원
If you have any questions, require assistance with installation, or encounter any issues not covered in this manual, please contact BONTEC customer support. Refer to the product packaging or the official BONTEC web연락처 정보 사이트.