1. 제품 오버view
The Lewisia 10W Solar Water Pump Kit (Model zj-pq04) is a solar-powered pump system designed for various water features such as ponds, fountains, pools, gardens, patios, hydroponics, aquaculture, and bird baths. It utilizes a 10W solar collector to provide energy for water circulation and features interchangeable spray heads for customizable water patterns. The kit includes a long cable for flexible solar panel placement and a filter bag to prevent blockages.

Image: The Lewisia 10W Solar Water Pump Kit in operation, creating a fountain spray in a pond.
2. 패키지 내용
설치를 진행하기 전에 패키지에 모든 구성 요소가 들어 있는지 확인하세요.
- 10W 태양광 패널
- Water Pump with 16.4 feet (5m) power cord
- Interchangeable Nozzle Accessories (Mushroom, Blossom, and other spray heads)
- Metal Bracket for solar panel mounting
- Mounting Hardware (screws, nuts, wall anchors)
- 가방 필터
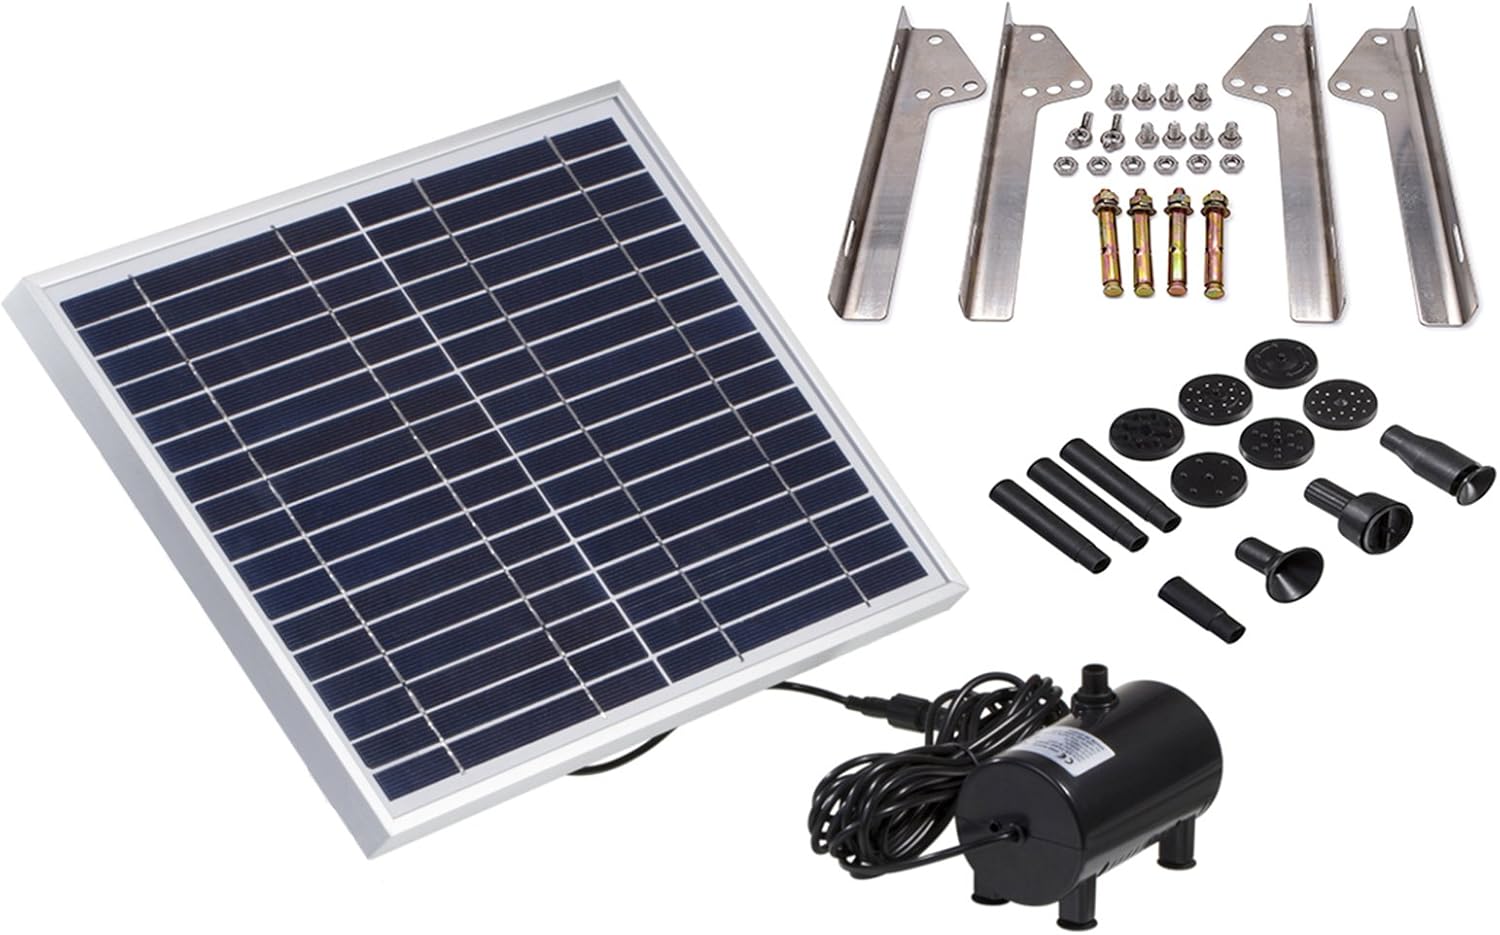
Image: All components of the Lewisia 10W Solar Water Pump Kit, including the solar panel, pump, various nozzles, and mounting hardware.
3. 설정 지침
3.1. Solar Panel Assembly
- Attach the metal bracket to the back of the solar panel using the provided screws and nuts.
- Adjust the angle of the bracket to optimize sunlight exposure. The bracket allows for ground standing or wall mounting.
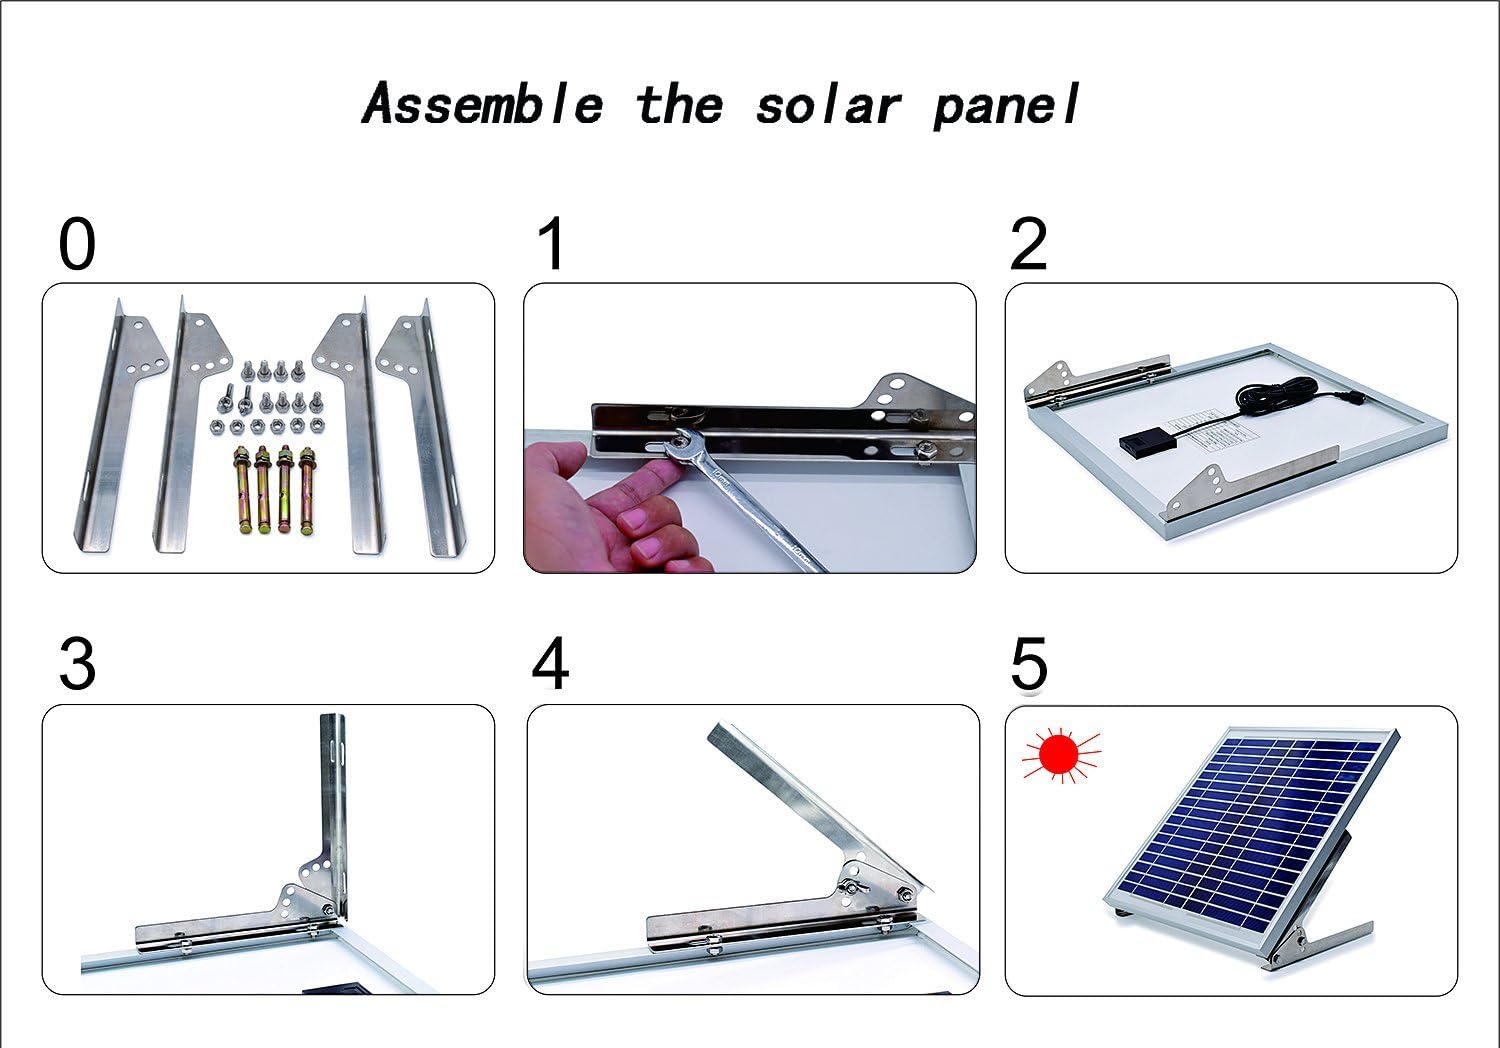
Image: A visual guide demonstrating the steps to assemble the metal bracket onto the solar panel.
3.2. Pump and Nozzle Assembly
- Select your desired nozzle accessory (e.g., Mushroom or Blossom spray head) and securely attach it to the pump outlet.
- Ensure the filter bag is properly installed around the pump to prevent debris from entering.

Image: A diagram illustrating the different nozzle accessories and how they can be combined with the pump to create various water patterns.
3.3. 배치 및 연결
- Place the assembled pump into your water feature (pond, pool, bird bath), ensuring it is fully submerged and stable.
- Position the solar panel in an area that receives maximum direct sunlight throughout the day. The 16.4-foot (5m) cable allows for flexible placement, enabling the pump to be in shade while the panel is in the sun.
- Connect the pump's power cord to the solar panel's output port.
4. 사용 설명서
The Lewisia 10W Solar Water Pump operates automatically when the solar panel receives sufficient direct sunlight. The pump will start and the water will begin to flow, creating your chosen fountain pattern.
- 햇빛 의존성: The height and intensity of the water spray are directly dependent on the amount and strength of direct sunlight hitting the solar panel. Performance may vary on cloudy days or in shaded areas.
- Water Patterns: Experiment with different nozzle accessories to achieve various water spray patterns, such as mushroom or blossom shapes.

Image: A solar-powered fountain operating in a garden pond, showcasing a wide spray pattern.
Video: Official product video demonstrating the assembly of the Lewisia 10W Solar Fountain Pump and showcasing various blossom and mushroom spray head patterns. It also illustrates how water height is affected by sunlight intensity.
5. 유지관리
Regular maintenance ensures optimal performance and longevity of your solar water pump kit.
- 펌프 청소: Periodically remove the pump from the water and clean any debris or algae that may have accumulated on the intake or inside the filter bag. A clogged pump can reduce water flow or stop operation.
- 태양광 패널 청소: 태양광 패널 표면을 부드러운 천으로 닦으십시오.amp cloth to remove dust, dirt, or water spots. A clean panel ensures maximum sunlight absorption and efficient power generation.
- 수위 확인: Ensure your water feature always has sufficient water to keep the pump fully submerged. Running the pump dry can cause damage.

Image: The water pump enclosed in a filter bag, designed to prevent dirt and debris from blocking the pump mechanism.
6. 문제 해결
If your solar water pump is not functioning as expected, consider the following common issues and solutions:
| 문제 | 가능한 원인 | 해결책 |
|---|---|---|
| Pump not working or weak flow | Insufficient direct sunlight, clogged pump/filter, low water level. | Ensure solar panel is in full, direct sunlight. Clean the pump and filter bag. Check and refill water feature to ensure pump is fully submerged. |
| 간헐적 작동 | Partial shading on solar panel, fluctuating sunlight intensity (e.g., passing clouds). | Relocate solar panel to an area with consistent, unobstructed direct sunlight. The pump requires bright, full sun to function optimally. |
| No water spray despite pump running | Nozzle blockage, incorrect nozzle attachment. | Remove and clean the nozzle. Ensure the nozzle is securely and correctly attached to the pump outlet. |
7. 사양
- 상표: 루이시아
- 모델 번호: zj-pq04
- 전원: 태양열 전원
- 재료: Polycrystalline silicon and ABS
- 품목 무게: 1.26 킬로그램
- 최대 유량 : 분당 5.95 갤런
- 최대 리프팅 높이: 26 피트
- 권tage: 17 볼트
8. 보증 및 지원
Lewisia is committed to customer satisfaction. While specific warranty details are not provided in this manual, the manufacturer typically offers support for product issues. If you encounter any problems with your Lewisia 10W Solar Water Pump Kit, please contact Lewisia customer service for assistance. Keep your purchase receipt as proof of purchase.