1. 서론
This manual provides essential information for the safe and efficient use of your Alienware AW3418DW 34.1-inch Curved Gaming Monitor. This monitor features a WQHD (3440x1440) resolution, a 120Hz refresh rate (overclocked), and NVIDIA G-SYNC technology for an immersive gaming experience. Please read this manual thoroughly before operating the device.
2. 안전 정보
- Always disconnect the power cable from the wall outlet before cleaning the monitor.
- 화재나 감전 위험을 방지하기 위해 모니터를 비나 습기에 노출시키지 마십시오.
- 모니터를 열지 마세요asing. 내부에는 사용자가 직접 수리할 수 있는 부품이 없습니다. 모든 수리는 자격을 갖춘 서비스 담당자에게 맡기십시오.
- 모니터가 떨어지지 않도록 안정적이고 평평한 표면에 놓으세요.
- 모니터 주변의 통풍이 잘 되도록 하십시오. 통풍구를 막지 마십시오.
- 모니터와 함께 제공된 전원 어댑터와 케이블만 사용하세요.
3. 패키지 내용
패키지에 모든 구성 요소가 들어 있는지 확인하세요.
- 에일리언웨어 AW3418DW 모니터
- 모니터 스탠드(베이스 및 라이저)
- 전원 케이블
- DisplayPort 케이블
- HDMI 케이블
- USB 3.0 업스트림 케이블
- 설명서 (빠른 설치 가이드, 안전 정보)
4. 설정
4.1 물리적 설정
Carefully remove the monitor and its components from the packaging. Place the monitor face down on a soft cloth or cushion to prevent scratches.
스탠드 부착하기
- 스탠드 받침대를 모니터 패널에 딸깍 소리가 나면서 제자리에 고정될 때까지 부착하십시오.
- Attach the stand base to the stand riser and tighten the captive screw.

그림 4.1: 전면 view of the Alienware AW3418DW monitor with its stand attached.

그림 4.2: 측면 view of the Alienware AW3418DW monitor with its stand.
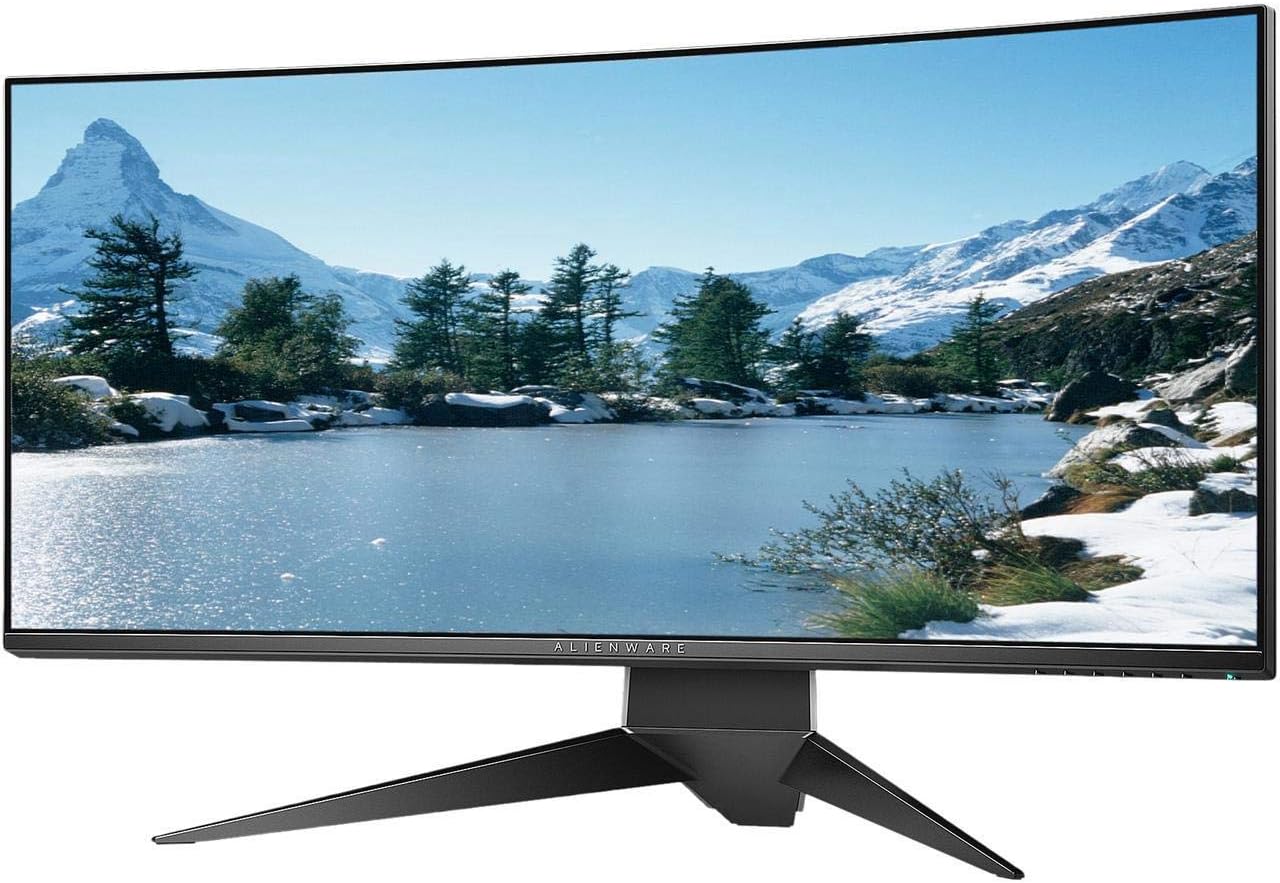
그림 4.3: 후면 view of the Alienware AW3418DW monitor showing the stand and AlienFX lighting.
VESA 장착
The monitor supports VESA mounting (100 x 100 mm). Remove the stand riser by pressing the release button and then attach the VESA-compatible mount to the monitor using appropriate screws. Ensure the mount can support the monitor's weight of 26.1 pounds (without stand).

Figure 4.4: Monitor dimensions for VESA mount compatibility.
4.2 연결 케이블
필요한 케이블을 모니터와 컴퓨터에 연결하세요.
- 전원 케이블 : 전원 케이블을 모니터의 전원 포트에 연결한 다음 벽면 콘센트에 연결하십시오.
- 비디오 케이블: Connect either the DisplayPort cable or the HDMI cable from your computer's graphics card to the corresponding port on the monitor. For optimal performance, especially for 120Hz refresh rate and G-SYNC, use the DisplayPort connection.
- USB 업스트림 케이블: Connect the USB 3.0 upstream cable from your computer to the monitor's upstream USB port to enable the monitor's USB hub functionality.
- USB 다운스트림 포트: Connect your USB devices (e.g., keyboard, mouse, webcam) to the four USB 3.0 downstream ports on the monitor.
5. 사용 설명서
5.1 전원 켜기/끄기
Press the power button located on the monitor to turn it on or off. The power LED will indicate the monitor's status.
5.2 화면 디스플레이(OSD) 탐색
The On-Screen Display (OSD) menu allows you to adjust various monitor settings. Use the control buttons, typically located on the bottom right or rear of the monitor, to navigate the OSD.
- OSD 메뉴를 활성화하려면 제어 버튼을 누르세요.
- 탐색 버튼(위/아래/좌/우)을 사용하여 메뉴 옵션을 이동하세요.
- 선택 버튼을 눌러 선택을 확정하거나 하위 메뉴로 이동하세요.
- 이전 메뉴로 돌아가거나 OSD를 종료하려면 뒤로/종료 버튼을 사용하세요.
5.3 디스플레이 설정
최적의 디스플레이 설정 조정 viewing and gaming performance.
- 해결: Set your computer's display resolution to 3440x1440 for the native WQHD experience.
- 새로 고침 빈도: The monitor supports up to 120Hz refresh rate (overclocked). Ensure your graphics card drivers are updated and the refresh rate is set in your operating system's display settings or graphics control panel.
- 엔비디아 지싱크: For tear-free and smooth gameplay, enable G-SYNC in your NVIDIA Control Panel. This feature synchronizes the monitor's refresh rate with your GPU's frame rate.
- 밝기/대비: Adjust these settings in the OSD menu to suit your environment and preference.
5.4 AlienFX Lighting
Customize the AlienFX lighting zones on your monitor through the OSD menu or Alienware Command Center software (if installed on your PC). You can select colors, effects, and synchronize lighting with other Alienware devices.
5.5 USB 허브 사용법
The monitor acts as a USB 3.0 hub, providing convenient access to four downstream USB ports for connecting peripherals. Ensure the USB upstream cable is connected to your computer for this feature to function.
6. 유지관리
6.1 모니터 청소
- Always unplug the monitor from the electrical outlet before cleaning.
- 부드럽고 보풀이 없는 천을 살짝 사용하십시오. damp물이나 비연마성 화면 세척제로 세척하세요.
- 세척제를 화면에 직접 뿌리지 마세요.
- 화면을 부드럽게 닦아 먼지와 얼룩을 제거하세요.
- 외부를 청소하세요asin부드럽고 마른 천으로 닦으세요.
6.2 보관
If storing the monitor for an extended period, disconnect all cables, carefully disassemble the stand (if applicable), and store it in its original packaging in a cool, dry place.
7. 문제 해결
모니터에 문제가 발생하면 다음의 일반적인 문제 해결 단계를 참조하세요.
- 디스플레이 없음: Ensure all power and video cables are securely connected. Check if the monitor is powered on and the correct input source is selected in the OSD.
- 깜빡임/끊김 현상: Verify that your graphics drivers are up to date. Ensure G-SYNC is properly configured in the NVIDIA Control Panel. Check for interference from other electronic devices.
- 잘못된 해상도/새로 고침 빈도: Adjust the display settings in your operating system or graphics control panel to the native resolution (3440x1440) and desired refresh rate (up to 120Hz).
- 데드 픽셀: The Alienware AW3418DW comes with a Premium Panel Guarantee. Refer to the warranty information for details on pixel policy.
- USB 포트가 작동하지 않음: 모니터와 컴퓨터 사이에 USB 3.0 업스트림 케이블이 연결되어 있는지 확인하십시오.
8. 사양
| 특징 | 사양 |
|---|---|
| 상표 | 에일리언웨어 |
| 모델 번호 | AW3418DW |
| 화면 크기 | 34.1 인치 |
| 해결 | WQHD (3440 x 1440 픽셀) |
| 종횡비 | 21시 9분 |
| 새로 고침 빈도 | 120Hz (오버클럭) |
| 응답 시간 | 4밀리초 |
| 적응형 동기화 기술 | NVIDIA G-SYNC |
| 디스플레이 유형 | LED IPS |
| 곡률 | 1900R |
| 명도 | 300칸델라/제곱미터 |
| 대비율 | 1000시 1분 |
| View잉 각도 | 178도 |
| 연결성 | 1x DisplayPort (1.2), 1x HDMI (1.4), 4x USB 3.0 Downstream, 1x USB 3.0 Upstream |
| 품목 무게 | 26.1파운드 (스탠드 제외) |
| 장착 유형 | VESA Compatible (100 x 100 mm) |
9. 보증 및 지원
Your Alienware AW3418DW monitor is covered by a 3 Years Limited Hardware Warranty 그리고 3 Years Advance Exchange Service, 포함 Premium Panel Guarantee. The Premium Panel Guarantee ensures a free panel replacement during the limited hardware warranty period even if only one bright pixel is found.
For technical support, warranty claims, or additional information, please visit the official Alienware or Dell support website. You may also find updated drivers and firmware there.
온라인 지원: www.dell.com/support