
1. 서론
Welcome to the Philco Electronic Bread Maker user manual. This appliance is designed to simplify the bread-making process, allowing you to create a variety of delicious breads, cakes, jams, and more with minimal effort. Please read this manual carefully before using the appliance to ensure safe and efficient operation and to fully understand its features.
2. 중요 안전 지침
전기 제품을 사용할 때는 화재, 감전, 인명 피해 위험을 줄이기 위해 다음 사항을 포함한 기본적인 안전 예방 조치를 항상 따라야 합니다.
- 뜨거운 표면을 만지지 마십시오. 손잡이나 손잡이를 사용하십시오.
- 감전을 예방하려면 코드, 플러그 또는 기기를 물이나 기타 액체에 담그지 마십시오.
- 어린이가 가전제품을 사용하거나 어린이 근처에서 사용할 때는 면밀한 감독이 필요합니다.
- 사용하지 않을 때와 세척하기 전에는 콘센트에서 플러그를 뽑으세요. 부품을 끼우거나 떼기 전에 식히세요.
- 코드나 플러그가 손상된 경우 또는 기기가 오작동하거나 어떤 식으로든 손상된 경우에는 기기를 작동하지 마십시오.
- 가전제품 제조업체가 권장하지 않는 부속품을 사용하면 부상을 입을 수 있습니다.
- 옥외에서는 사용하지 마십시오.
- 코드가 테이블이나 카운터 가장자리에 걸려 있거나 뜨거운 표면에 닿지 않도록 하세요.
- 뜨거운 가스나 전기 버너 근처 또는 가열된 오븐에 두지 마십시오.
- 뜨거운 기름이나 기타 뜨거운 액체가 담긴 가전제품을 옮길 때는 극히 조심해야 합니다.
- 연결을 끊으려면 모든 제어 장치를 "끄기"로 돌린 다음 벽면 콘센트에서 플러그를 뽑으세요.
- 본 제품을 본래 용도 외에는 사용하지 마십시오.

Image: Safety certification logos (INMETRO OCP 0040 and SGS) indicating compliance with safety standards.
3. 제품 오버view
Familiarize yourself with the components of your Philco Electronic Bread Maker.
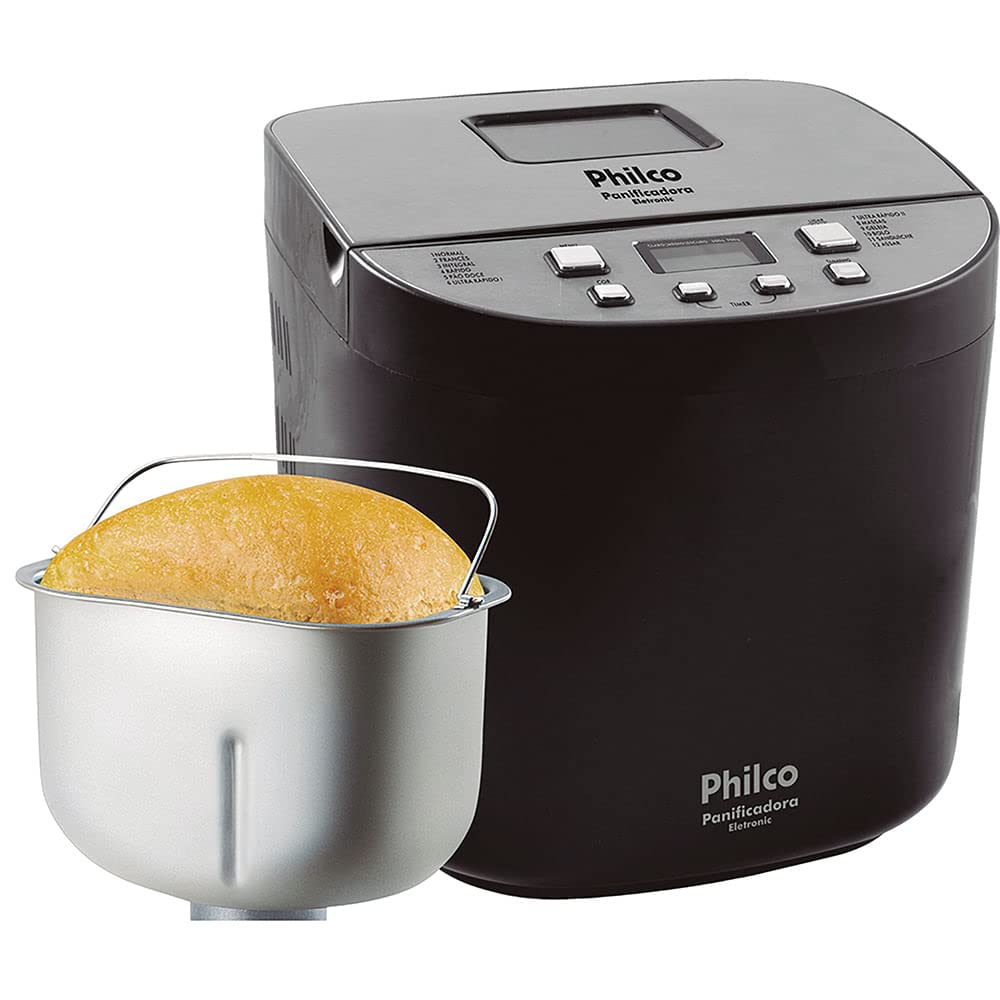
이미지: 앞면 view of the Philco Electronic Bread Maker, showing the main unit, control panel, and view잉 창.
제어판
The control panel allows you to select programs, adjust settings, and start/stop the bread maker.
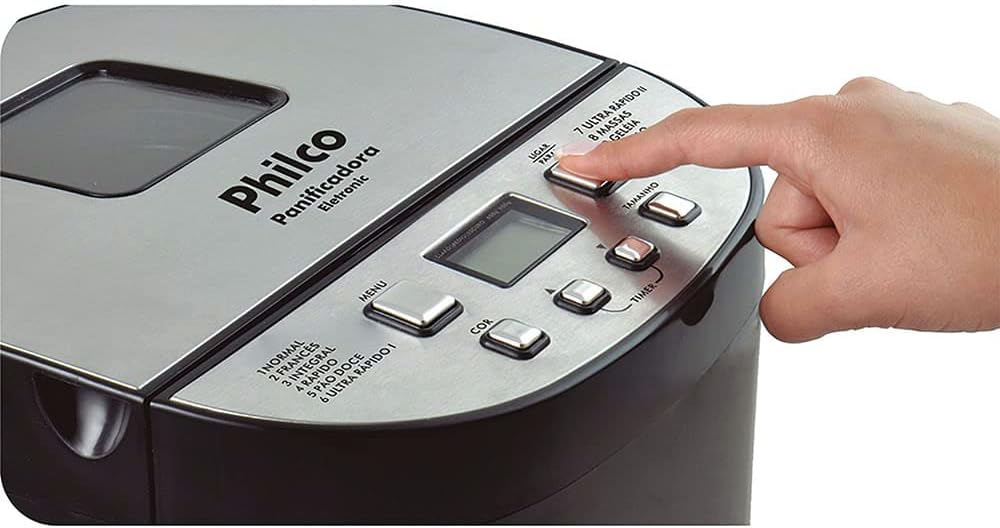
Image: Close-up of the bread maker's control panel, highlighting buttons for MENU, COLOR, TIMER, SIZE, and POWER, along with the digital display.
- 메뉴 버튼: 제공되는 12개 프로그램 중 하나를 선택합니다.
- 컬러 버튼: Adjusts the crust color (Light, Medium, Dark).
- 타이머 버튼(+/-): Sets the delay timer for deferred baking.
- 크기 버튼: Selects the loaf size (450g, 600g, 900g, 1200g).
- 전원 버튼: Starts or stops the selected program.
- LCD 디스플레이: 프로그램 번호, 남은 시간 및 선택된 설정을 표시합니다.
4. 설정 및 첫 사용
4.1 풀기
Carefully remove the bread maker and all accessories from the packaging. Retain the packaging for future storage or transport. Check that all parts are present and undamaged.
4.2 초기 청소
Before first use, clean the bread pan, kneading paddle, and measuring accessories with warm, soapy water. Rinse thoroughly and dry completely. Wipe the exterior of the appliance with a damp 옷감.
4.3 배치
제빵기를 직사광선과 열원으로부터 멀리 떨어진 안정적이고 평평하며 내열성이 있는 표면에 놓으십시오. 기기 주변에 충분한 환기가 이루어지도록 하십시오.
5. 사용 설명서
5.1 재료 추가하기
항상 액체 재료를 먼저 넣고 그 다음에 마른 재료를 넣으세요. 효모는 마지막에 넣어야 하며, 액체와 소금에서 떨어진 밀가루 윗부분의 작은 홈에 넣어주세요.

Image: A hand pouring dry ingredients, likely flour, into the bread maker's non-stick pan.
5.2 프로그램 선택
를 누르세요 메뉴 button repeatedly to cycle through the 12 available programs. The selected program number will be displayed on the LCD screen.
이용 가능한 프로그램:
- 정상: 기본 빵 레시피를 위한 정보입니다.
- 프랑스 국민: 겉은 바삭하고 속은 가벼운 빵을 원할 경우.
- 통 밀: For whole wheat bread, typically requiring a longer kneading time.
- 빠른: For quick bread baking, suitable for smaller loaves.
- 달콤한 빵: For breads with high sugar and fat content.
- ULTRA FAST I: For very quick baking of smaller loaves.
- ULTRA FAST II: For very quick baking of larger loaves.
- 가루 반죽: Prepares dough for rolls, pizza, or pastries without baking.
- 잼: 수제 잼과 마멀레이드를 만들 때 사용합니다.
- 케이크: 케이크와 퀵 브레드를 굽는 데 사용합니다.
- 샌드위치: 가볍고 폭신한 샌드위치 빵을 만들 때 사용합니다.
- 빵 굽기: 미리 만들어둔 반죽을 굽거나 굽는 시간을 늘릴 때 사용합니다.
5.3 Crust Color Selection
After selecting a program, press the 색상 button to choose your desired crust color: Light, Medium, or Dark.
5.4 Loaf Size Selection
를 누르세요 크기 button to select the desired loaf weight: 450g, 600g, 900g, or 1200g. Ensure your recipe quantities match the selected loaf size.
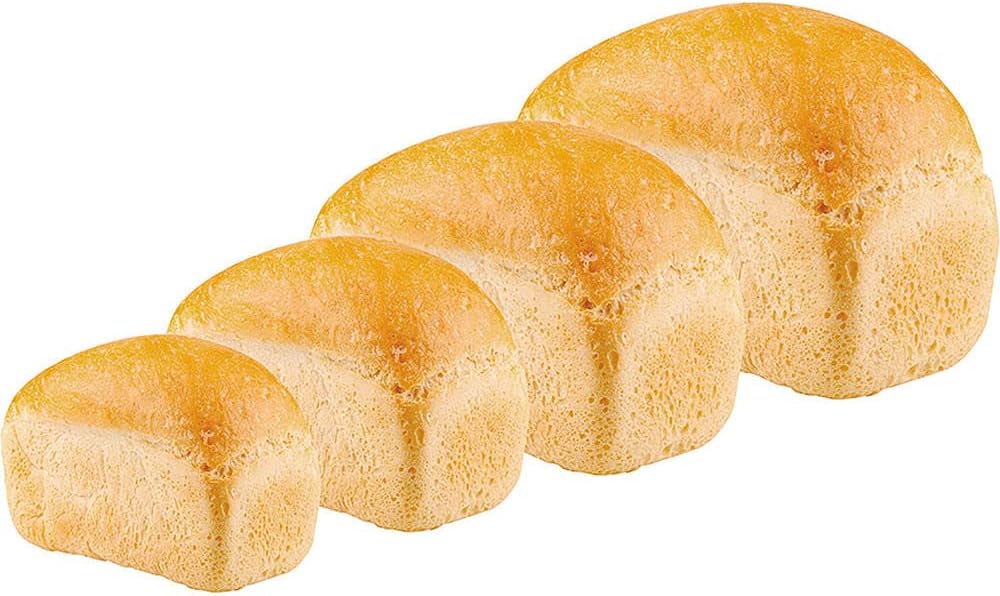
Image: Four baked loaves of bread, demonstrating the different size options available from the bread maker.
5.5 지연 타이머 기능
The timer function allows you to delay the start of the baking process by up to 13 hours. After selecting the program, crust color, and loaf size, use the 시간제 노동자 buttons (+/-) to set the desired delay time. The display will show the total time until the bread is ready.
5.6 보온 기능
After the baking cycle is complete, the bread maker will automatically switch to a 60-minute keep-warm function. This keeps your bread warm until you are ready to remove it.
5.7 시작 및 중지
를 누르세요 힘 button to start the selected program. To stop a program, press and hold the 힘 버튼을 몇 초간 눌러주세요.
5.8 빵 제거하기
Once the program is complete and the keep-warm cycle has finished (or you have manually stopped it), unplug the appliance. Carefully remove the bread pan using oven mitts, as it will be hot. Invert the pan to release the bread. If the kneading paddle remains in the bread, remove it carefully with a non-metallic utensil.

Image: A hand carefully lifting a freshly baked loaf of bread out of the bread maker's non-stick pan using the pan's handle.
6. 관리 및 유지 보수
6.1 빵틀과 반죽기 세척하기
After each use, allow the bread pan and kneading paddle to cool completely. Fill the pan with warm, soapy water and let it soak for 10-15 minutes to loosen any stuck-on dough. Use a soft sponge or cloth to clean. Do not use abrasive cleaners or metal utensils, as this can damage the non-stick coating. Rinse and dry thoroughly.
6.2 외부 청소
빵 제조기 외부를 부드러운 천으로 닦으세요.amp cloth. Do not immerse the appliance in water or spray it with liquids. Ensure no water enters the ventilation openings.
6.3 보관
Ensure the appliance is clean, dry, and completely cool before storing. Store it in a dry place, away from direct sunlight and out of reach of children.
7. 문제 해결
빵 제조기에 문제가 발생하면 다음의 일반적인 문제와 해결 방법을 참조하세요.
| 문제 | 가능한 원인 | 해결책 |
|---|---|---|
| 빵이 부풀지 않아요 | 유통기한이 지난 효모, 부적절한 물 온도, 소금/설탕 과다. | Check yeast expiration, use lukewarm water, ensure correct ingredient measurements. |
| 빵이 너무 빽빽하다 | 밀가루가 너무 많거나, 물이 부족하거나, 조리법이 잘못되었습니다. | 재료를 정확하게 계량하고, 액체와 밀가루의 비율을 적절하게 맞추고, 적절한 프로그램을 선택하세요. |
| 반죽용 패들이 빵에 끼어버렸습니다. | 흔히 발생하는 일입니다. | 빵이 약간 식으면 금속이 아닌 도구를 사용하여 조심스럽게 주걱을 제거하세요. |
| 기기가 켜지지 않습니다 | 플러그가 꽂혀 있지 않음, 전원이 꺼짐tag예, 콘센트 불량. | Check power cord connection, test outlet with another appliance, ensure power supply. |
| 연기나 타는 냄새 | 발열체에 음식물 찌꺼기가 남아 있어 내부 고장이 발생했습니다. | Unplug immediately. Allow to cool and clean thoroughly. If problem persists, contact support. |
8. 사양
| 특징 | 사양 |
|---|---|
| 모델 | Eletronic 12 Programs 700W (Part No. 054301004) |
| 상표 | 필코 |
| 힘 | 700와트 |
| 권tage | 110V |
| 프로그램 수 | 12 |
| 빵 크기 | 450g, 600g, 900g, 1200g |
| 크러스트 색상 | 라이트, 미디엄, 다크 |
| 지연 타이머 | 최대 13시간 |
| 보온 기능 | 60 분 |
| 재료 | 스테인리스 스틸(외부) |
| 색상 | 검은색 |
| 제품 무게 | 5.66kg(5660그램) |
| ASIN | B076HVLX2G |
9. 보증 및 지원
Your Philco Electronic Bread Maker is covered by a manufacturer's warranty. Please refer to the warranty card included with your purchase for specific terms and conditions. For technical support, service, or replacement parts, please contact Philco customer service through their official web사이트 또는 제품 설명서에 제공된 연락처 정보를 참조하세요.