
1. 서론
Thank you for choosing the XTUGA BK510 Single Channel Wireless In-Ear Monitor System. This system is designed to provide professional-grade audio monitoring for musicians, performers, and presenters. It features UHF wireless technology with 100 selectable channels, ensuring clear and reliable sound transmission. This manual will guide you through the setup, operation, and maintenance of your new in-ear monitor system.
2. 안전 정보
이 기기를 작동하기 전에 모든 안전 지침을 읽고 이해하십시오. 나중에 참조할 수 있도록 이 설명서를 보관하십시오.
- FCC 준수: Most users do not need a license to operate this wireless microphone system. However, operation is subject to certain restrictions: the system must not cause harmful interference, must operate at a low power level (not exceeding 50 milliwatts), and has no protection from interference received from any other device.
- FCC 규정: Purchasers should be aware that the FCC is currently evaluating the use of wireless microphone systems, and these rules are subject to change. For more information, contact the FCC at 1-888-CALL-FCC (TTY: 1-888-TELL-FCC) or visit the FCC's wireless microphone web대지: fcc.gov/cgb/wirelessmicrophones.
- 전기 안전: To prevent electric shock, do not open the device casing. 모든 서비스는 자격을 갖춘 담당자에게 의뢰하세요.
- 전원: 제공된 전원 어댑터만 사용하세요. 볼륨을 확인하세요.tage는 장치 요구 사항과 일치합니다.
- 물과 습기: Do not expose the device to water, rain, or excessive moisture.
- 열: 장치를 라디에이터, 난방 장치, 스토브 또는 기타 열을 발생시키는 기기와 같은 열원으로부터 멀리 두십시오.
- 통풍: Ensure proper ventilation around the transmitter unit. Do not block any ventilation openings.
- 이어폰 볼륨: 청력 손상을 방지하려면 장시간 높은 볼륨으로 청취하지 마십시오.
3. 패키지 내용
아래 나열된 모든 품목이 패키지에 포함되어 있는지 확인하세요. 품목이 누락되었거나 손상된 경우 판매점에 문의하세요.
- 1x XTUGA BK510 Transmitter Unit
- 1x XTUGA BK510 Bodypack Receiver
- 1x Detachable Antenna
- 1x Power Adapter (DC 12V-18V)
- 2x Audio Cables (1/4" TS to 1/4" TS)
- 1x Pair of Earbud Headphones (White)

영상: XTUGA BK510 Single Channel Wireless In-Ear Monitor System package contents, showing the transmitter, bodypack receiver, antenna, power adapter, two audio cables, and white earbud headphones.
4. 제품 오버view
4.1 송신기 유닛
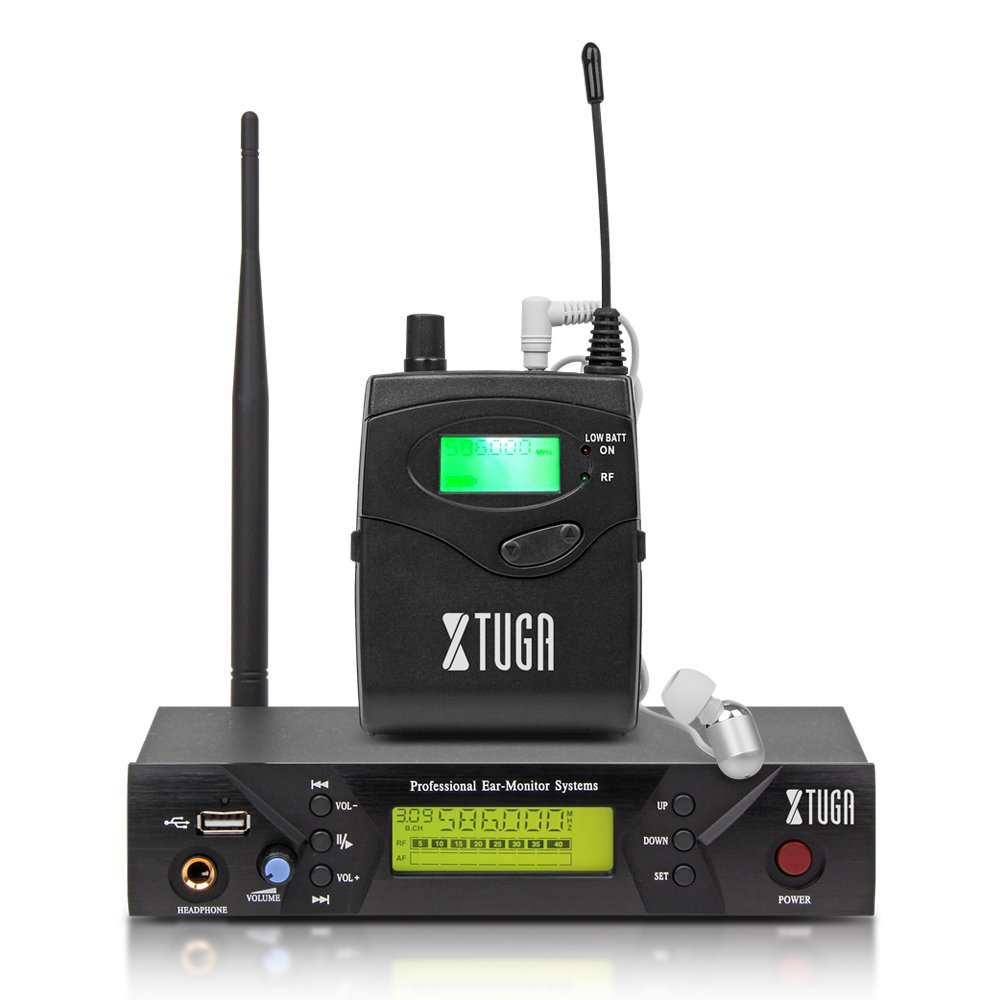
영상: Front panel of the XTUGA BK510 transmitter unit, featuring a USB port, headphone output, volume control, channel selection buttons (UP/DOWN), SET button, power button, and an LCD display.
- USB 포트: For connecting USB devices (e.g., for playback or recording, specific functionality may vary).
- 헤드폰 출력: 3.5mm jack for wired headphone monitoring directly from the transmitter.
- 볼륨 노브: Adjusts the output volume for the HEADPHONE output.
- 위/아래 버튼: Used to navigate and select channels or frequencies.
- 설정 버튼: 선택 사항을 확인하거나 설정 메뉴로 들어갑니다.
- 전원 버튼: Turns the transmitter unit on or off.
- LCD 디스플레이: Shows current channel, frequency, and other operational information.

영상: Rear panel of the XTUGA BK510 transmitter unit, showing the DC IN power input, AF IN (L) and AF IN (R) combo XLR/TRS inputs, AF LEVEL (Left/Right) adjustment knobs, and the ANTENNA connector.
- DC IN (12V-18V): 동봉된 전원 어댑터의 전원 입력 단자입니다.
- AF IN (L)/(R): Combo XLR/TRS inputs for connecting audio sources (e.g., mixer output).
- AF LEVEL (Left/Right): Rotary knobs to adjust the input audio level for each channel.
- ANTENNA Connector: For attaching the detachable antenna.
4.2 바디팩 수신기

영상: 앞쪽 view of the XTUGA BK510 bodypack receiver, showing the LCD display, LOW BATT indicator, RF indicator, and control buttons.
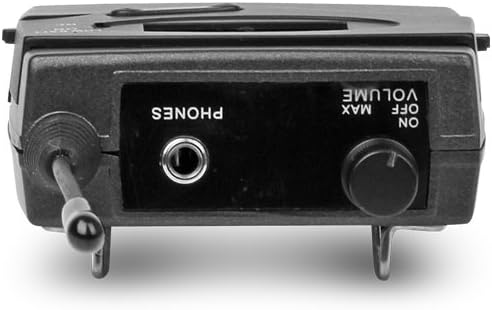
영상: 맨 위 view of the XTUGA BK510 bodypack receiver, showing the PHONES output jack and the ON/OFF/VOLUME knob.

영상: XTUGA BK510 bodypack receiver with the battery compartment open, showing slots for two AA batteries and the belt clip on the back.
- LCD 디스플레이: 현재 채널, 주파수 및 배터리 상태를 표시합니다.
- LOW BATT Indicator: 배터리 잔량이 부족할 때 불이 켜집니다.
- RF 표시기: Illuminates when receiving a radio frequency signal from the transmitter.
- ON/OFF/VOLUME Knob: Turns the receiver on/off and adjusts the headphone volume.
- 전화 출력: 3.5mm jack for connecting in-ear headphones.
- 배터리 칸: AA 건전지 2개가 들어갑니다.
- 벨트 클립: 바디팩을 옷이나 벨트에 부착하기 위한 용도입니다.
5. 설정 가이드
- Connect Transmitter Antenna: Screw the detachable antenna onto the ANTENNA connector on the rear panel of the transmitter unit. Ensure it is securely fastened.
- 송신기에 전원을 공급하세요: Connect the provided power adapter to the DC IN (12V-18V) port on the rear of the transmitter, then plug the adapter into a suitable power outlet.
- 오디오 소스 연결: Use the included 1/4" TS cables (or XLR cables, not included) to connect your audio source (e.g., mixer's auxiliary output, monitor send) to the AF IN (L) and/or AF IN (R) inputs on the transmitter's rear panel. For mono operation, typically use AF IN (L).
- 수신기 배터리 설치: Open the battery compartment on the bodypack receiver and insert two AA batteries, observing correct polarity (+/-). Close the compartment securely.
- 헤드폰을 수신기에 연결하세요: Plug your in-ear headphones into the PHONES output jack on the bodypack receiver.
6. 사용 설명서
- 송신기 전원 켜기: Press the POWER button on the transmitter's front panel. The LCD display will illuminate.
- 수신기 전원 켜기: Rotate the ON/OFF/VOLUME knob on the bodypack receiver clockwise until it clicks and the LCD display illuminates.
- Select Channel/Frequency (Transmitter):
- Use the UP/DOWN buttons on the transmitter to browse through the available 100 UHF channels.
- Press the SET button to confirm your desired channel. The display will show the selected frequency.
- Choose a channel that is clear of interference in your operating environment.
- Sync Receiver to Transmitter: The bodypack receiver should automatically sync to the transmitter's frequency. If not, consult the receiver's specific instructions (often involves holding a SET or SYNC button on the receiver while the transmitter is broadcasting). Ensure the RF indicator on the receiver is lit, indicating a successful connection.
- Adjust Audio Input Level (Transmitter): Play audio through your connected source. Adjust the AF LEVEL (Left/Right) knobs on the rear of the transmitter until the audio level is appropriate without clipping (distortion). Monitor the audio through the transmitter's HEADPHONE output if desired.
- Adjust Monitoring Volume (Receiver): Put on your in-ear headphones. Slowly rotate the ON/OFF/VOLUME knob on the bodypack receiver to adjust the listening volume to a comfortable level. Avoid excessively high volumes to protect your hearing.
- 모니터링 시작: Your XTUGA BK510 system is now ready for use.
7. 유지관리
- 청소: 부드럽고 마른 천으로 제품을 닦으십시오. 액체 세척제나 용제를 사용하지 마십시오.
- 배터리 교체: When the LOW BATT indicator on the bodypack receiver illuminates, replace both AA batteries with fresh ones. Remove batteries if the receiver will not be used for an extended period.
- 저장: 시스템은 직사광선과 극한의 온도를 피해 서늘하고 건조한 곳에 보관하세요.
- 안테나 관리: 안테나가 구부러지거나 부러지지 않도록 조심스럽게 다루십시오.
8. 문제 해결
| 문제 | 가능한 원인 | 해결책 |
|---|---|---|
| 수신기에서 소리가 나지 않습니다. |
|
|
| 간섭 또는 정전기. |
|
|
| Low audio quality (e.g., lack of bass). |
|
|
| LOW BATT indicator on receiver is lit. | 배터리가 부족합니다. | AA 배터리 두 개를 즉시 교체하세요. |
9. 사양
| 특징 | 세부 사항 |
|---|---|
| 모델 | BK510 |
| 상표 | 엑스투가 |
| 연결 기술 | 유선, 무선(RF) |
| 무선 통신 | UHF (100개 채널) |
| 송신기 재료 | 금속 |
| Bodypack Receiver Batteries | AA 배터리 2개 (필수) |
| 송신기 전원 입력 | 직류 12V-18V |
| 송신기 치수 | 17.72 x 11.81 x 4.72 인치 |
| 품목 무게(대략) | 3.34파운드(전체 패키지) |
| 특별 기능 | Lightweight (receiver), Volume Control |
| 제조업체 | 중국에서 만든 |
10. 보증 및 지원
보증: No specific warranty information is provided within this user manual. For details regarding warranty coverage, terms, and conditions, please refer to the product packaging, the purchase receipt, or contact the manufacturer directly.
지원하다: For technical assistance, troubleshooting beyond this guide, or inquiries about your XTUGA BK510 system, please contact XTUGA customer support. You may find contact information on the official XTUGA web사이트나 원래 구매처를 통해 구매하세요.
FCC 정보: For regulatory questions concerning wireless microphone systems, you can contact the FCC at 1-888-CALL-FCC (TTY: 1-888-TELL-FCC) or visit fcc.gov/cgb/wirelessmicrophones.