1. 서론
This manual provides comprehensive instructions for the installation, operation, and maintenance of your ASUS TUF B350M-PLUS GAMING Motherboard. Please read this manual thoroughly before beginning installation to ensure proper setup and optimal performance.
The ASUS TUF B350M-PLUS GAMING motherboard is engineered for robust performance and durability, supporting AMD Ryzen AM4 processors. It features advanced connectivity options including NVMe M.2, USB 3.1 Gen2, and Gigabit LAN, alongside ASUS's Gamer's Guardian safeguards and AURA Sync RGB lighting for system personalization.

Figure 1.1: The ASUS TUF B350M-PLUS GAMING Motherboard alongside its retail packaging.
2. 설정 및 설치
Before installing the motherboard, ensure your system components are compatible. Refer to the specifications section for detailed compatibility information.
2.1 패키지 내용
아래 나열된 모든 품목이 마더보드 패키지에 들어 있는지 확인하세요.
- TUF B350M-PLUS GAMING Motherboard
- Serial ATA 6.0Gb/s 케이블(2)
- 입출력 실드
- M.2 나사 패키지
- 사용자 설명서(본 문서)
- TUF Certification card
- TUF 게이밍 스티커
- DVD 지원
2.2 마더보드 레이아웃
마더보드의 다양한 구성 요소와 커넥터에 대해 알아보세요.

그림 2.1: 상향식 view of the motherboard, highlighting key component locations such as the CPU socket, RAM slots, and PCIe slots.
2.3 구성 요소 설치
- CPU 설치: Carefully align the AMD Ryzen processor with the AM4 socket. Ensure the triangle on the CPU matches the triangle on the socket. Lower the CPU gently into the socket and secure it with the retention lever.
- RAM 설치: Insert DDR4 memory modules into the DIMM slots. Press down firmly on both ends of the module until the clips snap into place. Refer to the motherboard manual for recommended dual-channel configurations.
- 그래픽 카드 설치: Insert your PCIe graphics card into the primary PCIe x16 slot. Ensure it is fully seated and secure the retention clip.
- 저장 장치 설치: Connect SATA drives to the SATA 6Gb/s ports. For NVMe M.2 SSDs, insert the drive into the M.2 slot and secure it with the provided screw.
- 전원 연결 : 전원 공급 장치의 24핀 ATX 전원 커넥터와 8핀 CPU 전원 커넥터를 마더보드에 연결합니다.
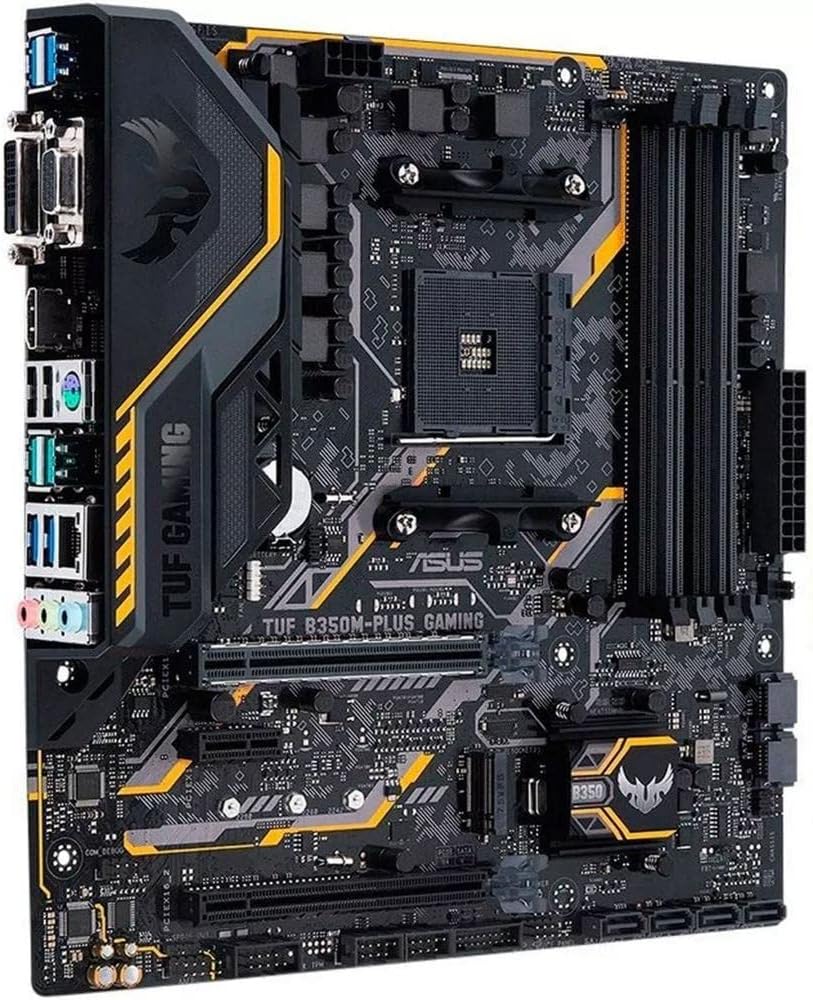
그림 2.2: 각도 view of the motherboard, showing the various ports and connectors for component installation.
2.4 후면 I/O 패널
The rear I/O panel provides various ports for connecting peripheral devices.

그림 2.3: 상세 view of the rear I/O panel, including USB ports, video outputs (HDMI, DVI, VGA), LAN port, and audio jacks.
- USB 3.1 Gen2 포트: 고속 데이터 전송을 위해.
- USB 3.1 Gen1 포트: 표준 USB 연결 방식입니다.
- USB 2.0 포트: For keyboards, mice, and other peripherals.
- HDMI 포트 : 디지털 비디오 출력용입니다.
- DVI-D 포트: 디지털 비디오 출력용입니다.
- VGA 포트: 아날로그 비디오 출력용입니다.
- LAN(RJ-45) 포트: 네트워크 연결을 위해.
- 오디오 잭: 오디오 입력/출력용.
3. 운영
3.1 첫 번째 부팅 및 BIOS 설정
Upon first power-on, the system will enter the BIOS (Basic Input/Output System) setup utility. Here you can configure system settings, boot order, and monitor hardware status.
- 누르다 델 or F2 during POST (Power-On Self-Test) to enter BIOS Setup.
- Navigate using keyboard arrows and 입력하다 열쇠.
- 변경 사항을 저장하고 종료하면 운영 체제 설치 프로그램으로 부팅됩니다.
3.2 드라이버 설치
After installing your operating system, install the necessary drivers from the included Supporting DVD or download the latest versions from the ASUS support website. This includes chipset drivers, LAN drivers, audio drivers, and any other peripheral drivers.
3.3 AURA Sync RGB 조명
The motherboard supports AURA Sync RGB lighting. Connect compatible RGB strips to the 4-pin RGB header and use the ASUS AURA Sync software to customize lighting effects and synchronize them across other AURA Sync enabled components.
4. 유지관리
4.1 BIOS 업데이트
정기적으로 ASUS 지원을 확인하세요 website for BIOS updates. BIOS updates can improve system stability, add support for new hardware, and fix known issues. Follow the instructions provided by ASUS for safe BIOS flashing.
4.2 청소
To ensure optimal performance and longevity, periodically clean dust from the motherboard and other internal components using compressed air. Ensure the system is powered off and unplugged before cleaning.
4.3 구성 요소 검사
Periodically inspect all cable connections (power, SATA, fan headers) to ensure they are secure. Verify that cooling fans are operating correctly and are free from obstructions.
5. 문제 해결
이 섹션에서는 일반적으로 발생할 수 있는 문제에 대한 해결책을 제공합니다.
| 문제 | 가능한 원인 | 해결책 |
|---|---|---|
| 시스템 전원이 켜지지 않습니다. | 전원 연결 불량, 전원 공급 장치 불량, 전면 패널 헤더 연결 오류. | 24핀 ATX 전원 케이블과 8핀 CPU 전원 케이블을 확인하십시오. 전면 패널 전원 스위치의 연결 상태를 확인하십시오. 전원 공급 장치를 테스트하십시오. |
| 모니터에 표시되지 않습니다. | Graphics card not seated properly, monitor cable disconnected, incorrect video output selected. | Reseat graphics card. Ensure monitor cable is securely connected to both monitor and graphics card/motherboard. Select correct input on monitor. |
| System reboots or freezes randomly. | Overheating, unstable RAM, outdated BIOS, driver issues. | Check CPU/GPU temperatures. Test RAM modules. Update BIOS and drivers. |
| USB 장치가 인식되지 않습니다. | Outdated USB drivers, faulty USB port, incompatible device. | Install latest USB drivers. Try different USB ports (especially USB 2.0 ports if 3.0/3.1 are problematic). Test device on another system. |
For more advanced troubleshooting, consult the comprehensive user manual PDF available on the ASUS support web사이트 또는 참조 고객 재views for common community-reported issues and solutions.
6. 기술 사양
Below are the key technical specifications for the ASUS TUF B350M-PLUS GAMING Motherboard.
| 특징 | 세부 사항 |
|---|---|
| 상표 | 아수스 |
| 시리즈 | TUF B350M-PLUS GAMING |
| 모델 번호 | TUF B350M-PLUS GAMING |
| CPU 소켓 | 소켓 AM4 |
| 칩셋 유형 | AMD B350 |
| RAM 메모리 기술 | DDR4 |
| 메모리 속도 | 2400 MHz (up to 3200+ MHz via OC) |
| 최대 메모리 용량 | 64GB (XNUMX기가바이트) |
| 제품 치수 | 9.6 x 1 x 9.6 inches (MicroATX) |
| 저장 인터페이스 | NVMe M.2, SATA 6Gb/s |
| USB 포트 | USB 3.1 Gen2, USB 3.1 Gen1, USB 2.0 |
| 비디오 출력 | HDMI, DVI, VGA |
| 랜 | 기가비트 랜 |
| 오디오 | 고화질 오디오 |
7. 보증 정보
The ASUS TUF B350M-PLUS GAMING Motherboard comes with an Ultimate Protection 5-Year Warranty, ensuring guaranteed reliability. This warranty covers defects in materials and workmanship under normal use conditions.
For detailed warranty terms and conditions, including coverage specifics and limitations, please refer to the official ASUS warranty policy document or contact ASUS customer support.
8. 지원 및 리소스
For further assistance, updated drivers, or additional documentation, please utilize the following resources:
- ASUS 공식 지원 Web대지: Visit the ASUS official website for the latest drivers, BIOS updates, and utility software.
- 사용자 매뉴얼(PDF): A comprehensive PDF version of this manual is available for download: 사용자 설명서 PDF 다운로드.
- ASUS Customer Service: Contact ASUS customer support for technical assistance or warranty claims. Refer to the ASUS web해당 지역의 연락처 정보는 사이트에서 확인하세요.
- 온라인 커뮤니티 포럼: Engage with other users and find solutions on various online forums dedicated to PC hardware and ASUS products.