1. 서론
This manual provides instructions for the installation, operation, and maintenance of your FreedConn TCOM VB Bluetooth Motorcycle Intercom. Please read this manual thoroughly before use to ensure proper functionality and safety.
2. 주요 특징
- Bluetooth V5.0 for stable connectivity.
- Intercom communication for 2-3 riders with an 800m range.
- Universal pairing with most Bluetooth headsets.
- Hands-free calling for mobile phones.
- Stereo music playback and music sharing with a passenger.
- 내장 FM 라디오.
- CVC 노이즈 감소 기술로 깨끗한 음질을 제공합니다.
- IP65 방수 등급.
- LCD screen for easy information display.
- Long battery life: up to 10 hours talk time, 7 hours intercom, 300 hours standby.

이미지: 이상view of FreedConn TCOM VB Intercom key features.
3. 패키지 내용
패키지에 모든 품목이 들어 있는지 확인하세요.
- TCOM-VB Main Unit (x2 for this package)
- Boom Microphone / Button Microphone (x2 sets)
- Speaker Pads (x12)
- Clip Bracket (x2)
- 3M Adhesive Mount (x2)
- 앨런 키 (x2)
- USB 데이터 케이블(x2)
- 사용 설명서(x1)

Image: Contents of the FreedConn TCOM VB package.
4. 설정 및 설치
4.1 인터콤 장치 장착
The TCOM VB unit can be mounted using either the clip bracket or the adhesive mount.
- 위치를 선택하십시오 : Select a suitable flat surface on the left side of your helmet.
- 클립 브래킷 설치:
- Loosen the screws on the clip bracket.
- Slide the bracket between the helmet shell and the inner padding.
- Tighten the screws to secure the bracket.
- 접착식 마운트 설치:
- Clean the helmet surface thoroughly.
- 3M 접착식 마운트에서 보호 필름을 벗겨내세요.
- 마운트를 헬멧 표면에 최소 30초 동안 단단히 눌러주세요. 접착제가 완전히 경화될 때까지 24시간 동안 기다린 후 사용하십시오.
- 메인 유닛 부착: Slide the TCOM VB main unit onto the installed bracket until it clicks into place.
4.2 스피커 및 마이크 설치
헬멧 내부에 스피커와 마이크를 설치하세요.
- 스피커 배치: Attach the speakers to the inside of the helmet, aligning them with your ears. Use the provided speaker pads for comfort and optimal sound.
- 마이크 선택: Choose between the boom microphone (for open-face helmets) or the button microphone (for full-face helmets).
- 마이크 배치: 선명한 음성 전달을 위해 마이크를 입 가까이에 위치시키십시오.
- 케이블 연결: Plug the speaker and microphone cables into the corresponding ports on the TCOM VB main unit.

Image: Hard and soft cable microphone options for helmet installation.
Image: Step-by-step installation guide for the intercom unit.
5. 사용 설명서
5.1 전원 켜기/끄기
- 전원 켜기: Press and hold the Power button for approximately 3 seconds until the blue indicator light flashes.
- 전원 끄기 : Press and hold the Power button for approximately 3 seconds until the red indicator light flashes and the unit powers down.
5.2 블루투스 페어링 (휴대폰/GPS)
To connect your TCOM VB to a mobile phone or GPS device:
- Ensure the TCOM VB unit is powered off.
- Press and hold the Power button for approximately 5-7 seconds until the red and blue indicator lights flash alternately. This indicates pairing mode.
- On your phone or GPS, enable Bluetooth and search for new devices.
- 사용 가능한 장치 목록에서 "FreedConn TCOM VB"를 선택하십시오.
- 메시지가 나타나면 PIN "0000"을 입력하세요.
- 페어링이 완료되면 파란색 표시등이 천천히 깜빡입니다.

Image: Bluetooth pairing with smartphone and GPS.
5.3 인터콤 페어링 및 통신
The TCOM VB supports intercom communication for up to 3 riders, with 2 riders communicating simultaneously.
- Pairing Two Units (A & B):
- Ensure both units A and B are powered off.
- Press and hold the Power button on both units A and B simultaneously for 5-7 seconds until they enter pairing mode (red and blue lights flash alternately).
- Press the Power button on either unit A or B once. The units will search and pair with each other. Once paired, the blue light will flash slowly on both.
- Pairing Three Units (A, B, & C):
- First, pair units A and B as described above. Turn off both A and B after successful pairing.
- Next, pair units B and C. Turn off both B and C after successful pairing.
- To initiate a 3-way intercom: Power on all three units. Press the Power button on unit C once to connect to B. Then, press the Power button on unit B once to connect to A. All three units should now be connected.
- 인터콤 통화 시작: After pairing, a short press of the Power button will initiate or end an intercom call.
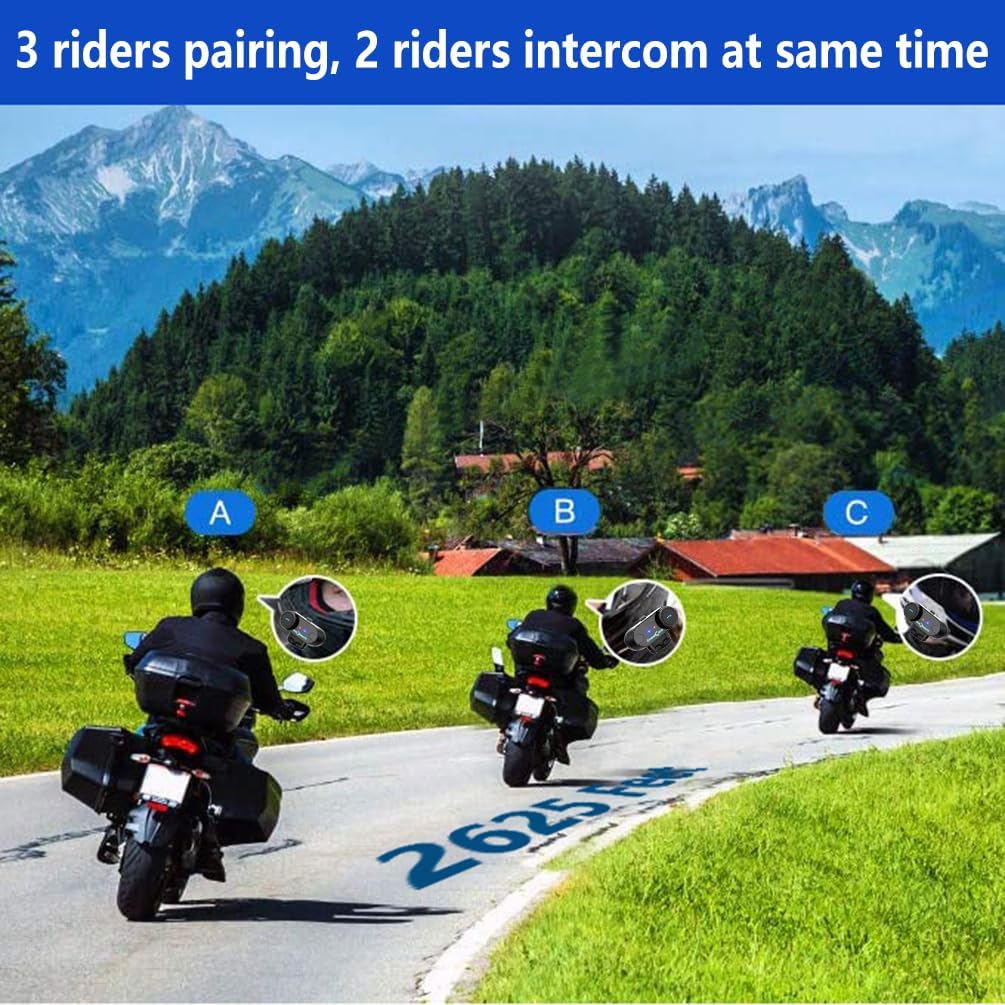
Image: 3 riders pairing, 2 riders intercom at the same time.

Image: Universal pairing feature.
Video: This video demonstrates the pairing process for three T-COMSC intercom units. The pairing steps are generally similar for TCOM VB models. First, pair two devices (A and B), then turn them off. Next, pair device B with device C. Finally, power on all three and initiate connections from C to B, then B to A for a three-way intercom.
5.4 전화 기능
- 전화 받기: 전화 버튼을 짧게 누르세요.
- 통화 종료: 전화 버튼을 짧게 누르세요.
- 전화 거부: 전화 버튼을 2초간 길게 누르세요.
- 마지막 번호 재다이얼: 전화버튼을 두번 누르세요.
- 음성 비서(시리/S-보이스): Short press the Voice Assistant button (if available) or a specific button combination as per your device's manual.
5.5 음악 재생
- 재생/일시 중지: 재생/일시 정지 버튼을 짧게 누릅니다.
- 다음 트랙: Short press the "Next" button or rotate the multi-function knob clockwise.
- 이전 트랙 : Short press the "Previous" button or rotate the multi-function knob counter-clockwise.
- 음악 공유: While playing music, activate the music sharing function (refer to specific button combination in the full manual) to share audio with a paired intercom unit.
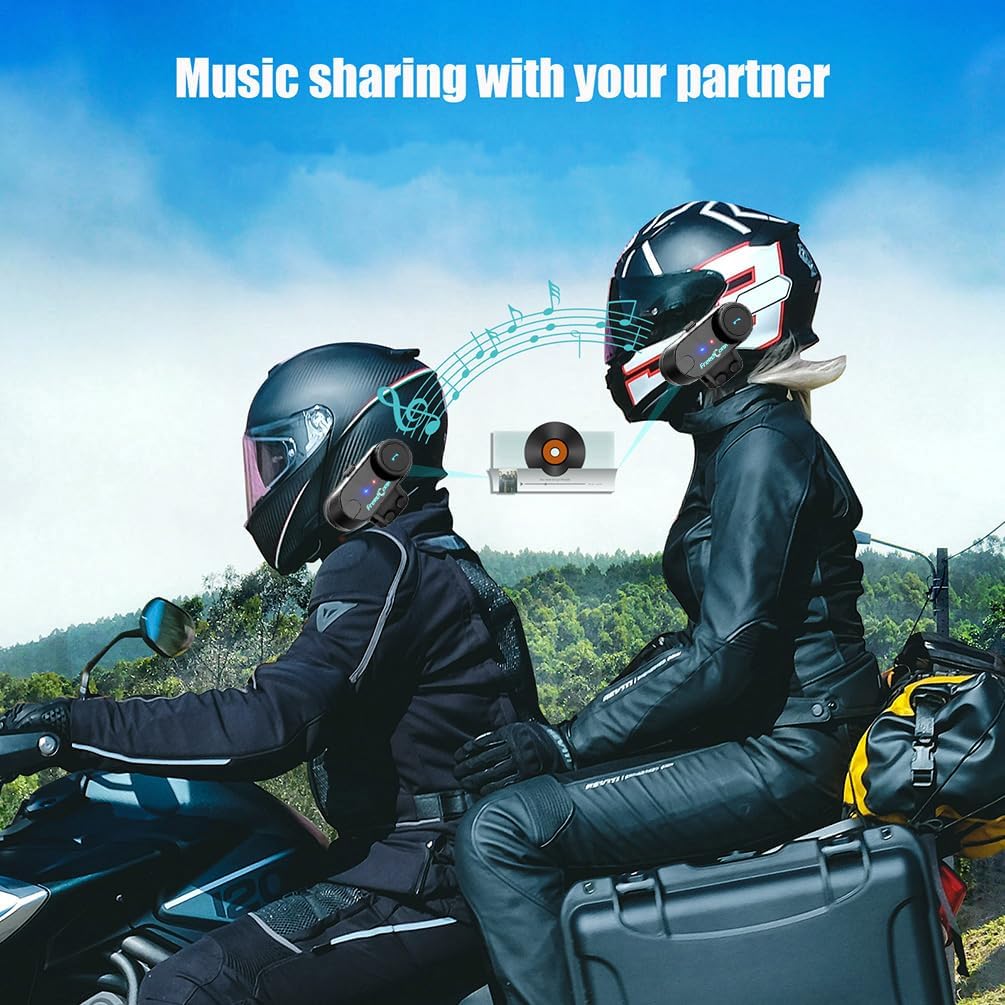
Image: Music sharing with a partner.
5.6 FM 라디오
- FM 라디오 켜기/끄기: FM 버튼을 2초 동안 길게 누르세요.
- 스캔 스테이션: Short press the "Next" or "Previous" button to scan for available FM stations.

Image: Built-in FM Radio feature.
5.7 볼륨 조절
Adjust the volume using the multi-function knob or dedicated volume buttons (if present).
- 볼륨 증가: Rotate the multi-function knob clockwise or press the Volume Up button.
- 볼륨 감소: Rotate the multi-function knob counter-clockwise or press the Volume Down button.
6. 유지관리
- 청소: 부드러운 천으로 기기를 닦으십시오. damp 옷감. 강한 화학 물질이나 연마성 세제를 사용하지 마십시오.
- 방수 기능: The unit is IP65 waterproof, meaning it is protected against low-pressure water jets from any direction. It is not designed for submersion. Ensure the USB port cover is securely closed when not charging.
- 충전 중: Charge the unit using the provided USB cable. A full charge takes approximately 2.5 hours. The indicator light will change to indicate charging status (e.g., red during charging, blue when fully charged).
- 저장: 장기간 사용하지 않을 때에는 시원하고 건조한 곳에 보관하세요.

Image: Battery life and waterproof features.
7. 문제 해결
| 문제 | 가능한 원인 | 해결책 |
|---|---|---|
| 전원이 없습니다 | 배터리 부족 | 장치를 2.5시간 동안 충전하십시오. |
| 휴대폰/GPS와 페어링할 수 없습니다 | Unit not in pairing mode; Bluetooth disabled on device | Ensure unit is in pairing mode (red/blue flashing). Enable Bluetooth on your device. |
| 인터콤 연결이 안 됨 | Units not paired correctly; out of range | Repeat intercom pairing steps. Ensure units are within 800m range. |
| Low audio volume or no sound from speakers | Speakers not positioned correctly; volume too low; cable loose | Adjust speaker position closer to ears. Increase volume. Ensure speaker cable is fully inserted. |
| Poor microphone quality / background noise | Microphone not positioned correctly; wind noise | Position microphone closer to mouth. Ensure CVC noise reduction is active. Consider using a different microphone type if applicable. |
메모: If your two speakers or one side speaker are not working, ensure the headset cable is completely inserted into the interface and that the speaker is inserted into the correct port. If the volume is low, adjust the speaker placement as close to your ears as possible.
8. 사양
| 모델: | T-COMVB-800M |
| 블루투스 버전: | 5.0 |
| 인터콤 범위: | 최대 800미터 (두 라이더 간 거리) |
| 최대 라이더: | 3 (2 simultaneous communication) |
| 배터리 용량: | 400mAh |
| 충전 시간: | 약 2.5시간 |
| 통화 시간: | 최대 10시간 |
| 인터콤 시간: | 최대 7시간 |
| 대기 시간: | 최대 300시간 |
| 방수 기능: | IP65 |
| 스피커 직경: | 40mm (XNUMXmm) |
| 임피던스: | 32옴 |
| 주파수 범위: | 20Hz - 20,000Hz |
| 소음 제어: | 능동형 소음 제거(CVC) |
| 호환 장치: | Mobile phones, MP3 players, GPS devices |
9. 보증 및 지원
For warranty information and technical support, please refer to the official FreedConn web사이트를 방문하거나 가까운 대리점에 문의하세요. 보증 청구를 위해 구매 증빙 자료로 구매 영수증을 보관하세요.
For common issues, please consult the troubleshooting section of this manual or the online FAQ resources provided by FreedConn.