1. 서론
This manual provides detailed instructions for the installation, operation, and maintenance of your ASRock AB350M-HDV MicroATX Motherboard. The ASRock AB350M-HDV is designed to support AMD Socket AM4 A-Series APUs (Bristol Ridge) and Ryzen Series CPUs (Summit Ridge), featuring a Digi Power design and 7 Power Phase design for stable performance. It supports DDR4 memory and offers various connectivity options including SATA3, USB 3.0, and an Ultra M.2 slot.
2. 제품 오버view
The ASRock AB350M-HDV motherboard is a MicroATX form factor board, ideal for compact PC builds. It features essential components for a modern computing system.

그림 2.1: 각도 view of the ASRock AB350M-HDV Motherboard, showcasing its compact MicroATX design and various components.
주요 특징:
- Supports AMD Socket AM4 A-Series APUs (Bristol Ridge) and Ryzen Series CPUs (Summit Ridge).
- DDR4 memory support up to 3200+ (OC) for Ryzen CPUs and 2400 for A-series APUs.
- 1 PCIe 3.0 x16 slot and 1 PCIe 2.0 x1 slot for expansion cards.
- 4 SATA3 ports and 1 Ultra M.2 (PCIe Gen3 x4 & SATA3) slot for storage.
- 6 USB 3.0 ports (2 front, 4 rear) and 2 USB 2.0 ports for peripheral connectivity.
- Integrated Gigabit Ethernet for network connectivity.
- Video outputs: VGA, DVI, HDMI.

그림 2.2: 상향식 view of the ASRock AB350M-HDV Motherboard, highlighting the CPU socket, RAM slots, M.2 slot, and PCIe slots.
3. 설정 및 설치
Follow these steps carefully to install your ASRock AB350M-HDV motherboard and its components.
3.1 CPU 설치
- 마더보드에서 AM4 CPU 소켓을 찾으세요.
- 소켓 측면에 있는 하중 레버를 들어 올리세요.
- CPU의 삼각형 표시를 소켓의 해당 표시와 일치시키세요. CPU를 소켓에 조심스럽게 넣으세요. 무리하게 힘을 주지 마세요.
- 로드 레버를 내려 CPU를 제자리에 고정합니다.
- 제조업체의 지침에 따라 CPU 쿨러를 설치하세요.
3.2 RAM(메모리) 설치
- Locate the DDR4 DIMM slots. This motherboard has 4 slots.
- DIMM 슬롯의 양쪽 끝에 있는 클립을 엽니다.
- RAM 모듈의 홈을 DIMM 슬롯의 키에 맞춥니다.
- RAM 모듈을 슬롯에 클립이 딸깍 소리를 내며 고정될 때까지 단단히 삽입하십시오. 두 클립이 모두 닫혔는지 확인하십시오.
3.3 저장 장치 설치(SATA 및 M.2)
SATA 드라이브:
- SATA 데이터 케이블의 한쪽 끝을 마더보드의 SATA3 포트에 연결하십시오.
- SATA 데이터 케이블의 다른 쪽 끝을 하드 드라이브 또는 SSD에 연결하십시오.
- 전원 공급 장치(PSU)에서 저장 장치로 SATA 전원 케이블을 연결합니다.
M.2 SSD:
- 마더보드에서 Ultra M.2 슬롯을 찾으세요.
- Remove the M.2 screw and standoff from the slot.
- M.2 SSD를 30도 각도로 슬롯에 삽입합니다.
- Push the M.2 SSD down and secure it with the screw and standoff.
3.4 전원 연결
- 파워서플라이의 24핀 ATX 전원 커넥터를 마더보드의 24핀 전원 소켓에 연결하십시오.
- Connect the 8-pin (or 4-pin) ATX 12V power connector from your PSU to the corresponding socket near the CPU.
3.5 전면 패널 연결
Connect the cables from your PC case (Power Button, Reset Button, HDD LED, Power LED, USB, Audio) to the corresponding headers on the motherboard. Refer to the motherboard layout diagram in your physical manual for exact header locations.
3.6 그래픽 카드 설치
- PCIe 3.0 x16 슬롯을 찾으십시오.
- PC 케이스에서 해당 확장 슬롯 덮개를 제거하세요.
- Align the graphics card with the PCIe slot and press it down firmly until it clicks into place.
- 그래픽 카드를 나사로 케이스에 고정합니다.
- Connect any required PCIe power cables from your PSU to the graphics card.
4. 사용 설명서
4.1 최초 부팅 및 BIOS/UEFI 설정
- 모든 구성 요소를 조립한 후 모니터, 키보드, 마우스를 연결하세요.
- 시스템의 전원을 켭니다.
- 시작 중에 반복해서 누르세요 델 or F2 BIOS/UEFI 설정 유틸리티에 들어가려면 키를 누르세요.
- In the BIOS, you can configure boot order, system time, and other advanced settings. Save changes and exit to boot into your operating system installation media.
4.2 드라이버 설치
After installing your operating system, install the necessary drivers for the motherboard components. These typically include chipset drivers, audio drivers, LAN drivers, and any specific utility drivers. Drivers can be found on the ASRock official web귀하의 특정 마더보드 모델에 대한 사이트입니다.
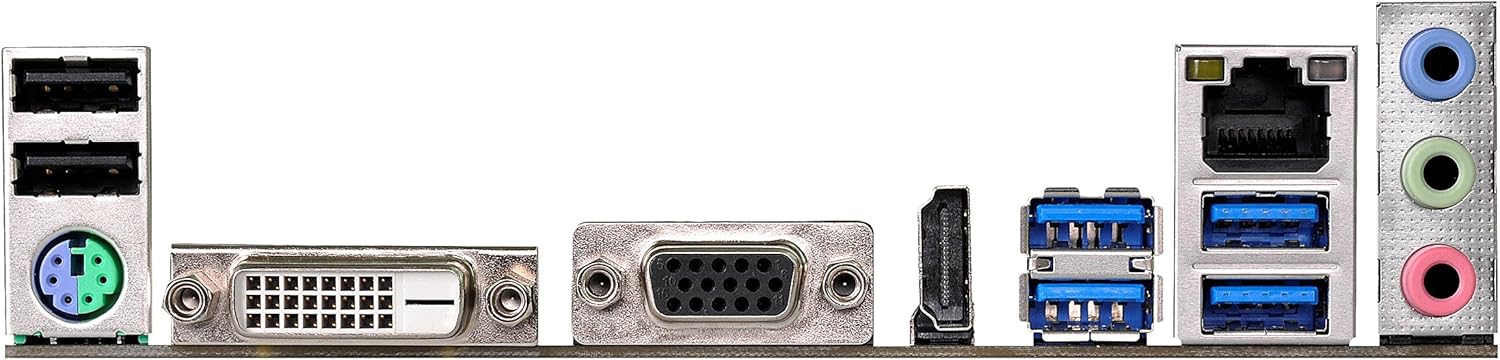
Figure 4.1: Rear I/O panel of the ASRock AB350M-HDV Motherboard, showing USB ports, video outputs (VGA, DVI, HDMI), LAN port, and audio jacks.
5. 유지관리
적절한 유지관리는 마더보드의 수명과 최적의 성능을 보장합니다.
5.1 청소
- 압축 공기를 사용하여 마더보드와 구성 요소의 먼지를 정기적으로 청소하세요.
- 청소하기 전에 시스템의 전원이 꺼져 있고 플러그가 뽑혀 있는지 확인하세요.
- 액체 세척제를 부품에 직접 사용하지 마십시오.
5.2 BIOS/UEFI 업데이트
ASRock을 주기적으로 확인하세요 website for BIOS/UEFI updates. Updates can improve compatibility, stability, and performance. Follow the instructions provided by ASRock carefully when performing a BIOS update to avoid system damage.
6. 문제 해결
이 섹션에서는 일반적으로 발생할 수 있는 문제에 대한 해결책을 제공합니다.
6.1 전원 없음/POST 없음(Power-On Self-Test)
- 전원 연결 확인: Ensure the 24-pin and 8-pin (or 4-pin) CPU power connectors are securely seated.
- PSU 확인: Test your power supply unit (PSU) to ensure it is functional and providing adequate power.
- 구성 요소 재장착: Remove and re-install the CPU, RAM, and graphics card to ensure they are properly seated.
- CMOS 지우기: Refer to your physical manual for instructions on how to clear the CMOS (Complementary Metal-Oxide-Semiconductor) settings, which can resolve boot issues.
6.2 디스플레이 출력 없음
- 모니터 연결: Ensure your monitor is correctly connected to the graphics card or motherboard (if using an APU with integrated graphics).
- 그래픽 카드: If using a dedicated graphics card, ensure it is properly installed and has sufficient power. Test with another graphics card if possible.
- APU Compatibility: If using an AMD A-Series APU, ensure your monitor is connected to the motherboard's video outputs (VGA, DVI, HDMI). Ryzen CPUs without integrated graphics require a dedicated graphics card.
6.3 운영체제가 부팅되지 않음
- 부팅 순서: Check the BIOS/UEFI settings to ensure the correct boot device (e.g., SSD/HDD with OS) is prioritized.
- 저장 장치: Verify that your storage device is detected in the BIOS.
- 운영체제 설치: If the OS is newly installed, ensure the installation process completed successfully.
7. 사양
| 상표 | 애즈락 |
| 모델명 | AB350M-HDV |
| CPU 소켓 | 소켓 AM4 |
| 칩셋 유형 | AMD 프로몬토리 B350 |
| 호환 프로세서 | AMD A-Series APUs (Bristol Ridge), Ryzen Series CPUs (Summit Ridge) |
| RAM 메모리 기술 | DDR4 |
| 메모리 클럭 속도 | 2133 MHz (Base), up to 3200+ (OC) for Ryzen CPU |
| 사용 가능한 메모리 슬롯 | 4 |
| 그래픽 카드 인터페이스 | PCI Express (1x PCIe 3.0 x16, 1x PCIe 2.0 x1) |
| 총 SATA 포트 수 | 4 (SATA3) |
| M.2 슬롯 | 1 (Ultra M.2, PCIe Gen3 x4 & SATA3) |
| 총 USB 포트 | 8개 (USB 3.0 6개, USB 2.0 2개) |
| 비디오 출력 | VGA, DVI, HDMI |
| 주 전원 커넥터 유형 | 24핀 ATX |
| 폼 팩터 | 마이크로ATX |
| 품목 무게 | 1.3 파운드 |
8. 보증 정보
The ASRock AB350M-HDV Motherboard comes with a 1년 보증. For specific terms and conditions, please refer to the warranty card included with your product or visit the official ASRock web대지.
9. 지원
추가 지원, 기술 지원 또는 드라이버 다운로드를 원하시면 공식 ASRock을 방문하세요. web대지:
You can also find contact information for customer service and support resources on their web대지.