소개
The ASUS ROG Maximus IX Hero is an ATX motherboard designed for 7th generation Intel Core processors. It features an LGA1151 socket, DDR4 memory support, and various connectivity options including DisplayPort, HDMI, M.2 slots, and USB 3.1. This motherboard provides a robust foundation for building a high-performance personal computer.

이미지: 위에서 아래로 view of the ASUS ROG Maximus IX Hero motherboard, showcasing its layout, CPU socket, RAM slots, and various expansion slots.
상자 안에 무엇이 들어있나요?
아래 나열된 모든 구성품이 패키지에 포함되어 있는지 확인하세요.
- 사용자 가이드
- 지원 DVD
- I / O 실드
- 2-in-1 SATA 6Gb/s 케이블 (2)
- SLI™ HB Bridge (2-way-M)
- Q-커넥터
- ROG 코스터
- 3D printing mount
- 10-in-1 ROG cable label
- CPU 설치 도구
- 2-in-1 M.2 Screw set
- ROG 스티커
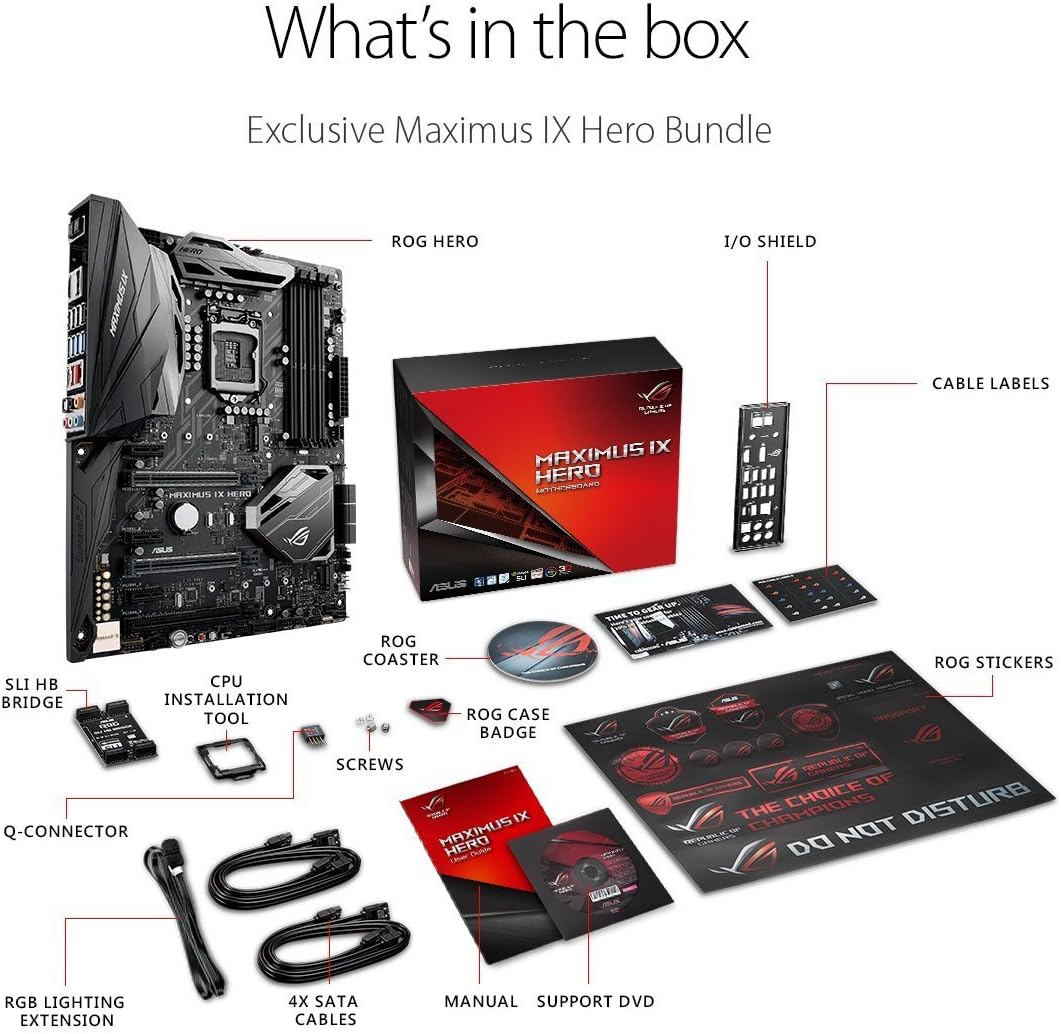
Image: A visual representation of the ASUS ROG Maximus IX Hero motherboard and its included accessories, such as cables, manuals, and installation tools.
주요 특징
- Supports 7th generation Intel Core processors, enhancing connectivity and speed with Dual M.2 slots, front panel USB 3.1, and Intel Optane Memory compatibility.
- Includes 5-Way Optimization with Auto-Tuning and FanXpert 4 for automated overclocking profile adjustments and dynamic system cooling.
- Features ASUS AURA Sync RGB lighting and a 3D-printing friendly mount for customization.
- Equipped with two Patent-pending Safe Slots, which integrate metal framing for enhanced support and rigidity of large graphics processing units (GPUs).
- Provides industry-leading 8-channel HD audio through the ROG exclusive SupremeFX S1220, powered by Japanese capacitors.
설정 및 설치
This section provides general guidelines for installing your ASUS ROG Maximus IX Hero motherboard. Refer to the detailed user guide for specific instructions and safety precautions.
1. 초기 검사
Before installation, carefully inspect the motherboard for any physical damage. Ensure the CPU socket pins are not bent.
2. CPU 설치 (LGA1151)
- CPU 소켓 레버를 엽니다.
- Align the notches on your 7th generation Intel Core processor with the socket.
- CPU를 억지로 끼우지 말고 조심스럽게 소켓에 넣으세요.
- 소켓 레버를 닫아 CPU를 고정합니다.
3. RAM 설치 (DDR4)
- DDR4 DIMM 슬롯의 클립을 엽니다.
- DDR4 메모리 모듈의 노치를 DIMM 슬롯의 키에 맞춥니다.
- 클립이 제자리에 고정될 때까지 메모리 모듈의 양쪽 끝을 단단히 누릅니다.
- The motherboard supports up to 64GB of DDR4 memory across four slots.
4. M.2 SSD 설치
The motherboard features dual M.2 slots for high-speed storage. Refer to the user guide for specific M.2 slot locations and screw set usage.
- 사용 가능한 M.2 슬롯을 찾으십시오.
- M.2 SSD를 슬롯에 비스듬히 삽입합니다.
- SSD를 살살 눌러 넣은 후 제공된 M.2 나사로 고정하십시오.
5. PCIe Card Installation (Safe Slots)
The motherboard includes reinforced Safe Slots for graphics cards and other PCIe devices.
- Align your PCIe card with an available PCIe slot.
- 카드가 완전히 제자리에 고정되고 고정 클립이 걸릴 때까지 꾹 눌러주세요.
6. Connecting Power and Front Panel Headers
Connect the 24-pin ATX power connector and the 8-pin CPU power connector from your power supply to the motherboard. Connect the front panel headers (power button, reset button, HDD LED, power LED, USB ports, audio) according to the motherboard manual's pinout diagram.
7. 후면 I/O 연결
Connect your peripherals to the rear I/O ports. This includes USB devices, display cables (HDMI, DisplayPort), Ethernet, and audio devices.

이미지: 클로즈업 view of the rear input/output panel of the ASUS ROG Maximus IX Hero motherboard, showing various ports including USB, HDMI, DisplayPort, Ethernet, and audio jacks.
8. RGB Lighting Setup
The motherboard features integrated AURA Sync RGB lighting. Additional RGB LED strips can be connected to the dedicated RGB LED headers for expanded lighting control.
9. Liquid Cooling Integration
For custom liquid cooling setups, the motherboard includes H2O sensor headers to monitor temperature and flow within your cooling loop.
제품 끝view 동영상
비디오: 오버view of the ASUS ROG Maximus IX Hero motherboard, highlighting its key features, connectivity options, and design elements. This video provides a visual guide to the board's components and capabilities.
작동 지침
1. 초기 부팅
After completing hardware installation, connect your display, keyboard, and mouse. Power on your system. The system should display the BIOS/UEFI interface or begin the operating system installation process.
2. BIOS/UEFI 구성
Press the designated key (usually DEL or F2) during boot-up to enter the BIOS/UEFI setup. Here you can configure boot order, system time, enable/disable features, and apply overclocking settings. The 5-Way Optimization feature can assist with automated tuning.
3. 드라이버 설치
Install all necessary drivers for the motherboard chipset, audio, LAN, and other integrated components. These can typically be found on the included Support DVD or downloaded from the ASUS official web대지.
4. 소프트웨어 유틸리티
Utilize ASUS software utilities such as AURA Sync for RGB lighting control and FanXpert 4 for fan speed management to optimize your system's performance and aesthetics.
유지
1. Keep Clean
Regularly clean dust from the motherboard and connected components using compressed air. Ensure the system is powered off and unplugged before cleaning.
2. BIOS/UEFI 업데이트
정기적으로 ASUS 지원을 확인하세요 webBIOS/UEFI 업데이트 사이트입니다. 업데이트를 통해 시스템 안정성, 호환성 및 성능을 향상시킬 수 있습니다. 시스템 손상을 방지하기 위해 업데이트 지침을 주의 깊게 따르십시오.
3. 드라이버 업데이트
Keep your system drivers updated to ensure optimal performance and compatibility with new hardware and software.
문제 해결
1. 전원 없음/부팅 안 됨
- 모든 전원 케이블(24핀 ATX, 8핀 CPU)이 안전하게 연결되어 있는지 확인하세요.
- 전원 공급 장치가 켜져 있는지 확인하십시오.
- 전면 패널 전원 버튼의 연결 상태를 확인하십시오.
- 최소 구성 요소(CPU, RAM 1개, 내장 그래픽이 없는 경우 GPU)로 부팅해 보세요.
2. 디스플레이 출력 없음
- Ensure the monitor is connected to the correct graphics output (either motherboard or dedicated GPU).
- 그래픽 카드와 메모리 모듈을 다시 장착하세요.
- 다른 디스플레이 케이블이나 모니터를 사용하여 테스트해 보세요.
3. 시스템 불안정/충돌
- CPU와 GPU 온도를 확인하세요.
- 모든 드라이버가 최신 상태인지 확인하세요.
- If overclocked, revert to default settings to test stability.
- 메모리 진단 도구를 실행하여 RAM 무결성을 확인하세요.
명세서
| 특징 | 세부 사항 |
|---|---|
| 상표 | 아수스 |
| 모델명 | ROG MAXIMUS IX HERO |
| CPU 소켓 | LGA 1151 |
| 호환 프로세서 | 7세대 인텔 코어 |
| 칩셋 유형 | 인텔 Z270 |
| RAM 메모리 기술 | DDR4 |
| 사용 가능한 메모리 슬롯 | 4 |
| Maximum RAM Size | 64GB (XNUMX기가바이트) |
| 그래픽 카드 인터페이스 | PCI 익스프레스 |
| 총 HDMI 포트 | 1 |
| 총 USB 포트 | 2 (USB 3.1 Type-A, USB 3.1 Type-C on rear I/O) |
| 시스템 버스 표준 지원 | SATA 3 |
| 품목 무게 | 2.9 파운드 |
보증 및 지원
이 제품에는 다음이 포함되어 있습니다. 3년 보증 from ASUS. For technical support, driver downloads, and further assistance, please visit the official ASUS support web웹사이트 또는 ASUS 스토어.