
1. 서론
The XTUGA EW240 UHF 4-Channel Wireless Microphone System is designed for professional audio applications, offering reliable performance and clear sound transmission. This system features a robust metal receiver and four bodypack transmitters, each capable of operating on independent channels without interference. It is suitable for various events requiring multiple wireless microphones.
2. 주요 특징
- 전문적인 디자인: Durable metal construction for the receiver.
- 4채널 작동: Four independent channels can operate simultaneously without interference.
- 개별 볼륨 컨트롤: Each channel on the receiver has its own volume control.
- Quiet Audio Circuitry: Designed for silent operation, reducing unwanted noise.
- Frequency Expansion Compression: Intrusive frequency expansion compression technique reduces noise and extends dynamic range.
- 넓은 주파수 응답: 50 Hz - 15 kHz with very low distortion.
- 다중 출력: One 1/4-inch mixed output and four individual 1/4-inch outputs.
- 작동 범위: 최대 65미터(약 213피트).
- 바디팩 송신기: Innovative design compatible with lavalier, headset, or instrument connectors.
3. 패키지 내용
The XTUGA EW240 system typically includes the following components:
- 1x XTUGA EW240 UHF 4-Channel Receiver
- 4x UHF Bodypack Transmitters
- 4x Headset Microphones
- 4x Lavalier Microphones
- 4x 수신기 안테나
- 수신기용 전원 어댑터 1개
- 1x 1/4-inch Audio Cable
- 사용 설명서 (본 문서)
- Batteries for Transmitters (2x AA per transmitter, not always included)
4. 설정 지침
4.1 수신기 배치 및 연결

이미지 1: 앞쪽 view of the XTUGA EW240 receiver. This image shows the front panel of the receiver unit, featuring four antennas, two digital display screens for channels 1-2 and 3-4, and individual volume controls for each channel.

이미지 2: 뒤쪽 view of the XTUGA EW240 receiver. This image displays the back panel of the receiver, highlighting the individual 1/4-inch audio outputs (OUT A, OUT B, OUT C, OUT D), a mixed 1/4-inch output, antenna connections (ANT A, ANT B, ANT C, ANT D), and the DC power input.
- 수신기를 배치하십시오: Place the receiver unit in a central location, away from large metal objects or other electronic devices that may cause interference. Ensure the antennas are fully extended and positioned vertically for optimal signal reception.
- 전원 연결: Connect the provided AC power adapter to the DC 16V input on the rear of the receiver. Plug the adapter into a suitable power outlet.
- 오디오 출력 연결:
- For a mixed output of all four channels, connect a 1/4-inch audio cable from the "MIXED" output on the receiver to the input of your mixer or amp리퍼.
- For individual channel control, connect 1/4-inch audio cables from "OUT A", "OUT B", "OUT C", and "OUT D" to separate inputs on your mixer or amp리퍼.
4.2 송신기 준비
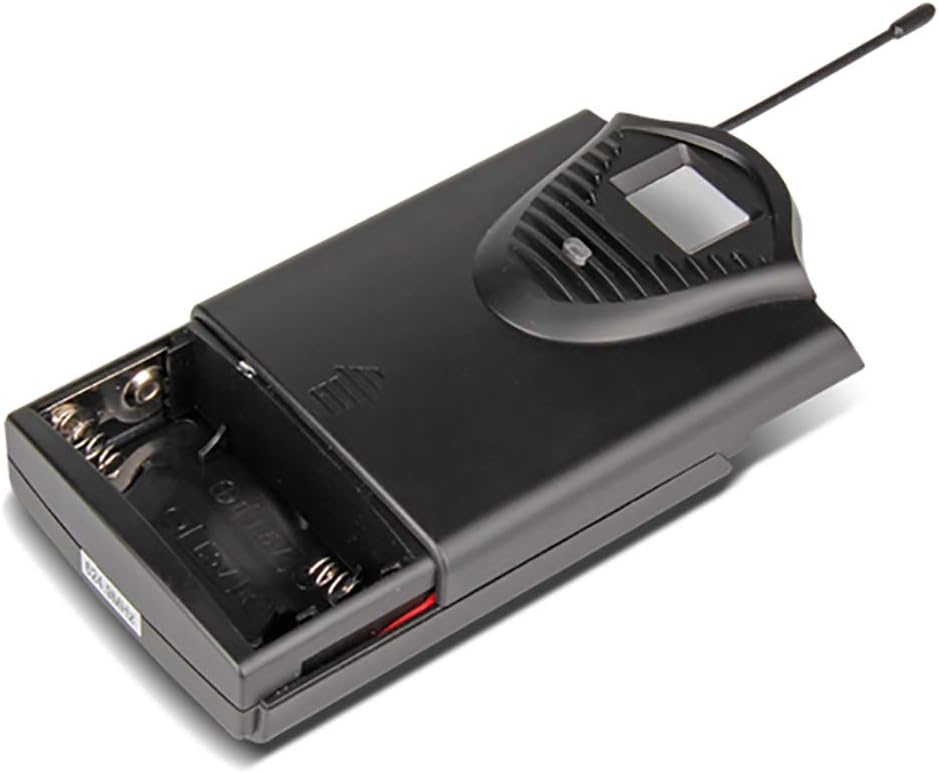
이미지 3: Bodypack transmitter with battery compartment open. This image illustrates the battery compartment of the bodypack transmitter, designed to hold two 1.5V AA batteries.

이미지 4: Two bodypack transmitters with connected microphones. This image shows two bodypack transmitters, one connected to a headset microphone and the other to a lavalier microphone, demonstrating the versatility of the system.
- 배터리 설치: Open the battery compartment of each bodypack transmitter. Insert two 1.5V AA batteries, ensuring correct polarity. Close the compartment securely.
- 마이크 연결: Plug the 3.5mm connector of either a headset microphone or a lavalier microphone into the input jack on the top of the bodypack transmitter. Ensure the connection is firm.
- 보안 전송기: Attach the bodypack transmitter to clothing or a belt using the integrated clip. Position the microphone appropriately for the user (e.g., lavalier clipped to clothing, headset worn on head).
5. 사용 설명서
- 수신기 전원 켜기: Press the power button on the front panel of the receiver. The display screens should illuminate, showing the channel frequencies.
- 송신기 전원 켜기: Slide the power switch on each bodypack transmitter to the "ON" position. The transmitter's display should light up, indicating its operating channel and battery status.
- 주파수 동기화: The EW240 system is designed for automatic frequency synchronization. Ensure the transmitter and receiver are on the same channel frequency. If channels are not synchronized, refer to the troubleshooting section or consult the full product manual for specific pairing instructions (not detailed in provided data).
- 볼륨 조절: Slowly increase the master volume on your mixer/amplifier and then adjust the individual channel volume controls on the receiver to achieve the desired audio level. Speak into the microphone to test the sound.
- 모니터 성능: Observe the signal indicators on the receiver to ensure a strong and stable connection.
- 전원 끄기 : After use, first turn off all bodypack transmitters, then power off the receiver.
6. 유지관리
- 배터리 교체: Replace transmitter batteries when the low battery indicator appears or when audio quality degrades. Always use fresh 1.5V AA batteries.
- 청소: Clean the receiver and transmitters with a soft, dry cloth. Do not use liquid cleaners or solvents.
- 저장: When not in use for extended periods, remove batteries from transmitters and store the system in a cool, dry place, away from direct sunlight and extreme temperatures.
- 안테나 관리: Handle receiver antennas carefully to prevent bending or damage.
7. 문제 해결
| 문제 | 가능한 원인 | 해결책 |
|---|---|---|
| 마이크에서 소리가 나지 않습니다. |
|
|
| Static, interference, or intermittent audio. |
|
|
| Poor sound quality (e.g., muffled, distorted). |
|
|
8. 사양
8.1 General System
- 채널 수: 4
- 안정: ± 0.006%
- Normal Deviation: ± 22kHz
- S/N 비율: <120dB (XNUMXdB)
- THD : <0.6%
- 주파수 응답: 50Hz - 15kHz
- 작동 범위: 65미터(약 213피트)
8.2 수신기
- 감광도: > 80dB
- 오디오 출력: Balanced and Unbalanced (1/4-inch mixed, 4x 1/4-inch individual)
- 전력 요구 사항: AC 16 V, 400 mA
- 치수: 440 x 210 x 40mm(약 17.3 x 8.3 x 1.6인치)
- 무게: 약 1.3kg(2.87파운드)
8.3 Wireless Microphone (Bodypack Transmitter)
- 카트리지 유형 : Dynamic (for included microphones)
- RF 출력: <10mW (XNUMX밀리와트)
- Normal Deviation: ± 22kHz
- 최대 편차: ± 80kHz
- 배터리: 2x 1.5V AA 배터리
- 배터리 수명: > 8시간
9. 보증 및 지원
The XTUGA EW240 UHF Wireless Microphone System comes with a 2년 품질 보증. For technical support, warranty claims, or further assistance, please contact XTUGA customer service through their official channels or the retailer from whom the product was purchased.
자세한 내용은 다음을 방문하세요. XTUGA Brand Store.