
1. 서론
The Power Probe III Clamshell is a versatile electrical circuit tester designed for diagnosing automotive electrical systems. This tool provides capabilities for testing voltage, current, resistance, and continuity, making it an essential device for automotive technicians and enthusiasts. It operates on 12-24 VDC systems.
2. 안전 정보
Always observe the following safety precautions when using the Power Probe III:
- 적절한 보안경을 착용하십시오.
- Do not use the tool if the cable or insulation is damaged.
- Ensure proper ventilation when working with vehicle batteries.
- 움직이는 엔진 부품과의 접촉을 피하십시오.
- Do not apply power to circuits that could be damaged by direct battery voltage. Always verify the circuit's voltage requirements before applying power.
- Keep the tool away from heat, oil, and sharp objects.
3. 패키지 내용
Verify that all items are present in your Power Probe III Clamshell package:
- Power Probe III handheld tool
- 20피트 연장 코드
- Battery Hookup Clips
- 프로브 팁
- 사용 설명서(본 문서)
- 상표

The Power Probe III Clamshell tool and its accessories, including the 20-foot cord and battery hookup clips, displayed in its retail packaging.
4. 제품 특징
The Power Probe III is equipped with the following key features:
- 디지털 전압계: 정확한 볼륨을 제공합니다tage 수치.
- 최소/최대 기능: Captures minimum and maximum voltage 수치.
- Audible Circuit Monitoring: Alerts the user to circuit status.
- 4mm Standard Banana Jack with Auxiliary Ground: For comprehensive component testing.
- 12-24 VDC System Compatibility: Works with a wide range of automotive electrical systems.
- Power-up Components: Safely apply positive or negative battery voltage to components.
- Test for Bad Grounds: Quickly identify faulty ground connections.
- 연속성 테스트: 회로의 무결성을 확인하십시오.
- Indicate Pos/Neg Voltage: Clearly shows polarity.
- Test Relays: Facilitates relay testing.

The Power Probe III Clamshell diagnostic tool, shown in green, featuring a digital display, power switch, and probe tip.
5. 설정
To begin using your Power Probe III, follow these steps to connect it to a vehicle's battery:
- 차량의 시동이 꺼져 있는지 확인하십시오.
- Connect the red battery hookup clip to the positive (+) terminal of the vehicle's battery.
- Connect the black battery hookup clip to the negative (-) terminal of the vehicle's battery.
- The Power Probe III is now powered and ready for use. The digital display will illuminate, showing the battery voltage.
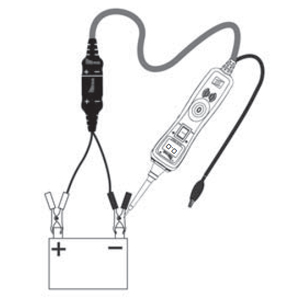
Diagram illustrating the correct connection of the Power Probe III to a vehicle's 12V battery using the provided battery hookup clips for power.
6. 사용 설명서
6.1. Digital Voltmeter
Once connected to the battery, the Power Probe III automatically displays the voltage at the probe tip. Touch the probe tip to any circuit or component to read its voltage 디지털 디스플레이에 표시됩니다.
6.2. 최소/최대 볼륨tage 캡처
To activate the Min/Max function, press the 'MODE' button until 'MIN/MAX' appears on the display. The tool will then record the lowest and highest voltage readings encountered. Press 'MODE' again to exit this function.
6.3. Audible Circuit Monitoring
The Power Probe III provides an audible tone to indicate circuit status. A high-pitched tone indicates positive voltage, and a low-pitched tone indicates negative voltage or ground. This feature can be toggled on or off using the dedicated button.
6.4. Powering Components
The tool can safely apply positive or negative battery voltage to components for testing. Use the rocker switch to apply voltage:
- Press the rocker switch forward (towards the tip) to apply positive (+) battery voltage.
- Press the rocker switch backward (towards the cable) to apply negative (-) battery voltage (접지).
Caution: Before applying power, ensure the component can safely handle direct battery voltag이자형. 잘못된 볼륨 적용tag전기 또는 전류는 손상을 일으킬 수 있습니다.
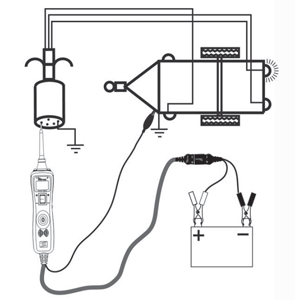
Diagram showing the Power Probe III connected to a vehicle battery and probing an automotive component to test its electrical function.
6.5. Testing for Bad Grounds
To test for a bad ground, connect the tool's auxiliary ground lead to a known good ground. Then, probe the suspected ground point with the tool's tip. If the display shows a voltage reading other than 0V, it indicates a poor or open ground connection.
6.6. 연속성 테스트
To test for continuity, ensure the circuit or component is de-energized. Connect the auxiliary ground lead to one end of the circuit/component and probe the other end with the tool's tip. A 0V reading and an audible tone (if enabled) indicate continuity.
6.7. Indicating Positive/Negative Voltage
The digital display clearly shows the voltage value and its polarity (positive or negative). The LED indicators on the tool also light up red for positive voltage and green for negative voltage/ground.
6.8. Testing Relays
The Power Probe III can be used to test relays by applying power to the relay's coil and checking for continuity across the switch contacts. Refer to the specific relay's wiring diagram for proper connection points.
7. 유지관리
To ensure the longevity and accurate performance of your Power Probe III:
- Clean the tool regularly with a soft, dry cloth. Do not use abrasive cleaners or solvents.
- Inspect the probe tip, cable, and battery clips for any signs of wear or damage before each use. Replace damaged components immediately.
- Store the tool in a clean, dry environment, away from extreme temperatures and direct sunlight.
8. 문제 해결
Power Probe III 사용 중 문제가 발생하면 다음 사항을 고려하십시오.
- 전원/디스플레이 없음: Ensure the battery hookup clips are securely connected to a functional 12-24 VDC battery. Check the cable for damage.
- 부정확한 판독: Verify that the probe tip and connections are clean and making good contact. Ensure the vehicle battery is adequately charged.
- 도구 과열: Discontinue use immediately. This may indicate a short circuit or excessive current draw. Allow the tool to cool down and inspect the circuit being tested.
For persistent issues, contact Power Probe customer support.
9. 사양
| 사양 | 값 |
|---|---|
| 모델 번호 | PP3CSGRN |
| 제품 치수 | 7.5 x 2 x 12 인치 |
| 품목 무게 | 1.36 파운드 |
| 전원 | Battery Powered (12-24 VDC) |
| 색상 | 녹색 |
| 제조업체 | 파워 프로브 |
10. 보증 및 지원
Power Probe products are designed for durability and performance. For specific warranty information, please refer to the documentation included with your purchase or visit the official Power Probe website. For technical support, troubleshooting assistance, or to inquire about replacement parts, please contact Power Probe customer service through their official channels.