1. 서론
This manual provides comprehensive instructions for the installation, operation, and maintenance of your ASUS H170 PRO GAMING Motherboard. Designed to support 6th Generation Intel Core Desktop Processors, this motherboard integrates advanced features such as DDR4 memory support, USB 3.1 Type-A/C, and M.2 connectivity, making it suitable for high-performance computing and gaming. It also features Intel Gigabit Ethernet with LANGuard for robust networking and SupremeFX Audio for superior sound.
설치를 시작하기 전에 이 설명서를 꼼꼼히 읽어 올바른 설정을 완료하고 시스템의 성능과 수명을 극대화하십시오.
2. 설정
2.1 설치 전 체크리스트
Before you begin, ensure all necessary components are available and compatible. The retail package of your ASUS H170 PRO GAMING Motherboard should include the following items:
- ASUS H170 PRO GAMING Motherboard (ATX form factor)
- 4 x Serial ATA (SATA) cables
- I/O 백플레이트
- 케이블 라벨
- M.2 나사 패키지
- 드라이버 및 유틸리티를 사용하여 DVD를 지원합니다.
- 사용 설명서 (본 문서)
Additionally, ensure you have the following compatible components:
- 6th Generation Intel Core Desktop Processor (LGA1151 socket)
- DDR4 RAM modules (2133 MHz recommended)
- Compatible power supply unit (PSU)
- Storage devices (HDD/SSD)
- Graphics card (if not using integrated graphics)
- Computer case
- Monitor, keyboard, and mouse
2.2 물리적 설치
Follow these steps carefully to install your motherboard and essential components into your computer case.
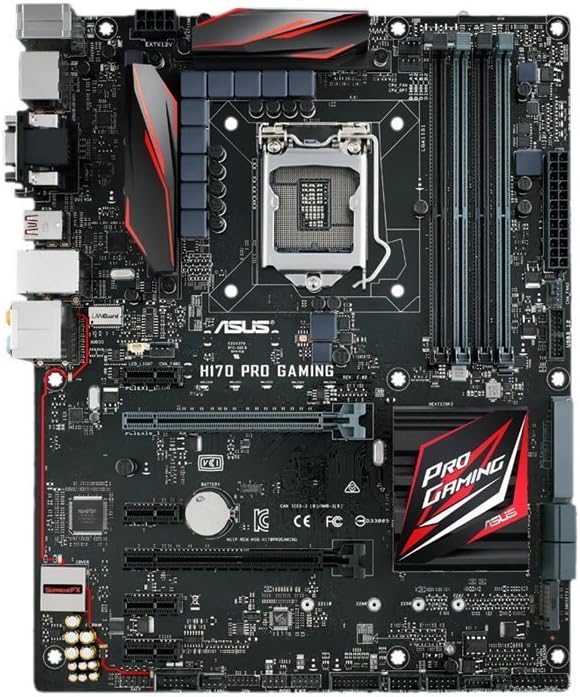
그림 2.2.1: 상향식 view of the ASUS H170 PRO GAMING Motherboard, showcasing the LGA1151 CPU socket, DDR4 DIMM slots, PCIe slots, and various connectors.
- 사례 준비: Install the I/O shield into the rear opening of your computer case. Ensure the standoffs inside the case align with the screw holes on the motherboard.
- 메인보드를 설치하세요: 마더보드를 케이스에 조심스럽게 넣고 스탠드오프와 I/O 쉴드에 맞춰 정렬한 후 나사로 고정하십시오.
- CPU 설치:
- CPU 소켓 레버를 열고 보호 캡을 제거하십시오.
- CPU의 황금색 삼각형이 소켓의 삼각형과 일치하는지 확인하여 CPU를 소켓에 맞춰 장착하십시오.
- CPU를 소켓에 조심스럽게 넣으세요. 무리하게 힘을 주지 마세요.
- 레버를 닫아 CPU를 고정합니다.
- 열전도성 페이스트를 바르고 제조업체의 지침에 따라 CPU 쿨러를 설치합니다.
- RAM 모듈 설치:
- DDR4 DIMM 슬롯의 클립을 엽니다.
- RAM 모듈의 홈을 DIMM 슬롯의 키에 맞춥니다.
- Press down firmly on both ends of the module until the clips snap into place. For dual-channel operation, refer to the motherboard's silkscreen for recommended slot pairing (e.g., A2/B2).
- 저장 장치 설치:
- For SATA drives, connect one end of the SATA cable to a SATA 6Gb/s port on the motherboard and the other end to your HDD/SSD. Connect the SATA power cable from your PSU to the drive.
- For M.2 SSDs, insert the M.2 module into the M.2 slot at an angle, then gently push it down and secure it with the provided M.2 screw.
- Install Expansion Cards (e.g., Graphics Card):
- Align the expansion card with the appropriate PCIe slot (e.g., PCIe x16 for graphics cards).
- 카드가 제대로 장착되고 고정 클립이 잠길 때까지 꾹 눌러주세요.
- 나사로 카드를 케이스에 고정합니다.
- 전원 케이블 연결:
- 파워서플라이의 24핀 ATX 전원 커넥터를 마더보드에 연결하십시오.
- 8핀(또는 4핀) CPU 전원 커넥터를 마더보드에 연결합니다.
- Connect any additional power cables required for your graphics card or other components.
- 전면 패널 케이블 연결: Connect the power button, reset button, HDD LED, power LED, and USB/audio headers from your case to the corresponding pins on the motherboard. Refer to the motherboard manual for exact pin layouts.
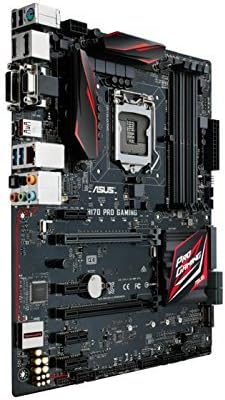
그림 2.2.2: 각도 view of the ASUS H170 PRO GAMING Motherboard, highlighting the I/O ports and the overall layout within a system.
2.3 초기 전원 켜기
After completing all physical connections, double-check all cables and component seating. Connect your monitor, keyboard, and mouse. Power on your system. The system should boot to the BIOS/UEFI interface or attempt to boot from a connected storage device.
3. 마더보드 작동
3.1 BIOS/UEFI 설정
The BIOS (Basic Input/Output System) or UEFI (Unified Extensible Firmware Interface) is the first software that runs when you power on your computer. It initializes hardware components and loads the operating system. To enter the BIOS/UEFI setup utility, press the 델 키 또는 F2 전원 켜기 자체 테스트(POST) 과정 중 키입니다.
- 부팅 순서: Configure the boot order to prioritize your operating system installation media (e.g., USB drive, DVD drive) or your primary storage drive.
- 시스템 정보: Verify that your CPU, RAM, and storage devices are correctly detected.
- 고급 설정: Adjust settings related to CPU, memory, storage controllers (SATA mode), and integrated peripherals.
3.2 드라이버 설치
After installing your operating system, it is crucial to install the necessary drivers for your motherboard's components. These drivers enable proper communication between the hardware and the operating system, ensuring optimal performance and stability.
- 칩셋 드라이버: Install Intel H170 chipset drivers first.
- LAN 드라이버: Install Intel Gigabit Ethernet drivers for network connectivity.
- 오디오 드라이버: Install SupremeFX Audio drivers for sound functionality.
- USB 드라이버: Install USB 3.1 drivers for enhanced USB performance.
- 그래픽 드라이버: Install drivers for your dedicated graphics card or Intel integrated graphics.
Drivers can typically be found on the included support DVD or downloaded from the official ASUS support web대지.
3.3 연결성
The H170 PRO GAMING motherboard offers a variety of connectivity options:
- USB 포트: Multiple USB 3.1 Type-A and Type-C ports, along with USB 3.0 and USB 2.0 ports, for connecting peripherals.
- 비디오 출력: DisplayPort and HDMI for connecting displays (requires compatible Intel CPU with integrated graphics).
- 회로망: Intel Gigabit Ethernet port for wired network connection.
- 오디오: SupremeFX Audio ports for high-quality sound output and input.
- 저장: SATA 6Gb/s ports and M.2 slot for high-speed storage devices.
4. 유지관리
Regular maintenance helps ensure the longevity and optimal performance of your motherboard and overall system.
4.1 청소
Dust accumulation can lead to overheating and component failure. Periodically clean your computer's interior:
- 청소하기 전에 컴퓨터 전원을 끄고 전원 플러그를 뽑으세요.
- Use compressed air to remove dust from fans, heatsinks, and motherboard components.
- 컴퓨터 케이스 내부의 통풍이 잘 되도록 하십시오.
4.2 BIOS/UEFI and Driver Updates
Keeping your BIOS/UEFI firmware and drivers updated can improve system stability, performance, and compatibility with new hardware or software.
- 공식 ASUS 지원을 방문하세요 website for the latest BIOS/UEFI versions and drivers for your H170 PRO GAMING motherboard.
- Follow the instructions provided by ASUS for updating BIOS/UEFI firmware carefully, as improper updates can damage the motherboard.
- Regularly check for updated drivers for your chipset, audio, LAN, and other peripherals.
5. 문제 해결
이 섹션에서는 일반적으로 발생할 수 있는 문제에 대한 해결책을 제공합니다.
5.1 일반적인 문제 및 해결 방법
- 전원 없음/POST 불가:
- 모든 전원 케이블(24핀 ATX, 8핀 CPU)이 단단히 연결되어 있는지 확인하십시오.
- 전원 공급 장치(PSU)가 정상적으로 작동하는지 확인하십시오.
- Reseat RAM modules and expansion cards.
- Clear CMOS (Complementary Metal-Oxide-Semiconductor) by removing the CMOS battery for a few minutes or using the clear CMOS jumper (refer to motherboard manual for location).
- 시스템 불안정/충돌:
- Check for overheating. Ensure CPU cooler is properly installed and case fans are working.
- 메모리 진단 도구를 실행하여 RAM에 오류가 있는지 확인하십시오.
- 드라이버와 BIOS/UEFI를 최신 버전으로 업데이트하세요.
- Ensure all components are compatible and properly seated.
- 디스플레이 없음:
- Ensure monitor is connected to the correct video output (motherboard or graphics card).
- 그래픽 카드를 다시 장착하세요.
- 가능하다면 다른 모니터나 케이블로 테스트해보세요.
- 네트워크 연결 문제:
- LAN 케이블 연결 상태를 확인하십시오.
- Ensure Intel Gigabit Ethernet drivers are installed and up to date.
- 라우터/모뎀 상태를 확인하세요.
- 오디오 문제:
- Ensure speakers/headphones are correctly plugged into the audio jacks.
- Install or update SupremeFX Audio drivers.
- Check audio settings in your operating system.
5.2 추가 지원 요청
If you encounter issues not covered in this section, or if the suggested solutions do not resolve your problem, please refer to the official ASUS support resources.
6. 사양
Key technical specifications for the ASUS H170 PRO GAMING Motherboard:
| 특징 | 사양 |
|---|---|
| CPU 소켓 | LGA 1151 |
| 호환 프로세서 | 6th Generation Intel Core Desktop Processors |
| 칩셋 | 인텔 H170 |
| RAM 메모리 기술 | DDR4 |
| 메모리 속도 | 2133MHz |
| USB 포트 | USB 3.1 Type-A/C, USB 3.0, USB 2.0 |
| 스토리지 인터페이스 | SATA 6Gb/s, M.2 |
| 회로망 | Intel Gigabit Ethernet with LANGuard |
| 오디오 | SupremeFX Audio |
| 폼 팩터 | 에이티엑스 |
| 제품 크기(LxWxH) | 10.4 x 2.7 x 12.9 인치 |
| 품목 무게 | 3파운드 |
7. 보증 및 지원
7.1 보증 정보
ASUS products typically come with a limited manufacturer's warranty. The specific terms and duration of the warranty may vary by region and product. Please refer to the warranty card included with your product or visit the official ASUS web자세한 보증 정보 및 등록 절차는 해당 사이트를 참조하세요. 보증 청구를 위해 구매 증빙 자료를 보관하세요.
7.2 고객 지원
For technical assistance, driver downloads, BIOS updates, or further inquiries, please contact ASUS customer support or visit their official support web대지:
- ASUS 공식 Web대지: www.asus.com
- ASUS Support Page: 검색 "ASUS Support" online and navigate to the support section for motherboards.
- ASUS Store on Amazon: ASUS 스토어를 방문하세요 제품 정보 및 리소스를 확인하세요.
When contacting support, have your motherboard's model number (H170 PRO GAMING) and serial number ready.
8. 공식 제품 영상
No official product videos from the seller were found for this model at this time. For visual guides or demonstrations, please refer to the ASUS official web사이트 또는 승인된 채널.