
1. 서론
The D-Link DSL-G225 Wireless N300 ADSL2+/VDSL2 Modem Router is designed to provide a reliable and secure internet connection for home and office environments. This device supports various internet connection types, including ADSL2+, VDSL2, NBN (Australia), and UFB (New Zealand), ensuring broad compatibility with different service providers.
Equipped with N300 Wi-Fi technology and four Ethernet LAN ports, the DSL-G225 allows for seamless sharing of your internet connection across multiple devices such as desktop computers, laptops, tablets, smartphones, gaming consoles, and smart TVs.
주요 특징은 다음과 같습니다.
- Integrated ADSL2+/VDSL2 Modem for direct line connection.
- Wireless N300 technology for fast Wi-Fi speeds.
- Four 10/100 Ethernet LAN ports for wired connections.
- Support for NBN (Australia) and UFB (New Zealand) connection options.
- Easy setup wizard for quick installation.
2. 하드웨어 오버view
2.1 전면 패널
The front panel of the DSL-G225 features a series of LED indicators that provide real-time status information about the device's operation.
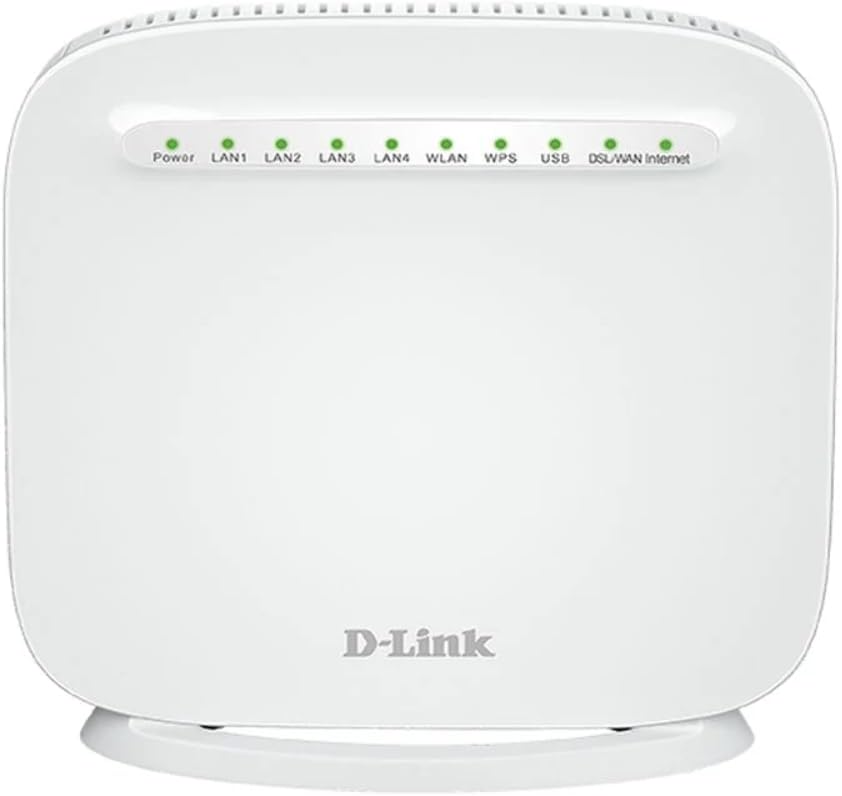
그림 1: 앞쪽 view of the D-Link DSL-G225 Modem Router, showing the Power, LAN, WLAN, WPS, USB, DSL/WAN, and Internet LED indicators.
| LED 표시등 | 상태 | 설명 |
|---|---|---|
| 힘 | 솔리드 그린 | 장치의 전원이 켜져 있습니다. |
| 랜 1-4 | 솔리드 그린 | 장치가 해당 LAN 포트에 연결됩니다. |
| 녹색 깜박임 | Data is being transmitted or received through the corresponding LAN port. | |
| 무선랜 | 솔리드 그린 | 무선 기능이 활성화되었습니다. |
| 녹색 깜박임 | 무선 데이터가 전송되거나 수신되고 있습니다. | |
| 뉴스 | 녹색 깜박임 | WPS connection attempt in progress. |
| USB | 솔리드 그린 | A USB device is connected and recognized. |
| DSL/WAN | 솔리드 그린 | DSL line is connected and synchronized, or WAN port is active. |
| 녹색 깜박임 | Attempting to establish DSL synchronization or WAN connection. | |
| 인터넷 | 솔리드 그린 | Successfully connected to the internet. |
| 녹색 깜박임 | 데이터가 인터넷을 통해 전송되거나 수신되고 있습니다. |
2.2 후면 패널
The rear panel contains all the physical ports for connecting the modem router to your internet service and local network devices.
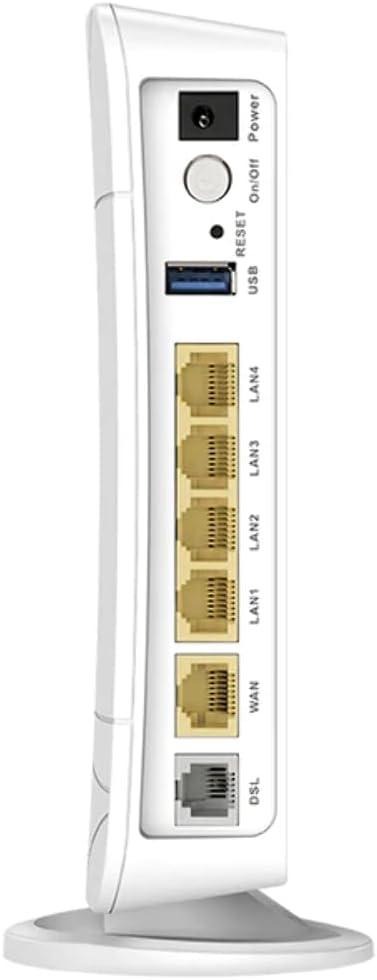
그림 2: 뒤쪽 view of the D-Link DSL-G225 Modem Router, displaying the Power input, On/Off button, Reset button, USB port, LAN ports, WAN port, and DSL port.
| 포트/버튼 | 설명 |
|---|---|
| 전원 입력 | 제공된 전원 어댑터에 연결합니다. |
| 켜기/끄기 버튼 | 장치의 전원을 켜거나 끕니다. |
| 재설정 버튼 | 10초간 길게 누르면 공장 기본 설정으로 복원됩니다. |
| USB 포트 | Connects USB devices such as storage drives for network sharing. |
| LAN 1-4 포트 | Connects wired devices (e.g., computers, gaming consoles) using Ethernet cables. |
| WAN 포트 | Connects to an external modem or NBN/UFB Network Termination Device (NTD) for internet access. |
| DSL 포트 | Connects to the telephone line for ADSL2+/VDSL2 internet service. |
3. 설정
3.1 물리적 연결
- 전원 연결: Connect the provided power adapter to the Power Input port on the rear panel of the modem router and then plug it into a power outlet. Press the On/Off button. The Power LED on the front panel should illuminate green.
- 인터넷 연결:
- For ADSL2+/VDSL2: Connect a telephone cable from your wall socket to the 디에스엘 모뎀 라우터의 포트.
- For NBN/UFB (FTTP/FTTC/HFC/Fixed Wireless): Connect an Ethernet cable from your NBN/UFB Network Termination Device (NTD) or wall socket to the 핏기 없는 모뎀 라우터의 포트.
- Local Network Connection (Optional): 이더넷 케이블을 다음 중 하나에 연결하세요. 랜 1-4 ports on the modem router to your computer's Ethernet port. For wireless devices, proceed to the Wi-Fi connection steps.
3.2 초기 구성
After physical connections are made, you can configure the modem router using its web기반 인터페이스.
- 컴퓨터가 이더넷이나 Wi-Fi를 통해 모뎀 라우터에 연결되어 있는지 확인하세요.
- 열기 web 브라우저(예: Chrome, Firefox, Edge).
- 주소창에 다음을 입력하세요.
http://192.168.1.1(기본 IP 주소)를 입력하고 Enter 키를 누르세요. - 기본 사용자 이름과 비밀번호를 입력하세요(일반적으로
adminfor both, or as printed on a label on the device). - Follow the on-screen Setup Wizard to configure your internet connection settings (ISP username/password, connection type) and Wi-Fi network name (SSID) and password.
4. 운영
4.1 Wi-Fi를 통한 장치 연결
- On your wireless device (smartphone, tablet, laptop), open the Wi-Fi settings.
- 사용 가능한 네트워크를 검색합니다.
- Select your Wi-Fi network name (SSID) as configured during the setup process.
- Enter your Wi-Fi password (network key) when prompted.
- Your device should now be connected to the internet via Wi-Fi.
4.2 이더넷을 통한 장치 연결
For devices requiring a stable wired connection, use an Ethernet cable.
- Connect one end of an Ethernet cable to an available 랜 port (1-4) on the rear of the modem router.
- Connect the other end of the Ethernet cable to the Ethernet port on your device (e.g., computer, smart TV, gaming console).
- The corresponding LAN LED on the front panel should illuminate green, indicating a successful connection.
4.3 USB 포트 기능
The USB port on the DSL-G225 can be used to connect a USB storage device (e.g., a USB flash drive or external hard drive) to share files across your network. Refer to the modem router's web interface for specific settings related to USB storage sharing.
5. 유지관리
5.1 펌웨어 업데이트
Periodically check the D-Link Australia support website for firmware updates. Firmware updates can improve performance, add new features, and address security vulnerabilities. Follow the instructions provided on the D-Link website carefully when performing a firmware update.
5.2 공장 초기화
If you encounter persistent issues or forget your login credentials, you can perform a factory reset. This will revert all settings to their default values.
- With the modem router powered on, locate the 다시 놓기 후면 패널의 버튼.
- 클립이나 이와 유사한 뾰족한 물체를 사용하여 재설정 버튼을 약 10초 동안 길게 누르십시오.
- Release the button. The modem router will restart with factory default settings. You will need to reconfigure your internet and Wi-Fi settings.
6. 문제 해결
6.1 인터넷 연결 없음
- 케이블 확인: Ensure all cables (power, DSL/WAN, Ethernet) are securely connected.
- LED 상태 : 확인하다 힘, DSL/WAN, 그리고 인터넷 LEDs are solid green. If the DSL/WAN LED is flashing, there might be an issue with your internet line or connection type. If the Internet LED is off, check your ISP settings in the router's web 인터페이스.
- ISP 자격 증명: Confirm that your internet service provider (ISP) username and password are correctly entered in the modem router's configuration.
- 장치 재시작: Power cycle the modem router and any connected devices (computer, NBN/UFB NTD) by unplugging them for 30 seconds and then plugging them back in.
6.2 Wi-Fi 연결 문제
- WLAN LED: 확인하십시오 무선랜 LED on the front panel is solid green. If it's off, Wi-Fi might be disabled. Check settings in the web 인터페이스.
- 올바른 비밀번호: Verify you are entering the correct Wi-Fi password (network key).
- 신호 강도: Move closer to the modem router to check if signal strength is an issue. Obstacles like walls and large appliances can interfere with Wi-Fi signals.
- 채널 간섭: In congested areas, changing the Wi-Fi channel in the router's settings may improve performance.
6.3 느린 인터넷 속도
- 장치 수: Too many devices actively using the network can reduce speeds.
- 간섭: Other wireless devices (cordless phones, microwaves) can cause interference.
- 펌웨어: Ensure your modem router has the latest firmware installed.
- ISP 문제: Contact your internet service provider to check for any network issues in your area or with your service plan.
7. 사양
| 특징 | 세부 사항 |
|---|---|
| 모델 번호 | DSL-G225-AU |
| 상표 | 디링크 |
| 시리즈 | 무선 N300 |
| 무선형 | 802.11n |
| 주파수 대역 클래스 | 싱글 밴드 |
| 이더넷 포트 | 4 x 10/100 LAN ports, 1 x WAN port |
| USB 포트 | 1 x USB 2.0 포트 |
| 모뎀 유형 | ADSL2+/VDSL2 |
| 운영 체제 | RouterOS (D-Link Firmware) |
| 특징 | 액세스 포인트 모드 |
| 치수(길이 x 너비 x 높이) | 15.5 x 15 x 6cm |
| 품목 무게 | 590g |
| 제조업체 | D-Link Australia |
8. 보증 및 지원
For warranty information and technical support, please refer to the official D-Link Australia website or contact D-Link customer service. Warranty terms and conditions may vary by region and purchase date.
It is recommended to register your product on the D-Link website to receive updates and access support resources.