1. 서론
This manual provides detailed instructions for the installation, operation, and maintenance of your ASUS X99-DELUXE motherboard. The ASUS X99-DELUXE is an ATX motherboard designed for high-performance computing, supporting Intel LGA 2011-3 processors and DDR4 memory.

그림 1: 상향식 view of the ASUS X99-DELUXE Motherboard, showing the CPU socket, RAM slots, and heatsinks.
2. 주요 특징
- ASUS OC Socket: Designed to enhance 8-core CPU and DDR4 performance beyond standard X99 expectations.
- DDR4 메모리 지원: Features a special memory overclocking design, supporting DDR4 memory speeds up to 3200MHz (O.C.).
- Dual M.2 X4 Support: Provides two M.2 slots with PCIe 3.0 x4 interface, enabling data transfer speeds up to 32Gb/s for compatible NVMe SSDs.
- Fan Extension Card: Includes an extension card for advanced PC cooling management.
- 5방향 최적화: Utilizes Dual Intelligent Processors 5 for system optimization, including performance tuning, power saving, digital power control, and fan control.
- UEFI BIOS: Features a media-acclaimed Unified Extensible Firmware Interface (UEFI) BIOS for intuitive system configuration.
- SATA Express: Supports SATA Express for storage speeds up to 10Gb/s.
3. 설정 및 설치
설치를 시작하기 전에 시스템 전원이 꺼져 있고 전원 콘센트에서 분리되어 있는지 확인하십시오. 정전기 방전을 방지하기 위해 마더보드의 가장자리를 잡고 다루십시오.
3.1. CPU Installation (LGA 2011-3 Socket)
- CPU 소켓 고정 장치를 조심스럽게 엽니다.
- CPU의 삼각형 표시와 소켓의 해당 표시를 일치시키십시오.
- CPU를 억지로 끼우지 말고 조심스럽게 소켓에 넣으세요.
- Close the retention mechanism to secure the CPU. Ensure no pins are bent during this process.

그림 2: 각도 view of the ASUS X99-DELUXE Motherboard, highlighting the LGA 2011-3 CPU socket.
3.2. 메모리(DDR4) 설치
The motherboard supports DDR4 memory modules. Refer to the motherboard manual for specific memory configurations and supported speeds.
- DIMM 슬롯의 양쪽 끝에 있는 클립을 엽니다.
- DDR4 메모리 모듈의 노치를 DIMM 슬롯의 키에 맞춥니다.
- 클립이 제자리에 딸깍 소리를 내며 고정될 때까지 모듈을 슬롯에 단단히 삽입하십시오.
3.3. Storage Device Installation (M.2, SATA)
Install M.2 SSDs into the dedicated M.2 slots and SATA drives to the SATA ports. The motherboard supports SATA 3 (6Gb/s) and SATA Express.
3.4. 주변기기 연결하기
Connect your display, keyboard, mouse, and other peripherals to the rear I/O panel. The motherboard provides various USB ports, Ethernet ports, and audio jacks.
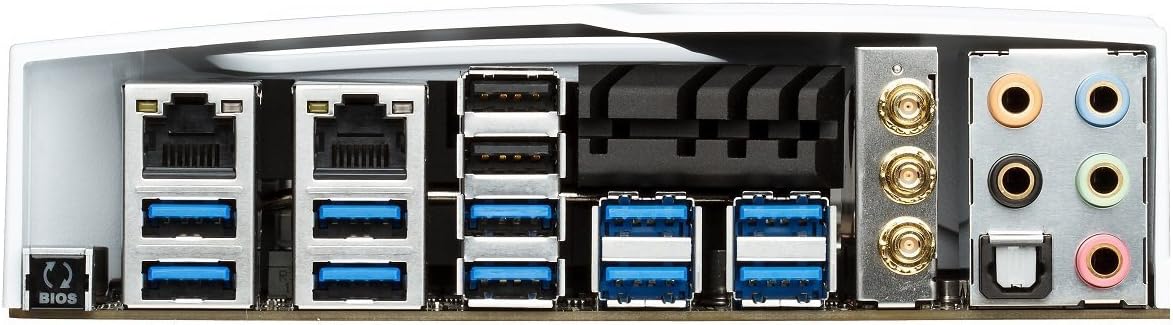
Figure 3: Rear I/O panel of the ASUS X99-DELUXE Motherboard, showing USB ports, Ethernet, and audio jacks.
4. 사용 설명서
4.1. UEFI BIOS 구성
The UEFI BIOS allows you to configure system settings, boot options, and hardware parameters. To enter the BIOS, press the 델 key during system startup.
- 이지 모드: Provides a simplified interface for basic settings.
- 고급 모드: Offers comprehensive control over all motherboard features, including overclocking and fan control.
4.2. 드라이버 설치
After installing your operating system (e.g., Windows XP, as listed in specifications, and newer OS versions), install the necessary drivers for the motherboard chipset, audio, network, and other integrated components. These are typically provided on a support DVD or available for download from the ASUS web대지.
4.3. 5-Way Optimization
The 5-Way Optimization feature, accessible through ASUS software, automatically tunes your system for optimal performance, power efficiency, digital power delivery, and fan acoustics based on your usage. It is recommended to manage overclocking and fan settings directly within the BIOS for more precise control.
5. 유지관리
정기적인 유지관리는 마더보드의 수명과 안정적인 작동을 보장하는 데 도움이 됩니다.
- 먼지 제거: 메인보드와 냉각 부품의 먼지는 주기적으로 압축 공기를 사용하여 제거하십시오. 청소하기 전에 시스템 전원을 끄고 전원 케이블을 뽑으십시오.
- 연결 확인: Verify that all cables and components are securely seated.
- BIOS 업데이트: ASUS 지원을 확인하세요 website for the latest BIOS updates to improve compatibility and performance. Follow update instructions carefully.
6. 문제 해결
If you encounter issues with your ASUS X99-DELUXE motherboard, consider the following troubleshooting steps:
- 전원 없음/부팅 불가:
- 모든 전원 케이블(24핀 ATX, 8핀 CPU)이 단단히 연결되어 있는지 확인하십시오.
- Verify the power supply unit (PSU) is functioning correctly.
- 전면 패널 전원 스위치와 마더보드의 연결 상태를 확인하십시오.
- 디스플레이 없음:
- Confirm the graphics card is properly seated in its PCIe slot and has adequate power.
- 모니터 케이블이 그래픽 카드에 제대로 연결되어 있는지 확인하십시오.
- 가능하다면 다른 디스플레이 케이블이나 모니터로 테스트해보세요.
- 시스템 불안정/충돌:
- RAM 모듈이 제대로 장착되었는지 확인하십시오. 모듈을 다시 장착하거나 모듈 하나씩 테스트해 보십시오.
- Ensure CPU cooler is correctly installed and making good contact with the CPU. Monitor CPU temperatures.
- BIOS 설정을 기본값으로 재설정합니다.
- CPU 소켓 핀이 휘어짐:
Bent pins in the CPU socket can cause severe system malfunctions or prevent booting. This type of damage is typically not covered under warranty. Exercise extreme caution during CPU installation to avoid bending pins.
7. 사양
| 범주 | 사양 |
|---|---|
| 상표 | 아수스 |
| 모델명 | X99-디럭스 |
| CPU 소켓 | LGA 2011-3 |
| 호환 프로세서 | Intel Core i7 (LGA 2011-3) |
| 칩셋 유형 | 인텔 X99 |
| RAM 메모리 기술 | DDR4 |
| 메모리 클럭 속도 | 최대 3200MHz(오버클럭) |
| 사용 가능한 메모리 슬롯 | 8 |
| RAM 메모리 최대 크기 | 64GB (XNUMX기가바이트) |
| 그래픽 카드 인터페이스 | PCI 익스프레스 |
| Total PCIe Ports | 5 |
| 총 SATA 포트 수 | 8 |
| 시스템 버스 표준 지원 | SATA 3 |
| USB 2.0 포트 | 2 (internal headers, total ports may vary) |
| 총 USB 포트 | Various (including USB 3.0 on rear I/O) |
| 이더넷 포트 수 | 1 (Dual Gigabit LAN) |
| 주 전원 커넥터 유형 | 24핀 ATX |
| 호환 장치 | 개인용 컴퓨터 |
| 플랫폼 | Windows XP (and newer OS versions) |
| 품목 무게 | 4.44파운드(약 2.01kg) |
8. 보증 및 지원
보증 정보 및 기술 지원에 대해서는 공식 ASUS를 참조하십시오. web웹사이트를 방문하거나 ASUS 고객 서비스에 문의하십시오. 보증 청구를 위해 구매 증빙 자료를 보관하십시오.
ASUS 지원 Web대지: https://www.asus.com/support/
Note: Damage resulting from improper installation, misuse, or unauthorized modifications may void your product warranty.