
소개
This manual provides comprehensive instructions for the installation, operation, and maintenance of your KitVision Observer 1080p Dashboard Camera. Please read this manual thoroughly before using the device to ensure proper functionality and safety. This device is designed to record your journeys, providing a reliable record of events on the road.
제품 끝view
구성 요소
The KitVision Observer 1080p Dashboard Camera package includes the following items:
- KV Observer 1080p Dashboard Camera
- 차량용 충전기
- 미니 USB 케이블
- 흡입 마운트
- 사용자 설명서(본 문서)
주요 특징
The KitVision Observer 1080p Dashboard Camera offers a range of features to enhance your driving experience and provide security:
- 풀 HD 1080P 녹화: Captures video at 30 frames per second for clear footage.
- 광각 렌즈: A 170-degree ultra-wide angle lens covers a broad view 도로의.
- 2.45인치 LCD 디스플레이: Allows for real-time viewing and playback of recorded footage.
- 내장형 G-센서: Automatically detects collisions and saves the corresponding footag덮어쓰기를 방지합니다.
- 연속 루프 녹음: Records continuously, overwriting the oldest unneeded files 메모리 카드가 가득 찼을 때.
- 12 Megapixel Photo Mode: Enables capturing high-resolution still images.
- WDR(광역 동적 범위) 기술: Provides enhanced visibility and recording quality in varying light conditions, including low light.
- 동작 감지: Automatically starts recording when motion is detected in front of the camera.
- 주차 모드: Provides surveillance even when the vehicle is parked and turned off.
제품 Views

그림 1: 앞쪽 view of the KitVision Observer 1080p Dashboard Camera, highlighting the main lens and branding.
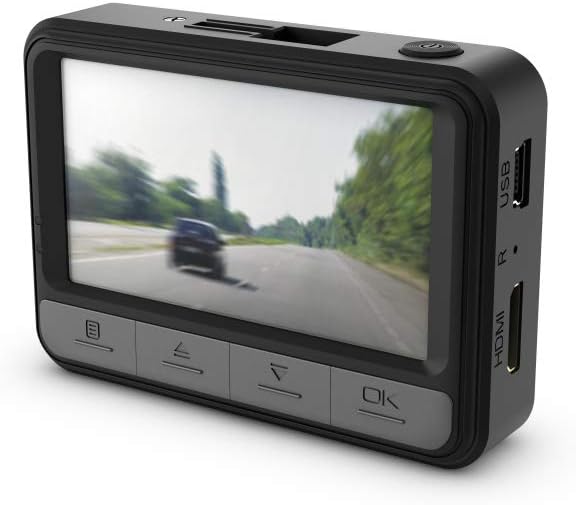
그림 2: 뒤쪽 view of the dashboard camera, showing the LCD screen and the navigation buttons for menu control.

그림 3: 옆 view of the camera, illustrating the USB and HDMI connectivity ports.

그림 4: The dashboard camera with its screen articulated upwards, providing a different view장치의 각도.
설정
1. 메모리 카드 삽입
Before first use, a compatible microSD card (not included) must be inserted into the camera. Ensure the camera is powered off before inserting or removing the card. Locate the microSD card slot on the side of the camera and gently push the card in until it clicks into place. To remove, push the card in again until it springs out.
2. 카메라 장착
- Clean the desired area on your windshield where the camera will be mounted. Ensure it does not obstruct your view 도로의.
- Attach the suction mount to the camera.
- Press the suction cup firmly against the windshield and engage the locking lever to secure it.
- Adjust the camera angle to ensure it captures the road ahead clearly.

그림 5: 클로즈업 view of the dashboard camera securely mounted on the vehicle's windshield.

그림 6: The dashboard camera installed in a vehicle, demonstrating its placement for optimal road recording.
3. 전원 연결
Connect the in-car charger to the camera's power input port and plug the other end into your vehicle's 12V power outlet (cigarette lighter socket). The camera will typically power on and begin recording automatically when the vehicle's ignition is turned on.
4. 초기 설정
Upon first power-on, you may need to set the date, time, and language. Use the navigation buttons below the screen to adjust settings and the 'OK' button to confirm. Refer to the 'Operating Instructions' section for detailed menu navigation.
작동 지침
1. 전원 켜기/끄기
- 오토매틱: The camera powers on and off with your vehicle's ignition.
- 수동 : Press and hold the power button (usually located on the top or side) to manually turn the camera on or off.
2. 녹음 모드
- 연속 루프 녹음: The default mode. The camera records video in segments (e.g., 1, 3, or 5 minutes) and automatically overwrites the oldest unlocked files 메모리 카드가 가득 찼을 때.
- G-센서(충돌 감지): When the built-in G-Sensor detects a sudden impact or collision, the current recording segment is automatically locked and saved to a protected folder, preventing it from being overwritten.
- 동작 감지: When enabled in the settings, the camera will start recording automatically if it detects movement in its field of view while parked. This feature requires a continuous power supply.
- 주차 모드: Similar to motion detection, this mode provides surveillance when the vehicle is parked. It typically activates upon detecting impact or motion, recording for a short period. This also requires a continuous power supply or sufficient internal battery charge.
3. 메뉴 탐색 및 설정
Use the buttons located below the LCD screen to navigate the camera's menu. Typically, there are buttons for Menu, Up, Down, and OK/Confirm. Press the 'Menu' button to access settings such as video resolution, loop recording duration, G-sensor sensitivity, date/time, and more.
4. 재생
다시view 기록된 footage directly on the camera, enter playback mode via the menu. Use the navigation buttons to select and play video files. Alternatively, you can remove the microSD card and view files on a computer, or connect the camera directly to a computer using the Mini USB cable.
5. 사진 모드
Switch to photo mode via the menu to capture still images. Press the 'OK' button to take a picture. The camera supports 12 Megapixel photos.
유지
1. 카메라 청소
- 부드럽고 마른 천을 사용하여 카메라 본체를 청소하세요.
- For the lens and screen, use a lens cleaning cloth specifically designed for optics to avoid scratches. Do not use abrasive cleaners or solvents.
2. 메모리 카드 관리
- 서식: It is recommended to format the microSD card periodically (e.g., once a month) using the camera's menu function. This helps maintain optimal recording performance and prevents data corruption. Formatting will erase all data on the card, so back up any important file첫 번째입니다.
- 대사: Memory cards have a limited lifespan. If you experience frequent recording errors or data corruption, consider replacing the microSD card with a new, high-quality card.
3. 배터리 관리
The camera contains a Lithium Ion battery. Avoid exposing the camera to extreme temperatures for prolonged periods, as this can affect battery life and performance. If the camera will not be used for an extended time, ensure it is stored in a cool, dry place with a partial charge.
문제 해결
If you encounter issues with your KitVision Observer 1080p Dashboard Camera, refer to the following common solutions:
- 카메라 전원이 켜지지 않음: Ensure the in-car charger is securely connected to both the camera and the vehicle's power outlet. Check if the vehicle's power outlet is functioning.
- 카메라가 녹화되지 않음: Verify that a microSD card is inserted correctly and has sufficient free space. Format the memory card if necessary (after backing up important files). Check recording settings in the menu.
- 비디오 품질이 좋지 않음: Clean the camera lens. Ensure the windshield area in front of the camera is clean. Check the video resolution settings in the menu.
- G-Sensor not triggering: Adjust the G-sensor sensitivity in the camera's settings. If set too low, it may not detect minor impacts.
- 버튼이 반응하지 않음: Try resetting the camera by pressing the reset button (if available, often a small pinhole) or by disconnecting and reconnecting the power.
- 날짜/시간이 잘못되었습니다. Re-enter the correct date and time in the camera's settings menu.
이러한 해결 방법을 시도한 후에도 문제가 지속되면 고객 지원팀에 문의하세요.
명세서
| 특징 | 세부 사항 |
|---|---|
| 제품 치수 | 9.25 x 2.16 x 4.52 인치 |
| 품목 무게 | 5.3 온스(0.33 파운드) |
| ASIN | B00EUUD01C |
| 품목 모델 번호 | KVOBS108 |
| 배터리 | 1개의 리튬 이온 배터리 필요(포함) |
| 첫 번째 이용 가능 날짜 | 14년 2013월 XNUMX일 |
| 제조업체 | Kondor Limited |
| 상표 | KitVision |
| 모델명 | Kitvision Observer 1080p Dashboard Camera |
| 차량 서비스 유형 | 자동차 |
| 연결 기술 | USB |
| 특징 | 모션 감지 |
| 비디오 캡처 해상도 | 1080p |
| 포함된 구성 요소 | KV Observer 1080p Dashboard Camera, In-car charger, Mini USB cable, Suction mount, User manual |
| 색상 | 검은색 |
| 제어 방법 | Touch (referring to buttons, not touch screen) |
보증 및 지원
For warranty information, please refer to the documentation included with your product or visit the official KitVision website. If you require technical assistance or have questions not covered in this manual, please contact KitVision customer support through their official channels.